by TRA
Lens Data:
Rodenstock
Imagon lenses
History, Characteristics and Operation
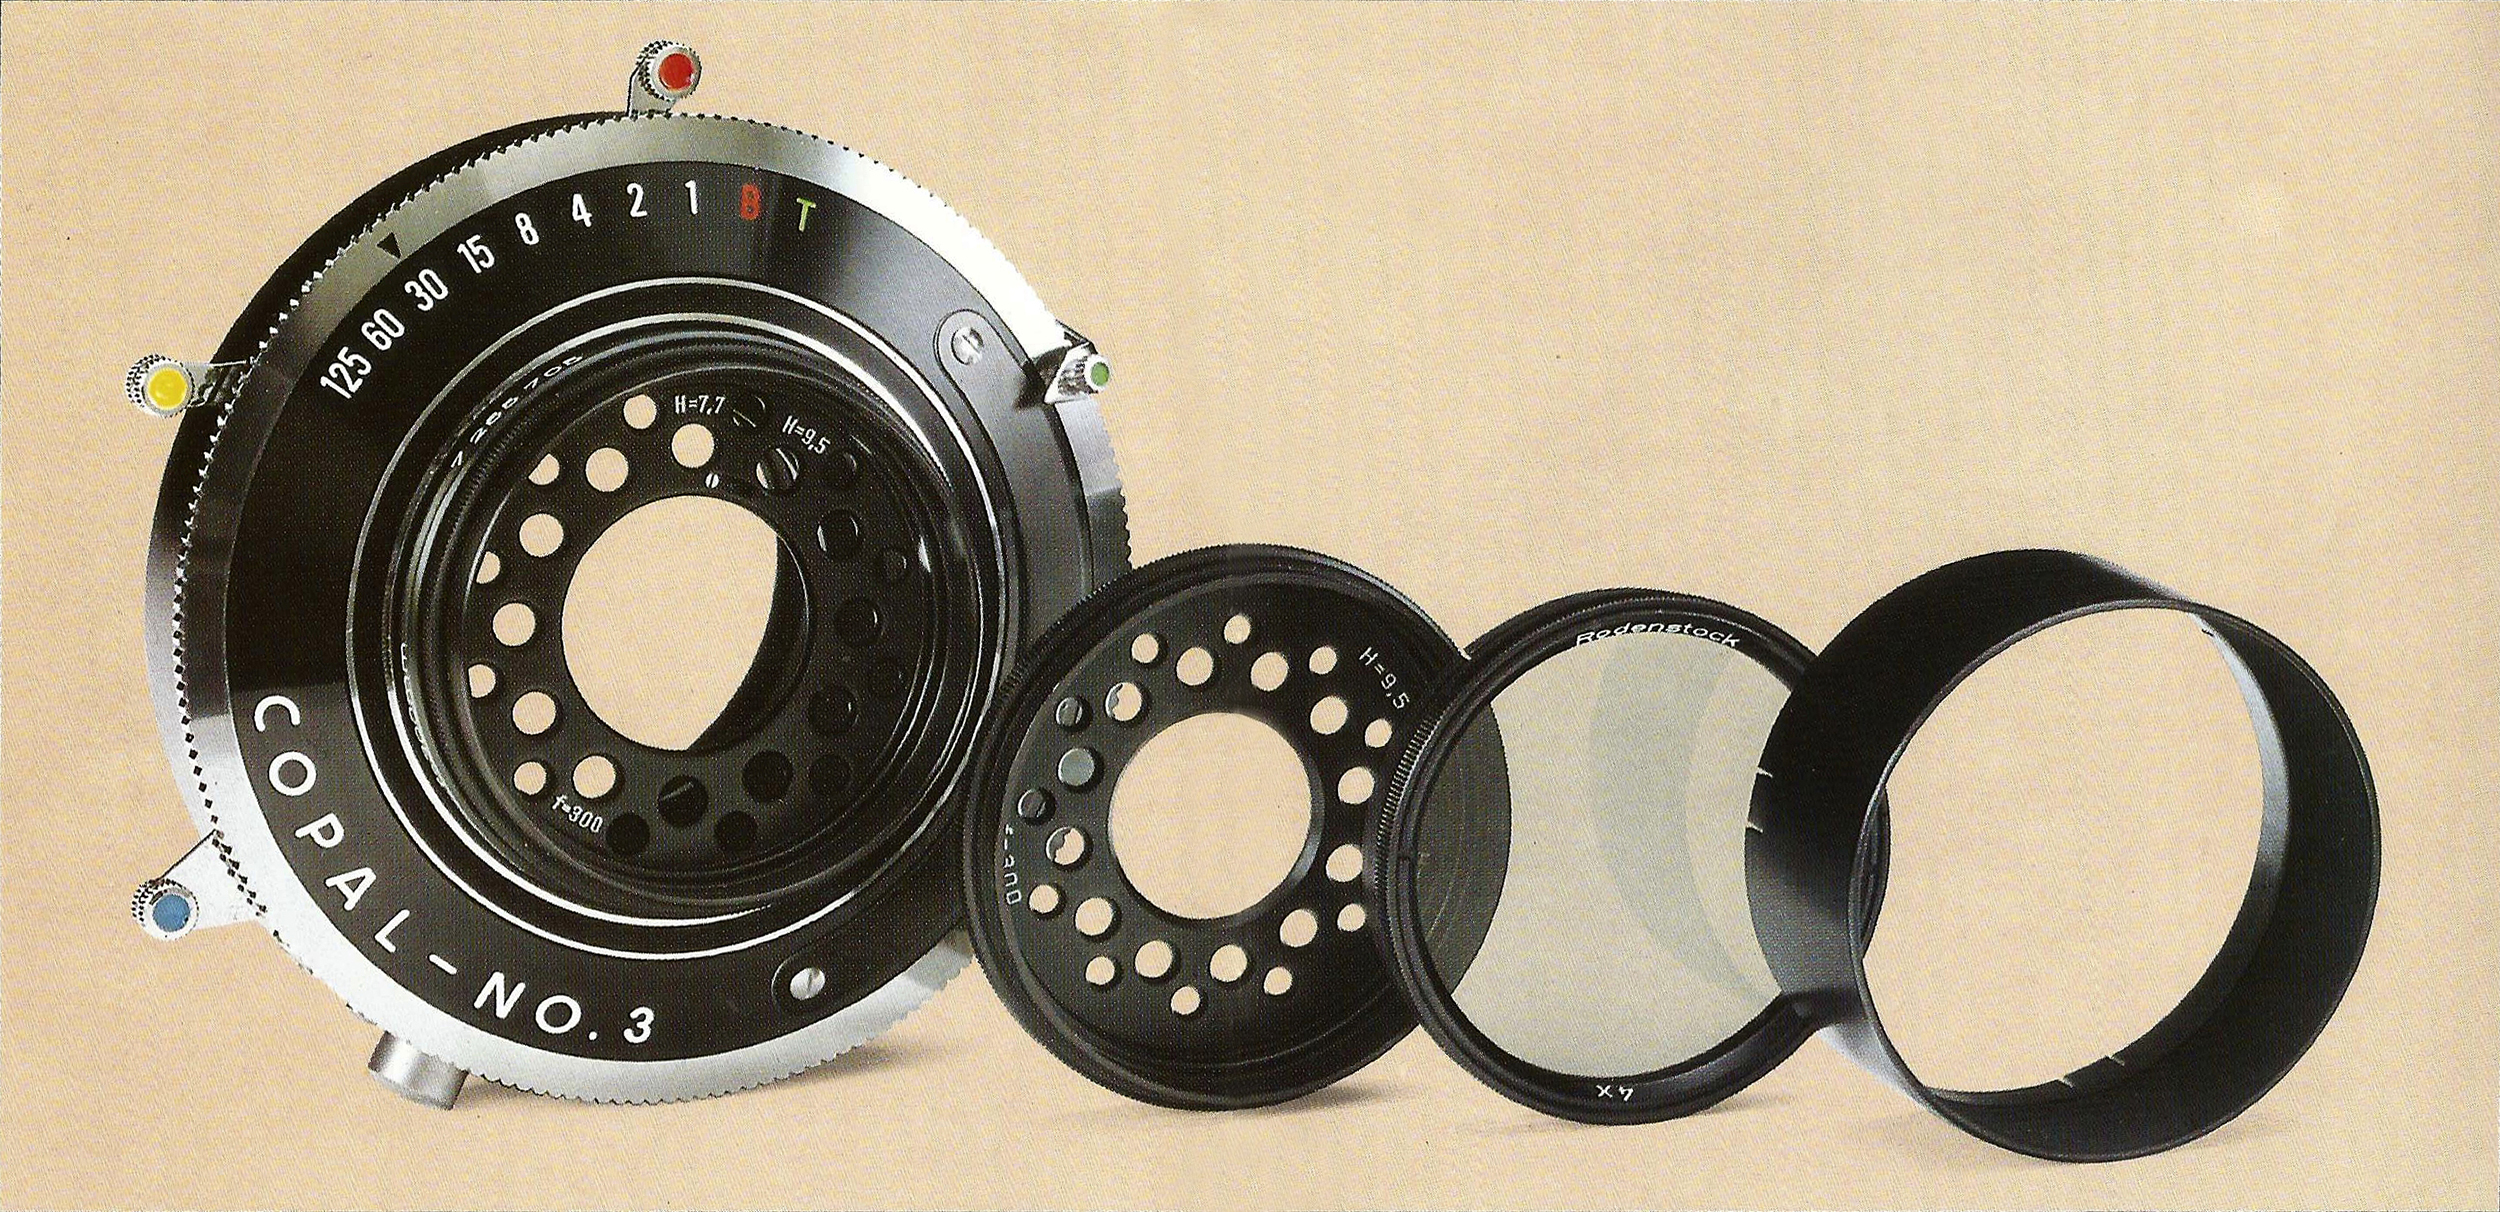
The Imagon 300mm lens in a Copal 3 shutter
Image from a Rodenstock brochure published in April 1986
Clicking on this image opens a larger copy of it.
[86_Imagon_300mm_cs.jpg]
History
The Rodenstock Imagon has been produced by the G. Rodenstock Optical Works, Munich, since 1931. Based on a suggestion by H. Kühn (1866 – 1944), it was computed by Dr. Staeble as an optical aid to providing specially luminous image effects. It was intended as the proper tool of a certain impressionistic school of photography that since the beginning of the century had tried to convey more than a mere record of objects. Photographers of this school used simple meniscus lenses or netting placed in front of the lens – but without going to the extent of complete image blurring. The Imagon met all these requirements as a “romantic” pictorial lens. It combined clarity with luminosity, clear image definition with the charm of softened outlines. A change in photographic fashions during the 1930s with the increasing popularity of documentary reality and of candid photography prevented the Imagon from achieving the popularity it deserved. But it has remained a classical lens type with an established place in photography.
Optical features of the Imagon
The Imagon is a single-component cemented doublet with adequate correction of all aberrations other than spherical. A special feature of this aberration is that it does not accurately define the focal length of the lens, for marginal rays meet in a different plane from central rays. The degree of this spherical aberration depends on the aperture. At large apertures it almost completely blurs the image but progressively disappears on stopping down. At the same time the plane of sharpest focus shifts. [TRA: !!! So that’s why I had so many out-of-focus shots with my first tests: I followed the standard procedure used with other lenses of setting the focus at maximum aperture, then trying out one aperture disc after the other, with the peripheral openings at various settings!] The object on which a lens with spherical aberration is focused at full aperture is no longer in the plane of sharpest focus of the stopped-down lens. Hence the Rodenstock Imagon must always be focussed at the aperture at which it is to be used. This clearly contradicts the Rodenstock statement elsewhere that the photographer should focus the lens before adding the diffusion disc. Clearly, getting in-focus images when using the Imagon system is not easy.
The Imagon controls image quality by special perforated diaphragms. The general softening of the image caused by spherical aberration is not able to reproduce an object both distinctly and softly. That requires a comparatively small aperture to produce an image largely free from spherical aberration plus a proportion of marginal rays of different focus that superimpose a blurred image on the sharp core. The perforated diaphragm provides this balance of rays contributing to image formation. The marginal diaphragm apertures are infinitely variable from fully open to fully closed, so that it is up to the photographer, what proportion of marginal rays he wants to include or keep out of the picture.
The shape of this aperture and the resulting image characteristic made it advisable not to quote a conventional relative aperture. It is of course possible to calculate the effective opening, as with any perforated plate, by summing the areas of all the holes. In practice the value obtained however yields a degree of overexposure. Experience has shown the optimum value to be somewhat below the theoretical aperture. Rodenstock therefore introduced so-called H values (from “Helligkeit” – brightness) which indicate an equivalent relative aperture of the Imagon diaphragm in use. Thus at a setting of H 5.8 the picture should be exposed as with a lens stopped down to f/5.8. Don’t worry about this description; in exposure terms, H-values operate exactly like traditional f-stops. Obviously, the smaller value of the quoted H-value range applies to the marginal diaphragm fully open and the higher value to the aperture fully closed. [TRA: This seems to be the wrong way round. Here I assume that by “smaller value” they mean the smaller aperture number, i.e., the larger aperture, and that by “high value” they mean the larger aperture number, i.e., the smaller aperture. Thus, for instance, on the H 5.8 – 7.7. disc, 5.8 is a smaller number that refers to a larger aperture, while 7.7 is a larger number that refers to a smaller aperture.]
Image characteristics
The Imagon lens produces variable imaging characteristics. It is not just a soft-focus lens, for if required it can also yield almost hard definition. At the smallest diaphragm aperture (H 11.5) [TRA: on the discs for the 200 - 300 mm lenses] the image is only just short of extreme pin-sharpness, with clear outlines and no irradiation – virtually the image quality of an anastigmat lens. You get the same effect by removing the perforated diaphragm and stopping down the iris. [TRA: They here refer to the iris in the Copal shutter, which is otherwise left fully open when using the Imagon discs.] But there is no real need for that; on the one hand the iris would have to be stopped down to at least f/16 to equal the definition obtained at H 11.5 (the perforated diaphragm also improves lens correction), and on the other, further stopping down provides little gain. In practice H 11.5 already yields optimum sharpness.
The other extreme is equivalent to using the Imagon without the perforated diaphragm and with the [TRA: Copal shutter] iris fully or nearly fully open. The image then resembles that obtained with a single meniscus lens, but with constant quality over a larger angle, as there is no significant astigmatism.
But the real field of the Imagon is the type of image for which it was designed: a clear yet luminous, defined yet softly irradiated effect, resulting from the graduated light control through the perforated diaphragms. The central aperture of these diaphragms determines the sharpness of the core image and the depth of relatively high definition, while the marginal apertures control the softening of the picture. H 9.5 (with the diaphragm fully open) [TRA: on the H 7.7 - H 9.5 disc] yields maximum depth and clearest outlines with slight diffusion. H 5.8 [TRA: presumably on the H 5.8 – H 7.7 disc with the peripheral holes closed] yields broader halos, a somewhat less distinct core image and less depth (which however is still amazingly great). And you have every intermediate stage between the two.
Taking technique
If you have only worked with fully corrected lenses, you will have to modify your technique to Rodenstock Imagon requirements. Thus you cannot focus on a plane of maximum sharpness at full aperture and stop down for the exposure. Due to its special characteristic the Imagon has to be focused at the aperture at which you intend to expose the picture. And you will have to get used to the sharpness zone of the Imagon in place of a plane of sharp focus.
If you are new to this approach, here is a suggested procedure:
Increase the camera extension appreciably more than needed and gradually decrease the lens/focussing screen distance until the nearest detail that should appear clear is in focus. Then reduce the camera extension further until more distant items become clear without loss of sharpness in the foreground. As soon as the foreground loses definition, slightly increase the camera extension again. That way you utilise the available zone of sharpness of the lens at that aperture. If this is not sufficient for the shot, you have to tilt the lens standard and/or the camera back.
Always determine the zone of relative sharpness with the marginal diaphragm apertures fully closed. With the perforated diaphragm open, the ground glass screen image is too vague and gives you little idea of the detail rendering. Although opening the marginal apertures slightly alters the focal length, this is negligible. Forget about the complicated instructions for soft focus lenses found in older textbooks.
You must however familiarise yourself with the ground glass screen image produced by the marginal rays and learn to assess the effect of their hazy subimage in the finished picture. For this will not appear anywhere near as hazy. It needs a little experience to estimate reliably how much diffusion during focusing leads to how much irradiation in the enlarged print. For the character of the image also depends on the degree of enlargement. A 1 mm wide halo on a 13 × 18 cm of 5 × 7 inch negative widens to 1.5 mm on an 18 × 24 cm or 8 × 10 inch enlargement. A similar halo outline on a 56 × 72 mm (2¼ × 2 7/8 inch) negative spreads to some 4 mm wide on enlarging to 18 × 24 cm. So you have to establish by trial and error what is suitable for your camera and what is not. In general, the smaller the negative, the less useful the largest aperture becomes.
In every case however the Imagon can deal with a greater subject brightness range than a fully corrected lens – the more so, the greater the central aperture and the greater the proportion of marginal rays contributing to the image. Thus you need less filling in for against-the-light shots as the lens does much of its own filling in. Nor do you have to worry about stray light – the Imagon is antireflection coated.
The H value alone however tells almost nothing about the image. Thus H 7.7 is on the one hand a medium aperture with open marginal diaphragm [TRA: i.e., the largest total light throughput on the disc with the medium aperture range, H 5.8 – H 7.7, with all peripheral holes open] and on the other the largest aperture with closed marginal diaphragm [TRA i.e., on the disc with the smaller aperture range, the H 7.7 – H 9.5 disc, with all the peripheral holes closed]. In the first case you get a typical Imagon image of softly diffused outlines. In the second case a very blurred and lifeless result. The same amount of light in the first place was split between the centre and the margins, while in the second case all went through the larger central aperture.
A special advantage always claimed for the Imagon is the extended depth of field; it even used to be called a “depth” lens. In view of the long focal length [TRA: with the current limited range of Imagon lenses], you will indeed be surprise at the extent of relative definition. This is due on the one hand to the spherical aberration: with no precisely defined focal length, spherically uncorrected lenses have a zone of sharpness instead of a plane of sharp focus. On the other hand the reduced definition of the Imagon image still allows items to be regarded as acceptably sharp that would be blurred compared with pin-sharpness. If parts of an image show a resolution of 8 lines/mm, others of only 3 lines/mm appear unsharp. If the whole image has no finer detail than 3 lines/mm, it appears evenly distinct all-over.
Focal lengths and aperture discs
Currently [TRA: in April 1986 when this brochure was published] the Rodenstock Imagon is available in focal lengths of 200 mm, 250 mm and 300 mm. The 200 and 250 mm lenses each have three perforated diaphragms of H 5.8 – 7.7, H 7.7 – 9.5 and H 9.5 – 11.5. The 300mm Imagon only has two perforated diaphragms starting with H 7.7. This restriction is due to the shutter into which all Imagon lenses [TRA: in 1986] have to be fitted. The largest currently available mechanical shutter (size 3) has a full opening of 40 mm. With the 300 mm Imagon that just provides an equivalent aperture of H 6.8. [TRA: the three discs supplied for the 120 mm and 150 mm lenses, which work well with the Pentacon Six and other Medium Format cameras, have the ranges H 4.5 – H 5.8, H 5.8 – H 7.7 and H 7.7 – H 9.5.]
Suitable film formats
The Imagon covers a useful angle of about 40º. Thus the 200 mm lens is usable for an image size up to 9 × 12 cm or 3½ × 4¾ inches and the 300 mm lens up to 13 × 18 cm or 5 × 7 inches. The lower limit is set by the enlarging capability of the negatives. The 200 mm Imagon is also popular for the professional 4.5 × 6 cm (1¾ × 2¼ inch) portrait format. Here a head-and-shoulders portrait fills the frame at 2 metres or 6½ feet distance. [TRA: this is the smaller “Medium Format” size.]
Use with Medium Format SLRs
Primarily the Imagon is intended for the view camera, but it can also be used with a single-lens reflex. In its standard mount the 200 mm Imagon can thus be adapted to the Rolleiflex SL 66 [TRA: which has the same format as the Pentacon Six] and the Mamiya RB 67. As the Rollei has a focal plane shutter [TRA: like the Pentacon Six!], a simple barrel – available from Rodenstock – is sufficient to mount the lens. On the Mamiya camera the shutter of the 180mm lens is used and the Imagon mounted in front via an adapter.
Possible problem reflections
Occasionally however the perforated diaphragm may be disturbing. It turns bright catchlights, for instance on spectacles, buttons or jewellery, to star-shaped spots. If you cannot avoid such reflections from the outset, for instance by repositioning the light sources, you will have to retouch them on the print.
Filters
Filters can be used without restriction on the Imagon. A neutral-density filter is enclosed for situations where the fastest shutter speed is still too slow [TRA: perhaps on a Copal No 3 shutter with a top speed of 1/125 sec]. The filter reduces the light transmitted to one-quarter, thus doubling the H value of the perforated diaphragms (H 5.8 becomes H 11.6 etc.). You will need the neutral density filter also if a flash set-up requires a different aperture from the one you intend to use. Films exposed with the Imagon are processed in the same way as any other film. Colour material processing is in any case standardised and black-and-white negatives print best if they are developed to a gamma of about 0.5.
Portraiture
The Imagon is the only lens that really meets the needs of the portrait photographer. [TRA: a bold claim!] For pictures of people, other lenses are usable only with considerable reservations. Frequently they render fine detail in a fashion that might delight a textile salesman but greatly detracts from the essential personality of the portrait. The Imagon on the other hand subdues this wealth of excessive detail – the minute pores and hairs – and preserves the natural lustre of the skin. With its variable definition you can match the image rendering specifically to the subject. A male character study appears best with clear outlines obtained at the smallest aperture (H 11.5); a dreamy portrait of a girl can utilise the luminous softness obtained at H 5.8. [TRA: in the 21st century, some of this language may sound dated to some readers. However, there is still a place for images of the type described.]
In portraiture, too, the lighting contrast can be greater than permissible with a sharp-definition lens. Trial and error [TRA: and a lot of time and expensive film!] will tell you just how far you can go. Moderate back lighting is ideal for optimum modelling; Imagon shots with soft overall illumination on the other hand tend to appear somewhat lifeless. To match the limited film [TRA: latitude] range with colour shots, keep to a maximum lighting contrast of 1:8 (3 lens stops); this is still one stop more than recommended for a sharp anastigmat lens.
We wish you success and satisfaction with the Imagon
[TRA: the Imagon is clearly best used in a studio, at least for portraits. Here all the variables can be controlled, the best settings for the lens and the lighting can be found, the correct focus determined and everything standardised, so that the subject only has to come in and sit or stand in the pre-determined place. The photographer will then have confidence that (s)he will obtain predictable results.]