Medium Format
Lenses with the Pentacon Six Mount
A comparative test
by TRA
1000mm
Carl Zeiss Jena made a 1000mm mirror lens with the astoundingly
fast aperture of f/5.6. But this comes at a price,
weight-wise: 14 kilograms. However, even at this weight, it is
still 2½ kilos less than the Carl Zeiss Oberkochen f/5.6
/ 1000mm Mirotar lens that was briefly available (to special
order!) for the Hasselblad, and was subsequently supplied
for various Rollei and Contax SLRs (according to Richard Nordin in
his book “Hasselblad System Compendium”). The CZ Jena mirror
lens is supplied in a sturdy wooden case, bringing the total
transportable weight to over 20 kilos (equivalent to your check-in
luggage allowance with many airlines!). Until recently, none
of my tripods has been up to the job of reliably supporting this
lens without me standing nervously nearby, ready to offer extra
support. I still feel that it is likely to have very little
practical use for the average amateur – though it is superb for
wildlife or for some sports photography. (To read a report
on a suitable tripod for this lens, click here.)
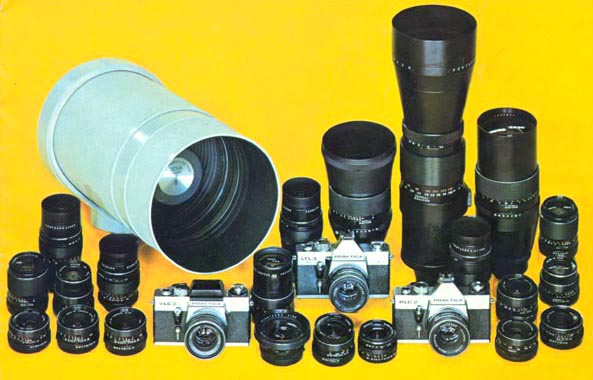
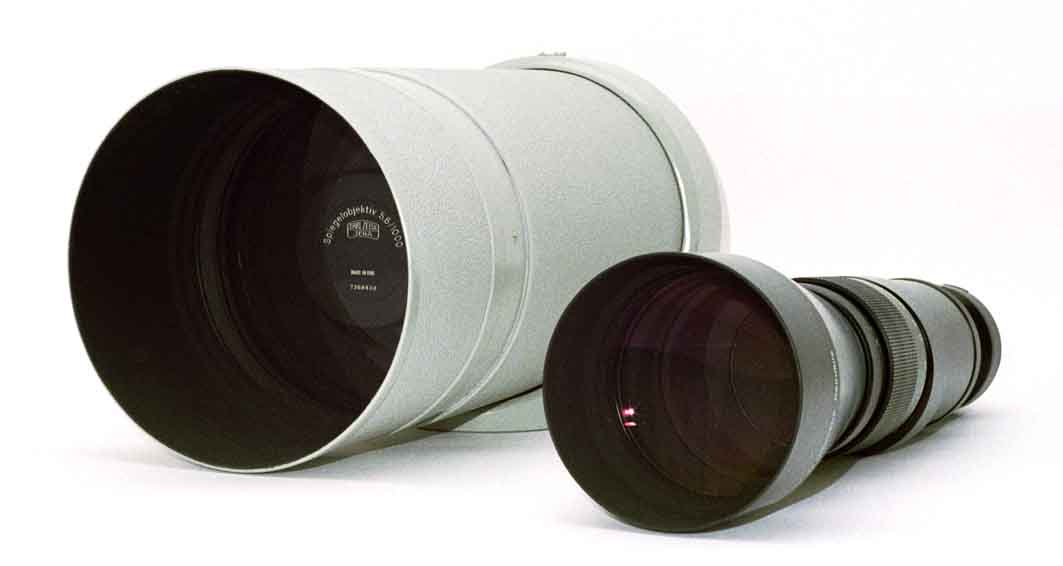
[Spiegellr: This image from the front of a Pentacon catalogue
published in 1975 shows the 1000mm mirror lens, which dwarfs the
35mm cameras in the picture.
The three tall lenses at the back on the right are (from left to
right): the 180mm Sonnar (with lens hood), the 500mm Pentacon
(with lens hood) and the 300mm Sonnar (minus lens hood).
There was a subsequent version of both of the Sonnars, each
slimmer than those shown in this photograph.]
Before looking at this lens in detail, let us look at an
alternative way of achieving 1000mm with the Pentacon Six.
500mm × 2
It is possible to add a 2× converter to the 500mm f/5.6 Pentacon
lens, yielding a 1000mm f/11 effect. All converters with Pentacon
Six mount available to me fit this lens. By adding the Joseph
Schneider converter to it and mounting the combination on an
Exakta 66 with a TTL head, one obtains full (open) aperture TTL
metering with this lens! (but one has to remember to swing the
ring to stop down to the chosen aperture before firing!)
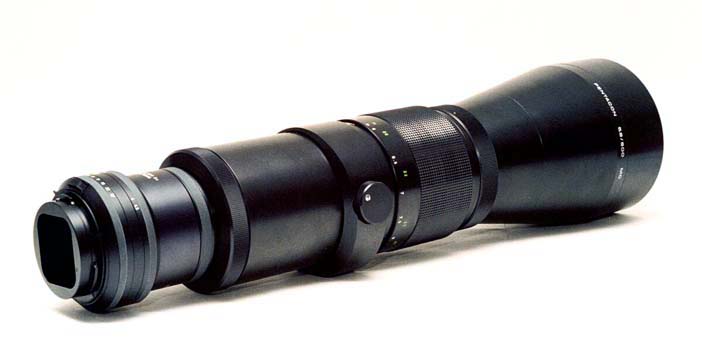
[C308-15 A real “long tom”: the Pentacon 500mm lens plus the
Schneider 2× converter]
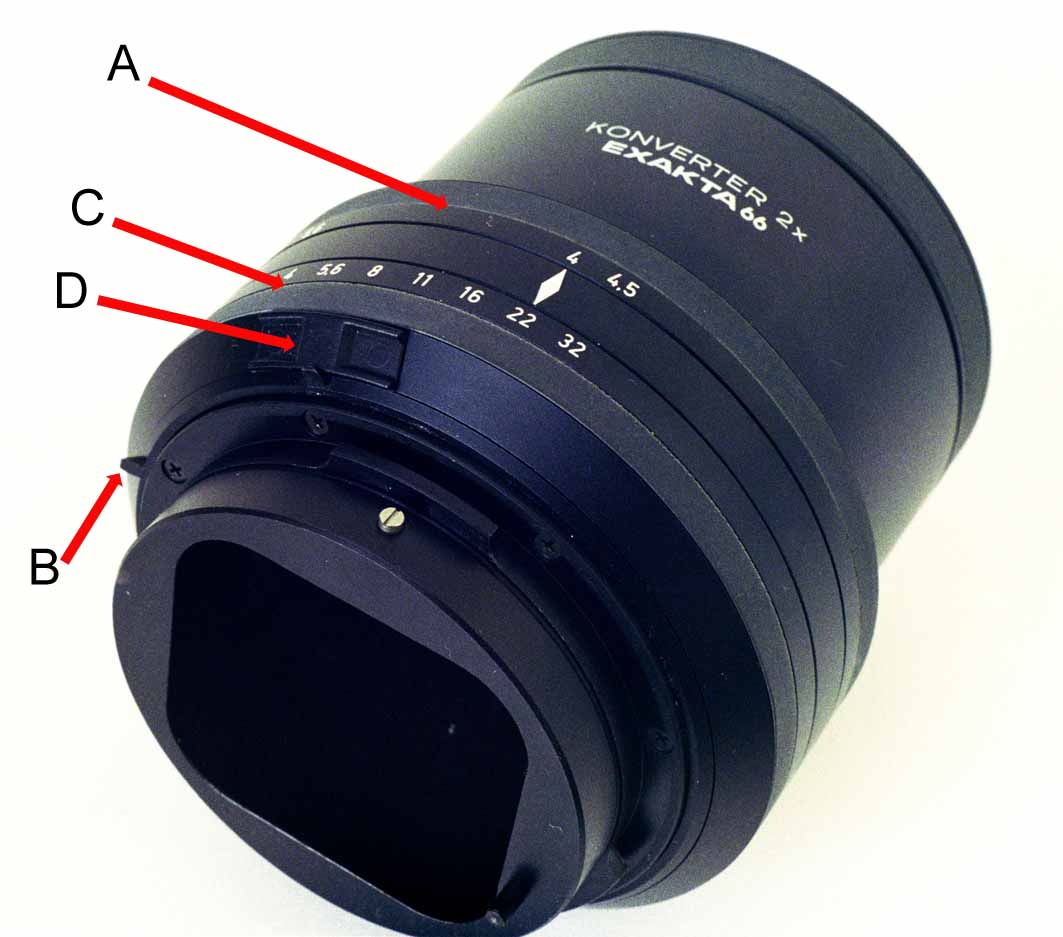
This close-up of the Schneider 2× converter shows how
the converter transmits information to the metering prism
on the Exakta 66.
Before mounting the converter on the camera, rotate the
converter’s front ring A, on which you can see the
aperture values 4 and 4.5 in this picture, to bring the
maximum aperture of the lens you plan to use in line with
the index mark (the white diamond behind it). (There
is also a setting for lenses with a maximum aperture of
f/5.6.)
This moves pin B to depress the appropriate maximum
aperture switch in the metering prism when the converter
is mounted on the camera.
To find the right working aperture for the shutter speed
chosen, rotate rear ring C on the converter until the
meter indicates correct exposure.
This moves cam D to tell the meter which aperture has been
selected.
Then set this aperture on the lens itself.
If you are using a non-Schneider lens, as is the case
with the 500mm Pentacon, remember to stop down the lens,
if it has a pre-set (i.e., non-automatic) diaphragm.
To go back to the section on teleconverters, click here.
|
|
 |
What a remarkable degree of magnification this combination
yields! With a sturdy tripod and fast film, you can really
bring distant details in close-up (if you don’t get arrested
first!). At f/5.6, I used the Panagor 2× converter, which we
now know I should not have done. A large part of the image
is extremely soft. At f/11 I tried both the Panagor and the
Schneider 2× converters. The Panagor/Pentacon combination
delivered a remarkably sharp image showing great detail over most
of the frame. As expected, the Schneider/Pentacon
combination produced a yet sharper image.

[C301-10: Pentacon 500mm at f/11 + Panagor 2× converter: Exakta
66 with 400ASA film. Shutter speed 1/125]
[C302-16: Pentacon 500mm at f/11 + Schneider 2× converter:
Pentacon Six with 160ASA film. Shutter speed 1/30]
(Colour differences between these two shots are due to the
prints that came from the lab, not the lenses. As I have
scanned from the prints, not the negatives, I have not been able
to correct this in my imaging software.)
| So, to achieve 1000mm, should one use the 500mm Pentacon
with a 2× converter, or the 1000mm Carl Zeiss Mirror Lens?
Here is how they compare for size – in these two
pictures with the Joseph Schneider 2× converter for the
Exakta 66 fitted to the Pentacon lens.
|
|
 [C374-34]
|
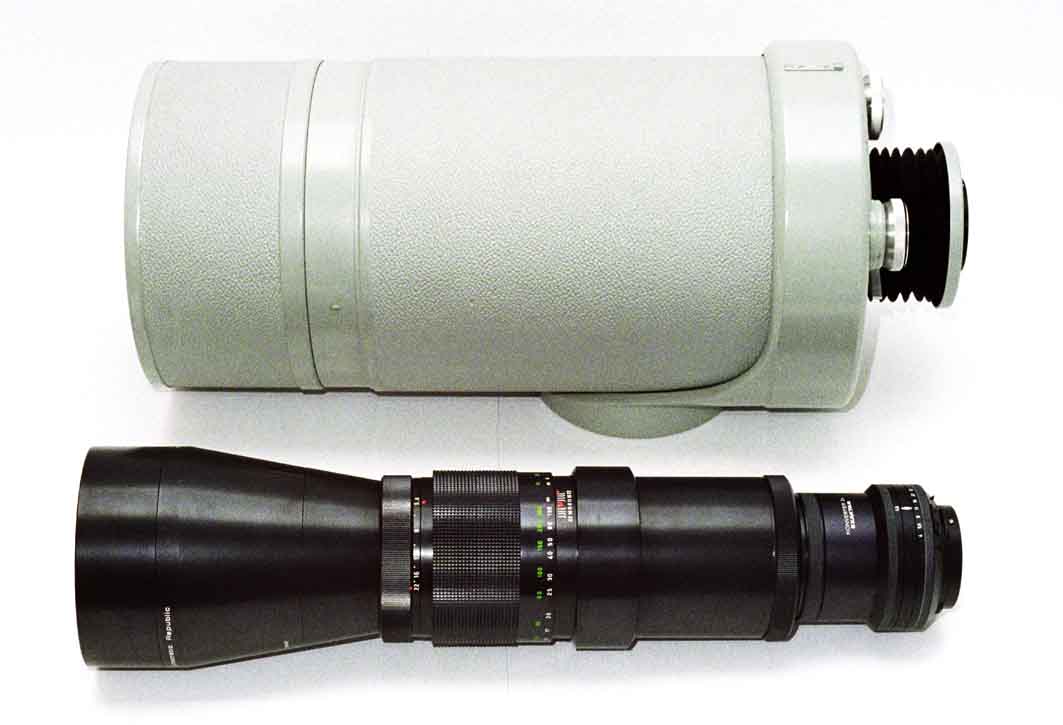
[C374-35]
1000mm
Now let’s look at the mirror lens in greater detail.
 [C369-8/9]
|
|
A maximum aperture of f/5.6 is exceptional for a 1000mm
lens, and it makes possible using the camera’s top shutter
speed of 1/1000 sec, which is really essential on many
occasions with such a great degree of magnification.
In fact, with 400ASA/ISO (27DIN) film, you may find
that you have too much light! A neutral
density filter is needed. Fortunately, the lens
comes with a range of filters built in, but here the
design shows its age: most of them are for use with
Black & White film:
Filter
Exposure
increase factor
Dark
yellow 2
Orange
2.5
Light
red 10
Dark
Red
16
(!)
Also usable with colour film are two other filters:
Filter
Exposure
increase factor
UV
1
(i.e., no exposure increase required)
ND 25% absorbtion 1.5 (i.e., about half a stop)
This is really not adequate; one really needs at least
an ND filter with an exposure increase factor of 2 (1
stop), preferably two different ND filters, one giving
the effect of an f/8 maximum aperture, the other the
effect of an f/11.
|
[C374-36an]
|
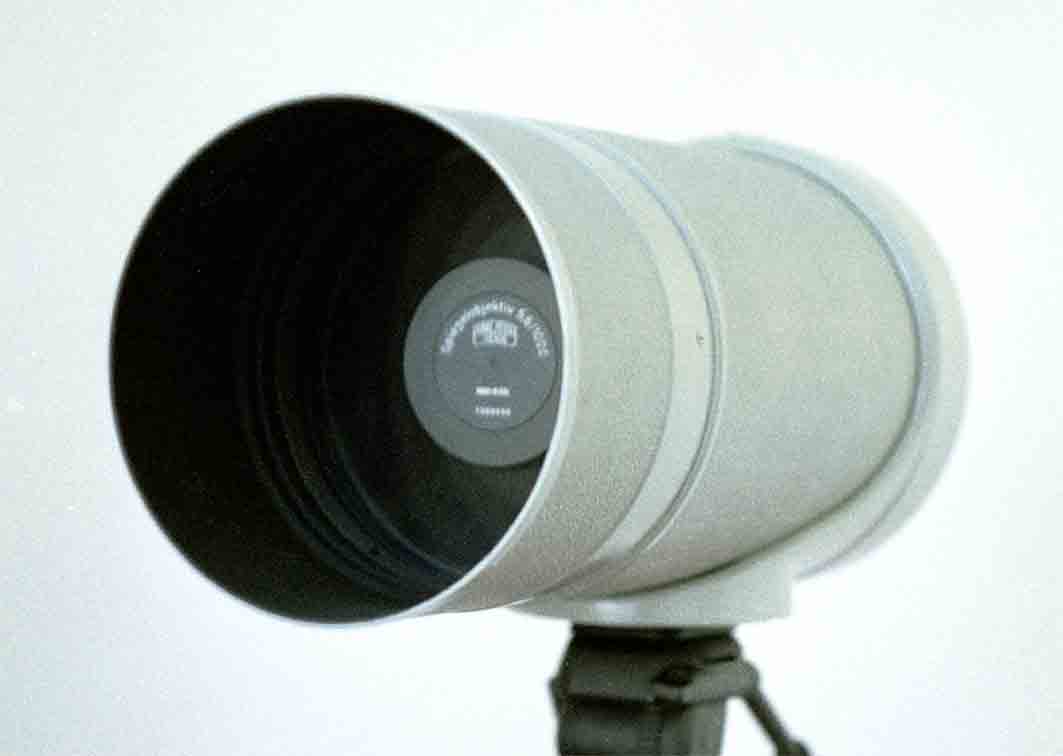
|
The filters are inside the lens, so it is not
possible to swap them for something else without partially
dis-assembling the lens! This should not be
difficult for an experienced camera repair person, but it
is not something that I am prepared to undertake.
Each filter has a diameter of 57mm, so it should be
possible to obtain alternative ND filters at modest
cost. The filters used are 5.23mm thick – thicker
than most filters used these days, but I doubt that a
slight difference in thickness would result in any
optical or mechanical problems.
The ingenious could no doubt find a way of inserting a
filter within the focussing bellows, though removing it
would be impossible without taking the lens off the
camera.
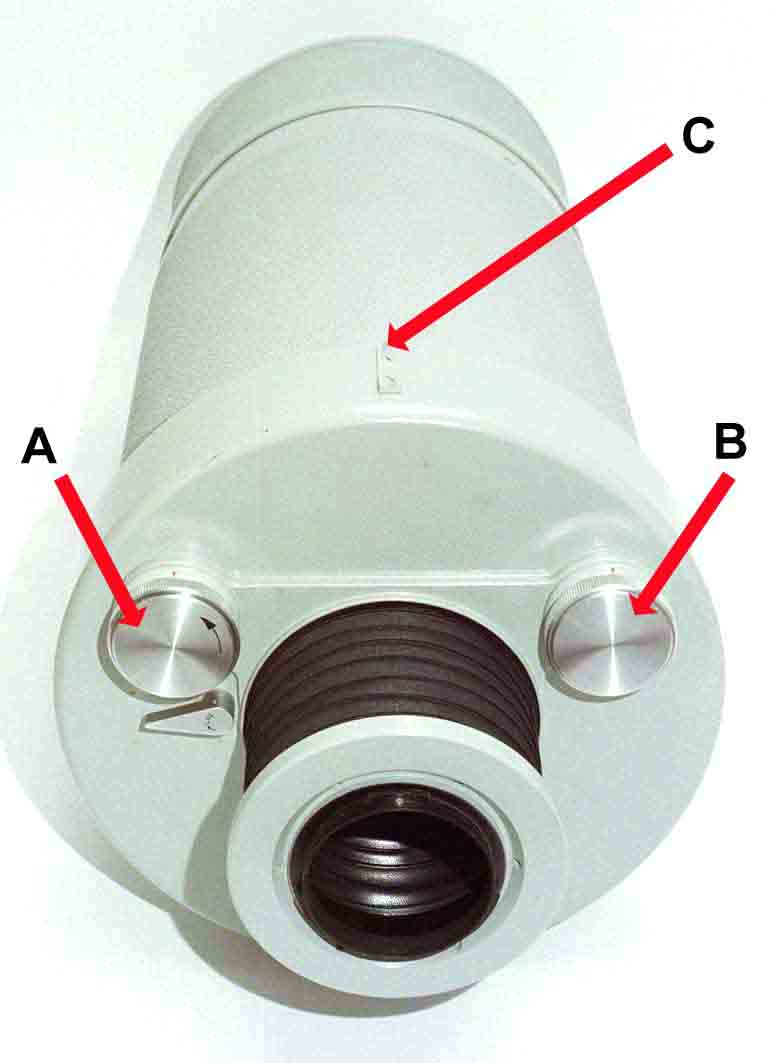
One of the fitted filters is always required – normally
the UV filter. To select a different filter lift
the small lever visible under the left-hand knob,
labelled “A” in the image here, and then rotate the
large knob anti-clockwise. There is some
resistance, but one by one the filters swing into
place. The order in which they are mounted is: UV,
ND, Yellow, Orange, Light Red, Dark Red.
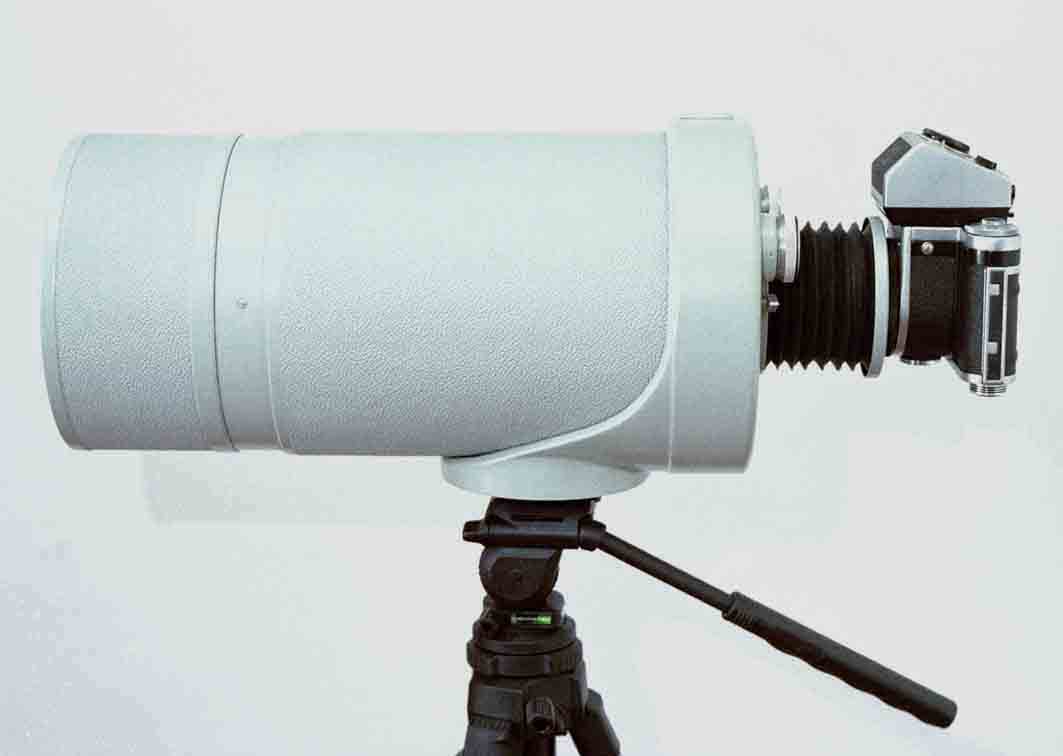
The knob to the right of the focussing bellows (“B” in
the image here) is the focus control. As you can
see from the images below, it is the lens that
is mounted on the tripod, so the focussing bellows only
have to support the weight of the camera.
|
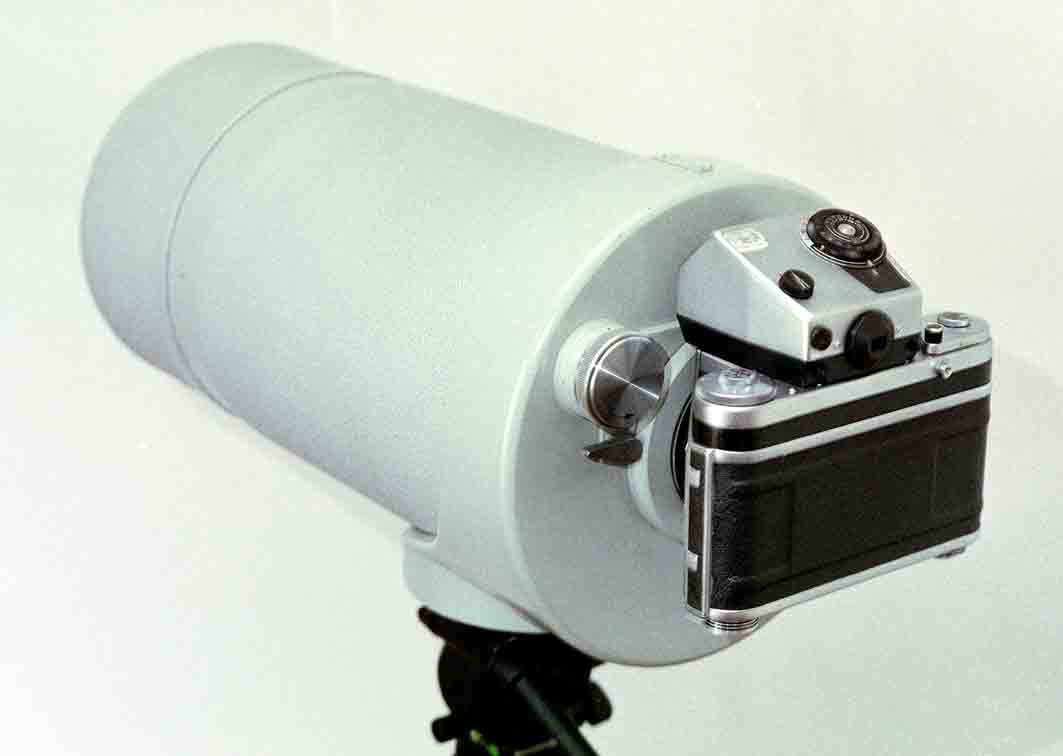
| The magnification with this lens is so enormous that you
may have difficulty working out just where it is pointed
at, as you search in the camera’s viewfinder for your
subject! To help you with this, there is a sighting
mark on the top of the lens, labelled “C” in this image. |
Compatibility
Problems
It is not possible to mount this lens on the Exakta 66
with its TTL metering prism, as this extends too far forward of
the front of the camera body. However, it will, of
course, mount on the Pentacon Six with its metering prism, or on
the Exakta 66 with the non-metering prism or other viewfinder.
It is also reported that it is not possible to mount this
lens on the Kiev 88CM. The round flat plate or ring of metal
just forward of the lens mount is fouled by the front of the Kiev
88 camera, which was never designed for Pentacon Six lenses.
The standard flange distance of the Kiev 88 – the distance between
the film plane and the front surface of the lens mount on the
camera – is 82.10mm, the same as the Hasselblad 1600F on which it
was based. The flange distance of the Pentacon Six is
74.10mm. Therefore, when the Kiev 88 was modified as the
Kiev 88CM (perhaps standing, in Cyrillic lettering, for “Six
Mount”),
the lens mount had to be recessed below the
front of the camera. However, it is of course not possible
to slice off 8mm from the front of the camera.
It may be possible to overcome this problem
by placing the shortest of the Pentacon extension tubes, the 10mm
tube, between the back of the 1000mm lens and the Kiev 88CM.
However, it would be necessary to check if
infinity focus is still possible with this tube in place and the
lens focussing bellows compressed to the
maximum. Information on this tube can be found here. As I no longer have a
Kiev 88 camera with the Pentacon Six mount, I am unable to check
this myself, and would welcome feedback from someone with this
lens and the Kiev 88CM.
___________________
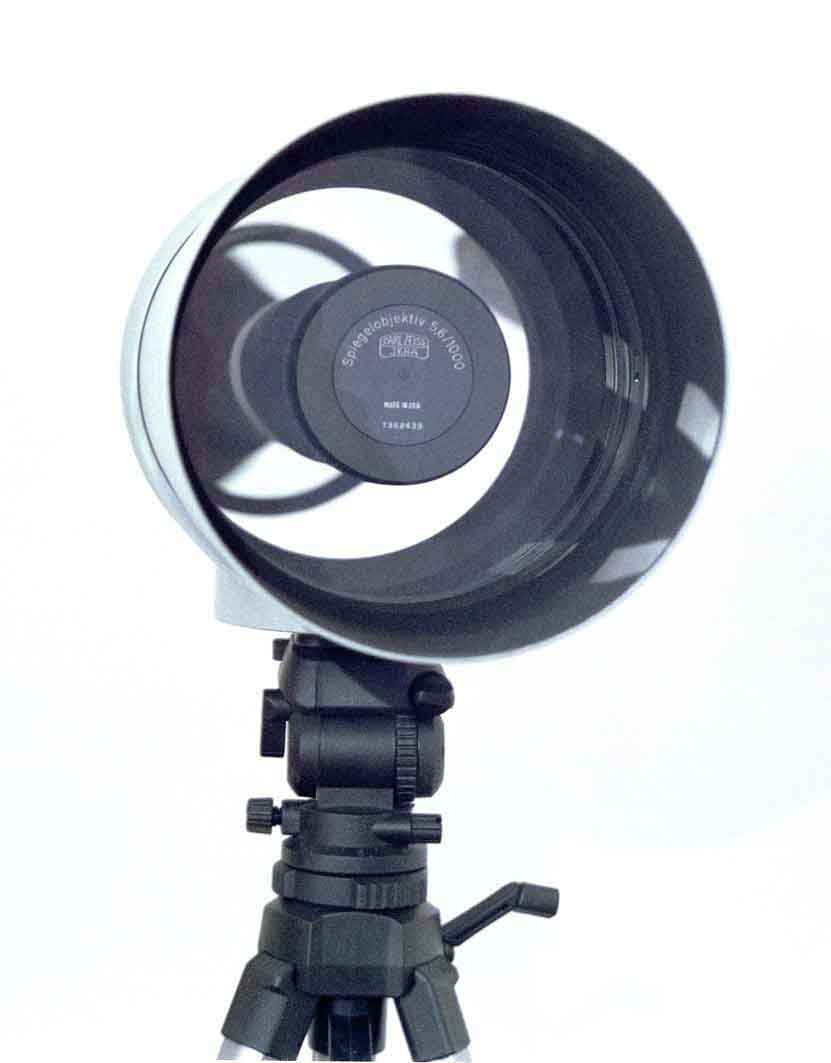
To give an idea of the scale of this lens, here are some shots of
it mounted on the Pentacon Six (or perhaps we should say that it
is the camera that is mounted on the lens, and not
the other way round!)
   [C369-1]
[C369-7]
[C369-4]
[C369-1]
[C369-7]
[C369-4]
|
(Is the camera behind the lens in the first shot? I’m not
sure!)
So much for the lens itself. Now how about the quality of
the images it delivers?
 [C369-17:] Here is a shot taken with the 80mm
Biometar standard lens at f/11.
[C369-17:] Here is a shot taken with the 80mm
Biometar standard lens at f/11.
The first thing that I discovered when the film came
back from processing was that the shutter on this
particular Pentacon Six had developed serious banding at
1/1000sec. This is visible as darker vertical
bands of exposure about one third of the way in to the
image from the left.
|
|
 [C369-162]
In this shot taken from the same position a few minutes
earlier we can see the degree of magnification achieved
with the 1000mm lens.
The banding caused by the shutter problem is clearly
visible.
We can also see slight cut-off at the bottom of the
frame, and a very small area of vignetting in the top
corners – though this is quite marked.
I have here scanned the whole of the negative. In
practice, the very edges would be masked in a slide
mount or in the negative holder in an enlarger, so that
these areas of vignetting are unlikely to be visible.
An ND4 filter would have yielded a better-exposed
negative.
|
[C369-16midcrop]
To examine further the quality of the images produced by
this lens, here I have enlarged a tiny area of the
centre of the image.
|
|
 [C369-16edgecrop]
And here I have enlarged an area of similar size at the
extreme right-hand edge.
|
| Both of these enlargements show the outstanding quality
of the images produced with the 1000mm mirror lens: there
is no chromatic aberration (colour fringeing) and
no linear distortion (curving of straight
lines). Image contrast and sharpness are
excellent. The only limiting factor is the film, as
at this degree of enlargement we can begin to see the
grain (Fuji NPH 400). In these bright winter
conditions, a slower film would have been more suitable –
in fact, on this occasion a 100ASA/ISO (21 DIN) film would
have been correctly exposed.
My conclusion is that most people will not need
the Carl Zeiss Jena 1000mm mirror lens, but if you do
need it, it will give you outstanding results.
P.S. After a service, the camera produced
correctly-exposed images with no signs of banding at
1/1000sec, as it had previously done.
|
Why isn’t the lens
barrel black?
For most of the past 30 years or so, it has been customary to
produce camera lenses with a black finish, although “chrome”
finishes seem to be making a comeback. However, the Carl
Zeiss Jena 1000mm mirror lens is most often seen in a light grey
that is just off-white, and there are also some that are finished
in an extremely light green that is also only just
off-white. Some late-production examples were produced in
black, but this is much rarer.
Why did Carl Zeiss choose these extremely light colours?
In an article entitled “Line and Length” in the 19 February 2005
issue of “Amateur Photographer”, Geoffrey Crawley wrote this:
| “There is a case for a white or cream finish for long
lenses. A few can usually be seen at sports
events. The idea is that sunlight is reflected and
the absorption and consequent heating given by a black
finish prevented. Long lenses are susceptible to
significant expansion and contraction in temperature
extremes.” |
For information on the Zoomar/Kilfitt 1000mm
Sport-Reflectar mirror lens, see here.
To read a report on a sturdier tripod for 1000mm
lenses, click here.
To go on to the next section, click below.
Next section (further 1000mm-1200mm tests)
To go back to the beginning of the lens tests, click below and
then choose the focal length that you want to read about.
Back to beginning of lens tests
Home
© TRA January 2002 Latest revision: November 2020