by TRA
Lens Data:
Rodenstock Imagon lenses for the Pentacon Six
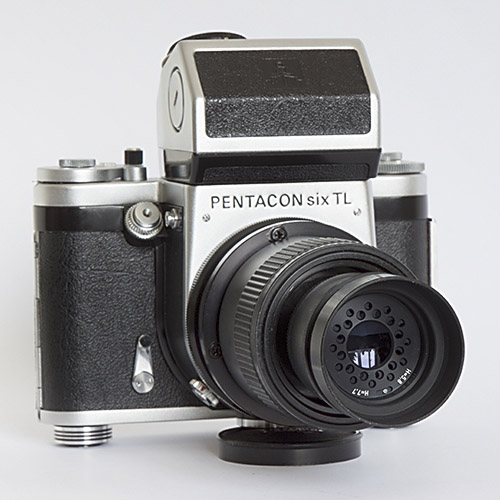
The Imagon 150mm lens
[ima150_01.jpg]
Ask any person familiar with film-based SLR cameras to describe the general characteristics of lenses, and they will probably come up with something along the lines of:
- optical components comprising at least 4 or 5
elements, frequently many more
(Tessar lenses have four elements, Biometars: 5, the Xenotar MF: 7, the 55mm PCS Arsat: 9, the 30mm Arsat/Zodiak fish-eye: 10, etc) - a focussing ring with distance markings in feet & inches and/or meters
- an index mark on the barrel, against which the
distance is set
- an aperture ring to change the size of the lens
aperture, with a standard set of numerals indicating
the aperture value
(frequently starting at 2, 2.8 or 3.5 and then going on to 4, 5.6, 8, 11, 16 and possibly further) - another index mark on the barrel, against which the chosen aperture value is set
- a depth-of-field scale to show what will be in
focus at different distance and aperture settings
- a camera mount
- in most cases, a thread at the front for mounting filters.
- just two optical elements (supplied already
mounted together)
- no focussing ring
- no aperture ring
- no built-in diaphragm of variable diameter
- no depth-of-field scale
- frequently no camera mount
- no thread at the front for filters.
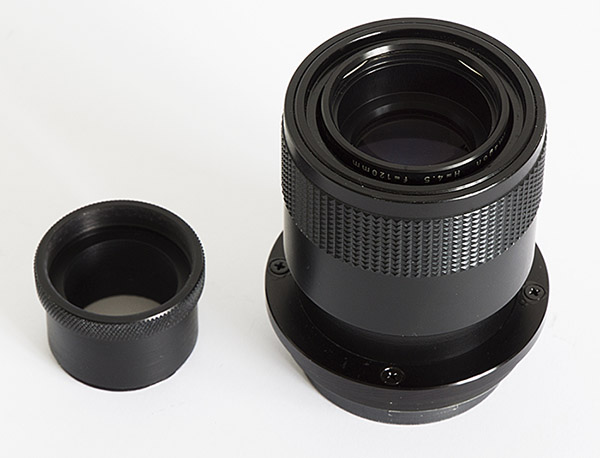
 The outfit illustrated in
this image includes items not supplied by
Rodenstock as part of the Imagon lens.
[ima150_02.jpg] |
|
The basic components from
Rodenstock should as a minimum include:
Note some of the items that are not mentioned above:
The lens on view cameras was mounted by the photographer onto a “lens board”, which was essentially a square piece of thin wood with a large circular hole in the middle. The lens was screwed into the hole in the lens board, which was clipped or otherwise fixed to the front standard of the camera. |
| A
shutter for the camera/lens These cameras did not normally have a shutter. The photographer could buy (or normally already owned) a shutter that was mounted either in front of or behind the lens (or, with more complex lens designs, between its front and rear elements). Some lenses were (and are!) supplied with a shutter mounted onto or into them. Rodenstock frequently supplied Imagons mounted in a shutter, and many Imagons on sale today come with that shutter. The Pentacon Six user, whose camera has a shutter built into it, will probably wish to remove any shutter that comes with the Imagon. (It should simply unscrew from the back of the Imagon.) How to focus the Imagon It is necessary to find a way of focussing the lens. The easiest way is probably to find a way to mount the lens onto the front of Pentacon Six bellows. However, remember that the lens does not have a Pentacon Six mount (or, probably, a mount for any other camera), so it may be necessary to have an adapter-ring custom made. However, using the bellows for hand-held photography is not ideal, and in fact Rodenstock did sometimes offer a focussing tube for the Imagon. This consists of a rotatable helical tube within another tube. Most helical focussing mounts for the Imagon were manufactured by Zörkendörfer for Rodenstock, although some came from other sources. These focussing tubes do not have any distance settings marked on them. |
|
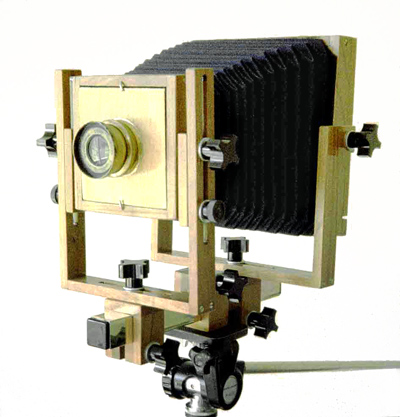 The Bender 5×4 inch view camera Note the removable lens board into which the lens has been screwed. (The lens on this camera is not an Imagon!) [c104_29a_s.jpg] |
| However, this is not a problem
for the Pentacon Six user. The view camera
user of 80 years ago focussed on a ground glass
screen at the back of the camera, and then slid a
film holder between the ground glass screen
and the camera bellows, closed the shutter,
removed the dark slide from the film holder, fired
the shutter, re-inserted the dark slide into the
film holder, and removed the holder from the
camera. Thanks to the mirror in the Pentacon Six and the use of roll film, most of these steps are unnecessary. The film is already in place, and protected from the light by the camera shutter, so no dark slide is needed. The mirror in the camera throat intercepts the image-forming light rays that come through the lens and turns them through 90° up onto the focussing screen. The photographer focusses the image on this screen. When the shutter is fired, the mirror moves up out of the way, the shutter opens to expose the film and then closes again. Job done. To take another picture, the user activates the advance lever, which advances the film to a new, unexposed portion, re-sets the mirror in the viewing position and cocks the shutter ready for the next exposure. However, as indicated above, with the Imagon the user cannot focus by looking at a distance scale printed on a lens barrel. The image to the right here shows a complete Imagon outfit with all components for the 120mm and 150mm Imagons for Medium Format and 35mm cameras. A mount for the 35mm camera to be used can be screwed to the back of the extension tube for 35mm cameras. Here, a Minolta SR-T 101 mount is shown. |
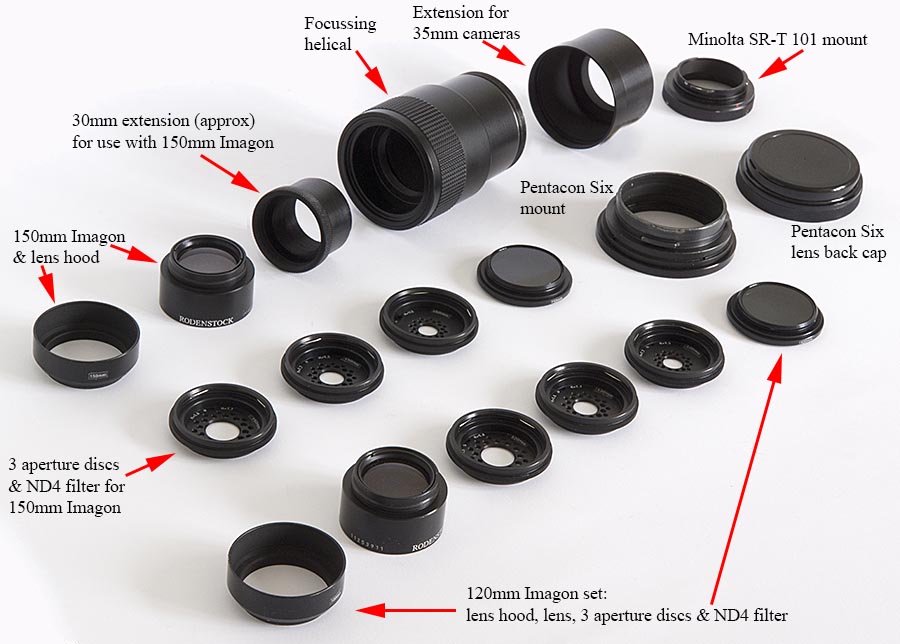 A complete usable Imagon outfit with two lenses for a Pentacon Six and a 35mm camera [ima120150_01.jpg] |
The two-element Imagon lenses do not have a telephoto design (nor could they, with just two elements). Therefore, a 200mm Imagon, for example, needs to be 200mm from the film. The distance from the film to the lens flange on the front of the Pentacon Six is 74.1mm, and the helical mount is not likely to be 125.9mm long. Therefore, it will probably be necessary to add a prolongation tube either in front of or behind the focussing helical, with a camera mount on the back of the helical or on the back of the tube. The length of the tube will depend on the focal length of the lens (i.e., the distance that the lens needs to be from the film in order to bring an object at “infinity” into focus).
Fortunately, some committed retailers did make up kits of all the right parts, so it was possible to buy an Imagon that you could attach to your camera and start taking pictures straight away. The principal retailer and promoter of the Imagon for the Pentacon Six was Schmachtenberg of Solingen, (West) Germany. Schmachtenberg also manufactured focussing tubes for the Imagon, and his tubes are shorter than the Zörkendörfer tubes. Unfortunately, his business no longer exists, although you may find equipment or packaging that bears his name.
What is the right focal length for the Pentacon Six?
The Imagon was originally designed as a portrait lens, and over many decades it was manufactured in a wide range of focal lengths. The “right” focal length for a given camera depended on the format of the camera: the larger the film format, the longer the length that was required.
At the time of writing, Wikipedia lists the following Rodenstock Imagon lenses, along with the format for which they were intended:
| 90 mm
(for 35 mm; prototype for pre-World War II Leica
only) 120 mm H=4.5 (for 35 mm and 6×6 cm) 150 mm H=5.8 (for 6×6 cm) 170 mm H=5.4 (for 6×9 cm) 200 mm H=5.4 (for 9×12 cm) 200 mm H=5.8 (for 4.5×6 cm, 6×6 cm, 6×7 cm, 6×9 cm, and 4×5") |
|
250 mm H=5.4 (for
10×15 cm) 250 mm H=5.8 (for 4×5") 300 mm H=5.6 (for 13×18 cm) 300 mm H=7.7 (for 5×7") 360 mm H=5.8 (for 16×21 cm and 8×10") 420 mm H=6.0 (for 18×24 cm) 480 mm H=6.2 (for 24×30 cm) |
Over many years Rodenstock marketed both the 120mm and the 200mm Imagons for 6×6 cameras, although for most purposes (and definitely for portraiture) the 200mm Imagons actually have too narrow an angle of view for 6×6. With the 200mm Imagon it would therefore be necessary to increase substantially the distance between the camera and the subject in order to get the right framing for a good portrait.
Schmachtenberg is credited with having convinced Rodenstock in the 1980s that there was a market for a 150mm Imagon, after which a 150mm Imagon was specially calculated and manufactured. It then appeared on the market for a short time. I here report on both a 120mm Imagon and a 150mm Imagon for the Pentacon Six. The general features of these lenses and their use apply also to Imagons of other focal lengths.
The helical in the above image was
supplied to the first owner by
Schmachtenberg of Solingen. The prolongation
tube behind it is necessary in order to put the Imagon
at the right distance from some 35mm cameras.
This extension tube and the Pentacon Six lens mount
were manufactured as a custom order for this lens and
camera by the photo machinist Glenn Evans of Glennview
in Chicago, USA. (See the Glennview website here.)
The
Pentacon Six lens mount screws directly onto the back
of the focussing helical and the lens can then be
focussed from “beyond” infinity to quite close up.
Mounting accessories on the front of the lens
The lens does have a screw thread at the back, to enable it to be screwed into a shutter, a lens board or a focussing helical, but there is no screw thread at the front, nor even a bayonet mounting. The components that go in front of the lens – the aperture discs, the filter and the lens shade – clip together, thanks to a partially-hidden spring at the front of the lens and at the front of each aperture disc and the filter.
When the 120mm Imagon is
used, the 30mm (approx) front extension tube,
also from Glenn View, is not required, and so
the lens needs to be mounted recessed within
the Schmachtenberg focussing helical in place
of the 150mm Imagon on the 30mm tube, with the
back of the helical again attached directly to
the Pentacon Six mount, also without using the
rear prolongation tube (which is only required
for 35mm cameras). It then focusses from
infinity to very close up on the Pentacon Six.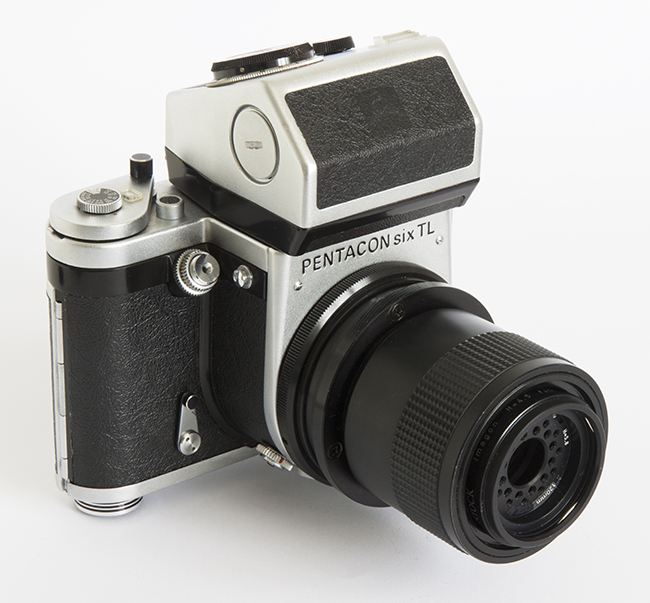 The 120mm Imagon mounted on the Pentacon Six and focussed at infinity, with an aperture disc in place. In use, a lens hood would be added to this (see below). [ima120_01.jpg] |
 The 120mm Imagon screwed straight into the focussing helical. To the left is the 30mm extension that is required with the 150mm Imagon. [ima120150_04.jpg] |
Mounting accessories on the front of the lens
The lens does have a screw thread at the back, to enable it to be screwed into a shutter, a lens board or a focussing helical, but there is no screw thread at the front, nor even a bayonet mounting. The components that go in front of the lens – the aperture discs, the filter and the lens shade – clip together, thanks to a partially-hidden spring at the front of the lens and at the front of each aperture disc and the filter.
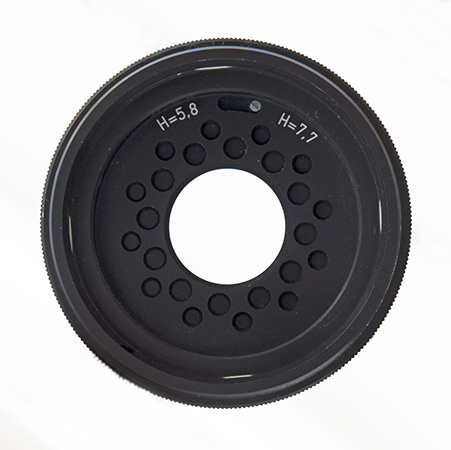
The aperture discs
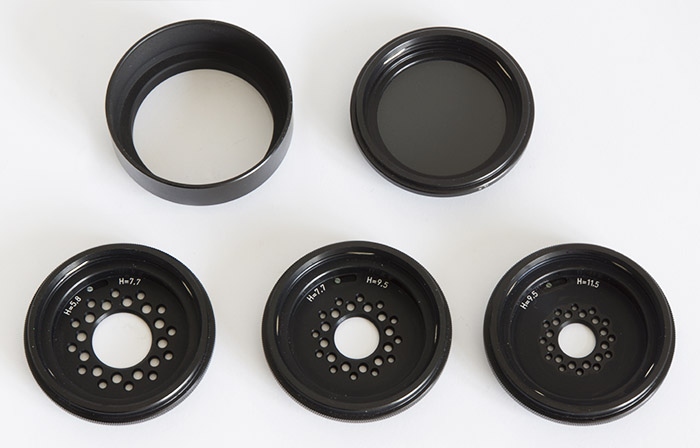
The lens hood (shade), ND4 filter and three aperture discs for the 150mm Imagon.
The straight pieces of clear metal at 90° intervals recessed within the front of the filter and each of the discs are springs to hold anything clipped onto the front.
[ima150_04.jpg]
Note that each of the aperture discs has a large hole in the middle and that the diameter of this hole is different for each of the discs. It is this hole that forms the aperture, and like all apertures, it has three functions:
- it controls the amount of light entering through the lens and striking the film
- it increases or decreases the depth of field, the nearest and farthest-away components of the subject that will be in focus
- the smaller the aperture, the greater the resolution of the lens (within certain limits).
| When I first uploaded this page
in 2016, I stated here: “If anyone knows what the
“H” stands for, I would be pleased to hear from
them.”
Nearly six years later, although hundreds of
people have written to me about details on this
website, no-one has answered this question.
However, in 2022 I found the answer when I bought
an instruction booklet produced by Rodenstock for
the Imagon. The information in that booklet
is so detailed that it merits its own page, which
can be found here. |
However, for practical purposes, the “H-numbers” can be taken as being equivalent to f/-stops, for the purpose of determining exposure. Each of the aperture discs has two “H-numbers”, a largest and smallest. The numbers on the discs are:
| For the 120mm
Imagon |
For the 150mm
Imagon |
|
|
These discs click in place onto the front of the lens. Only one disc is ever used at a time. They cannot be “doubled up”. Rodenstock advises focussing the image before adding the chosen disc. The lens hood should be clicked onto the front of the chosen disc.
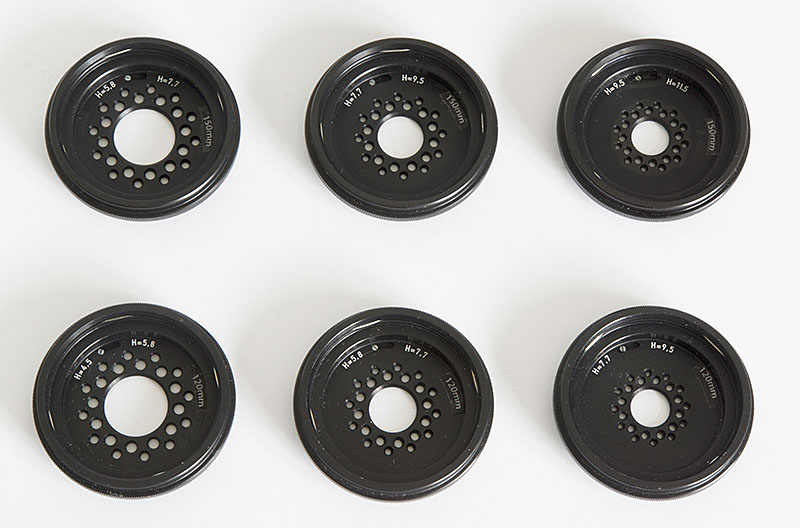
The diameter of the aperture discs is identical for the 120mm and 150mm Imagons, but the aperture values are different, because of the different focal lengths.
To avoid confusion when working with both lenses, I have therefore labelled the discs with the focal length. Some (later?) discs from Rodenstock come with the focal length already marked on the discs.
[ima120150_03.jpg]
Readers will observe that there is a series of holes arranged on two circles round the main aperture hole in each disc. It is these holes that control the variable diffusion effect of the disc. The purpose is that, while the core image is sharp, the peripheral holes superimpose onto the captured image diffusion of highlights in the subject area. The size of these peripheral holes can be easily adjusted by the user. When they are fully open, maximum diffusion for that disc occurs. When they are fully closed, minimum diffusion for that disc occurs. Naturally, when they are open, they also let through more image-forming light, and when they are closed, they let through less light, which is why each disc has two numbers printed on it. Intermediate “H-stops” can be guesstimated, and this should be well within the exposure latitude of modern negative film, both colour and black and white. If desired, through-the-lens metering can be used to obtain a more precise reading, which may be especially useful with colour reversal (“slide”) film.
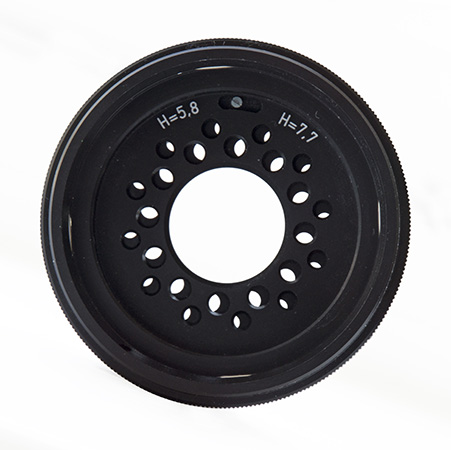
How does one open and close the peripheral holes?
 [ima150_07.jpg]
|
 [ima_150_08b.jpg]
|
 [ima150_09b.jpg]
|
Each “disc” is in fact made of two concentric discs, one in front of the other, with identical holes in exactly the same places. These two discs can be rotated in relation to each other. When the holes are all exactly aligned, as in the first image here on the left, all the holes are fully open. When the front disc is rotated to the right a few millimetres, the peripheral holes are fully closed, as in the last image on the right here. At intermediate positions, as in the middle image here, the peripheral holes can be more or less open or closed.
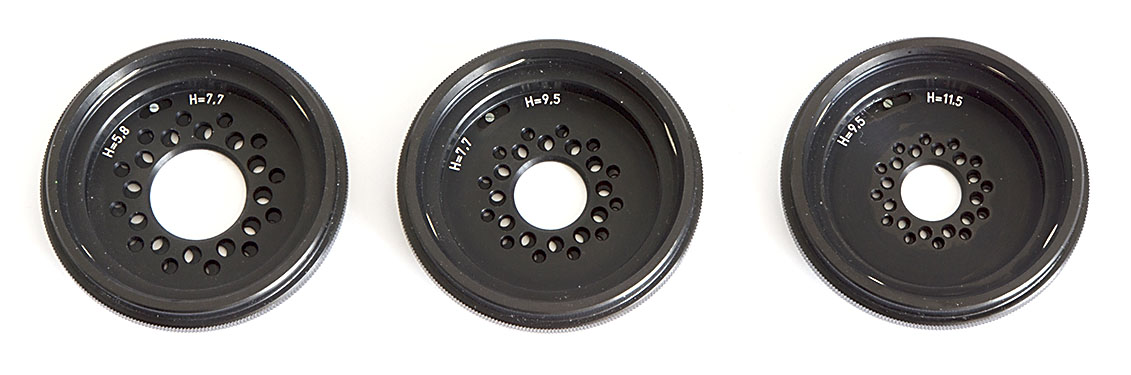
Here are all three “H-discs” for the 150mm Imagon, each one with the peripheral holes approximately half closed.
I have lightened the discs in this image and increased the contrast, in order to make it easier to see the detail of how the holes close.
[ima150_05c.jpg]
If you have an opportunity to buy Imagon aperture discs on their own, make sure that they are right for the lens with which you wish to use them, as the lenses of different focal lengths and their corresponding aperture discs are of widely differing diameters. In any case, the given “H-number” is only right for a lens of the focal length for which it was calculated. Some aperture discs have printed on them the focal length of the lens for which they are designed, but that is not the case with the set of discs shown here.
The Neutral Density filter
As the greatest diffusion effect is obtained at the largest aperture and with the peripheral diffusion holes open, in some situations even the fastest shutter speed may not prevent over exposure. For this reason, a neutral density filter may become essential in order to obtain the correct exposure within the shutter speed range that is available to the photographer.
One photographer even told me that for portraits he prefers to use his Imagon lens with no diffusion discs at all. This is probably not recommended, since even the disc with the largest aperture improves the resolution of the lens. However, the results will depend on the lighting that he uses and on the subjects of his pictures.
It is important to add the supplied lens hood in front of the filter, to prevent stray light falling on its surface and degrading the image.
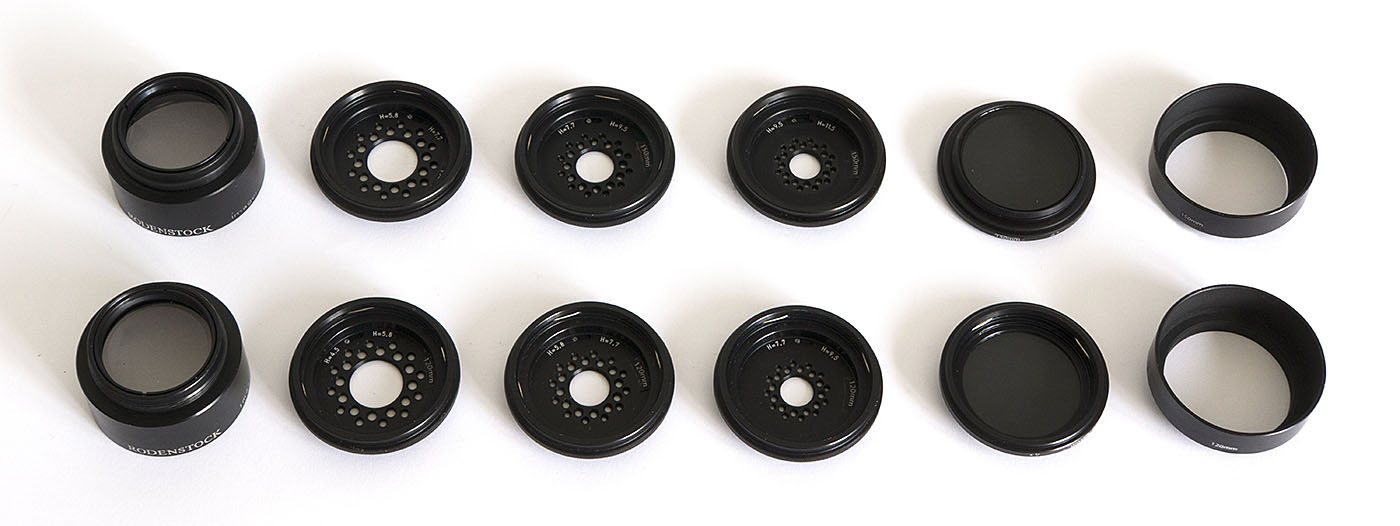
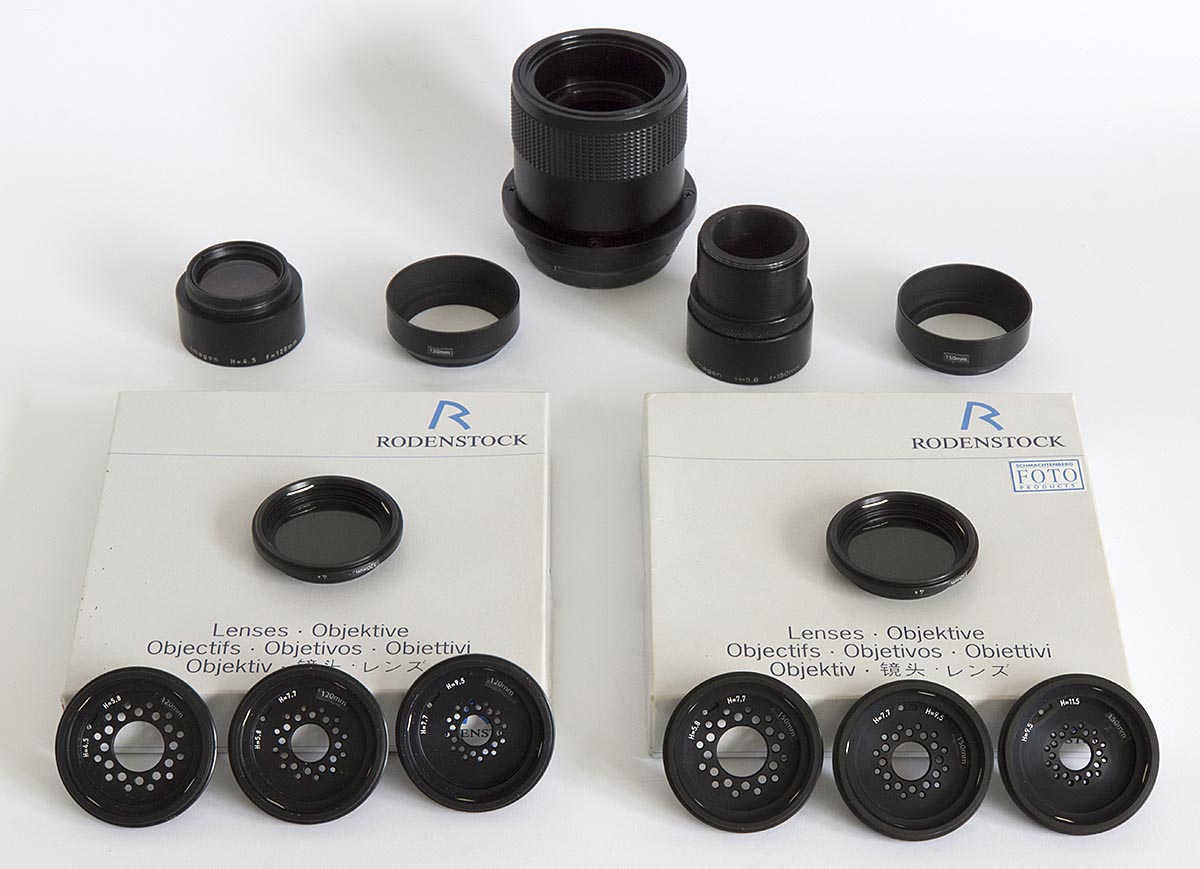
The complete 150mm Imagon set (top row), with the 120mm Imagon below it.
(Of course, a focussing helical and a lens mount are also required!)
[ima120150_02.jpg]
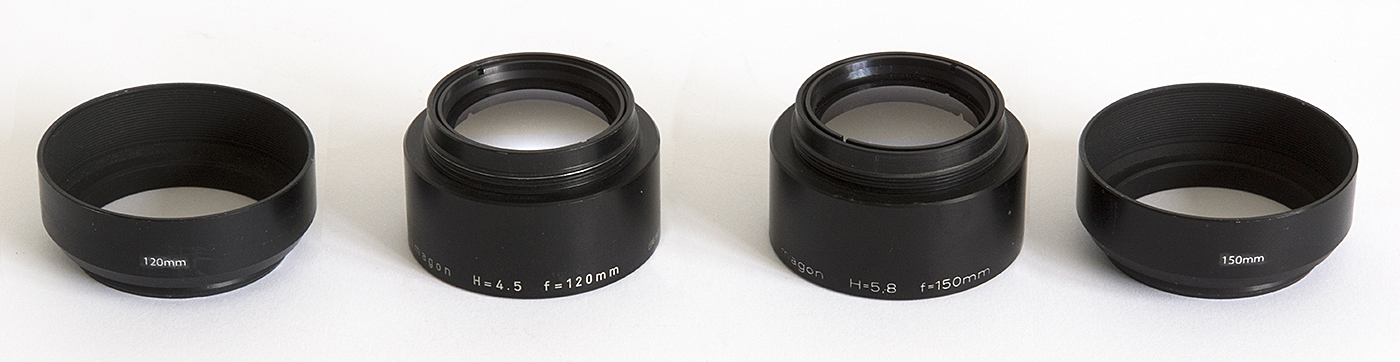
Close-up view of the 120mm and 150mm Imagons, with their lens hoods (labelled by me)
[ima120150_05.jpg]
| To the right: the
120 and 150mm Imagons with the boxes in which they
were supplied. Of course three items shown here are not part of the standard outfit as supplied by Rodenstock:
|
 [ima120150_06.jpg] |
|||
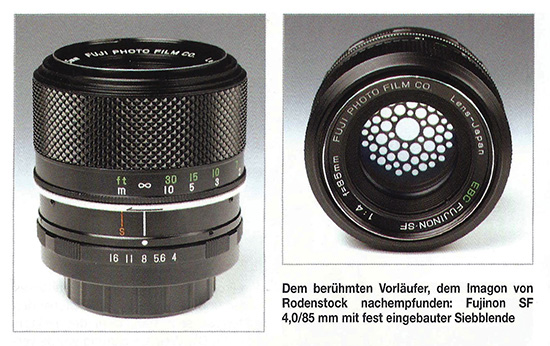
This system was copied by Fuji and by Mamiya-Sekor.
|
||||
The photographer needs to learn how to use the Imagon lens, which means making tests and recording the settings chosen for each picture, since it is not possible to see fully in the viewfinder the effects of the diffusion discs with this unusual lens. I have already taken my first pictures with this lens on my Pentacon Six, and hope to be able to report on the results soon. Meanwhile, I reproduce here some of the images presented by Rodenstock in one of their later brochures, which was published in April 1986.
 [86_Imagon_cover_as.jpg] |
|
This small brochure
(approximately 125mm wide × 125mm high) is 40
pages long, and has additional images on fold-out
pages at the front and back. It is in
German, English, French, Spanish and what I
believe to be Japanese. It features the 200mm Imagon mounted in a Copal Leaf Shutter. The images presented in the brochure were taken with this lens mounted on a view camera and the brochure states that the test images were taken on 6.5 × 9 cm (2½ × 3½ inch) Ilford FP 4 sheet film. It will be clear that other film was used for the two colour images. Clicking on the image on the left opens a full-sized copy. Note Even though all scanners soften the images that they scan, no sharpening has been applied on the computer to any of the images in this section. In addition to this, the printing process does in general produce images that have a lower resolution than that obtained on film, and this is definitely the case with the small size of reproduction of the images in this brochure. The original images are therefore likely to have been sharper than they appear here. Nevertheless, comparison of these images does yield useful information on the nature of images that can be produced with Rodenstock Imagon lenses. |
The brochure titles the following images “Test series”. The text given here and beside each image is taken directly from the English-language pages of the brochure.
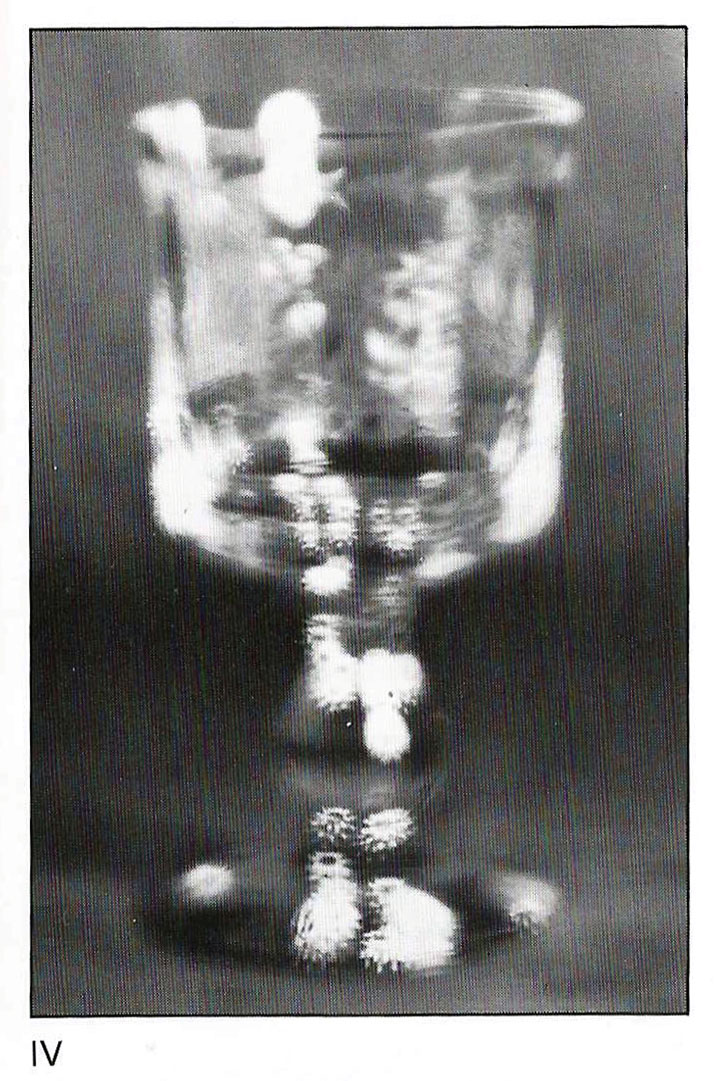
“Figs. I – V: A crystal goblet, rather harshly lit for this purpose, shows the brightness range covered by the Imagon.”
Clicking on each image opens a larger copy, although given the small size of the images in the brochure, only a single degree of enlargement will be given by most browsers, and a second click on the image will not enlarge it further.
 [86_Imagon_01s.jpg] |
“Fig.
I: The lens without perforated marginal
diaphragm, in the Compur shutter, at
full-aperture (f/ 5) yields a blurred image with
little detail and extensive irradiation.” |
 [86_Imagon_02s.jpg] |
“Fig. II: The smallest iris stop (f/ 5.6) on the other hand yields maximum definition and sharp outlines.” |  [86_Imagon_03s.jpg] |
“Fig. III: The performance at H 11.5 – the smallest of the Imagon’s perforated diaphragm stops – almost equals that of the fully stopped down lens.” |
 [86_Imagon_04s.jpg] |
“Fig. IV: The irradiation image on its own. The central aperture was covered up and the exposure produced exclusively by the marginal openings of the perforated H 9.5 to H 11.5 diaphragm. The serrations around the edges of the highlights result from projections of the diaphragm perforations.” | 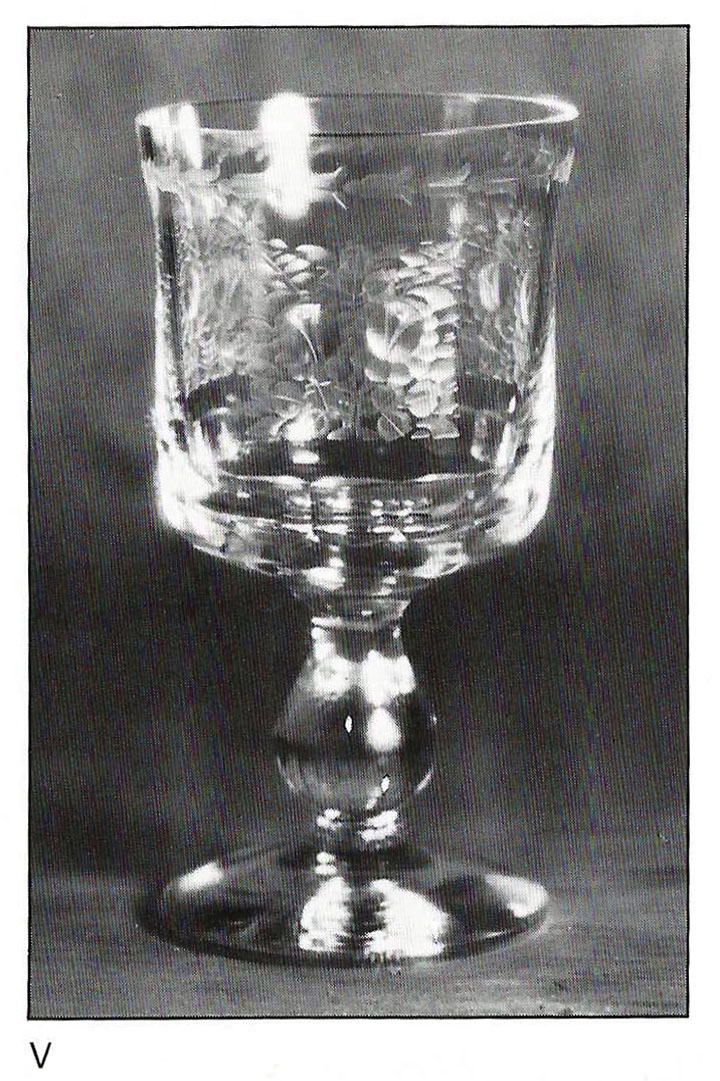 [86_Imagon_05s.jpg] |
“Fig. V: The core image combined with that produced by the marginal rays at H 9.5, with the marginal apertures open. The highlight edges are still slightly jagged. For optimum rendering of the glass the illumination should be softer.” | 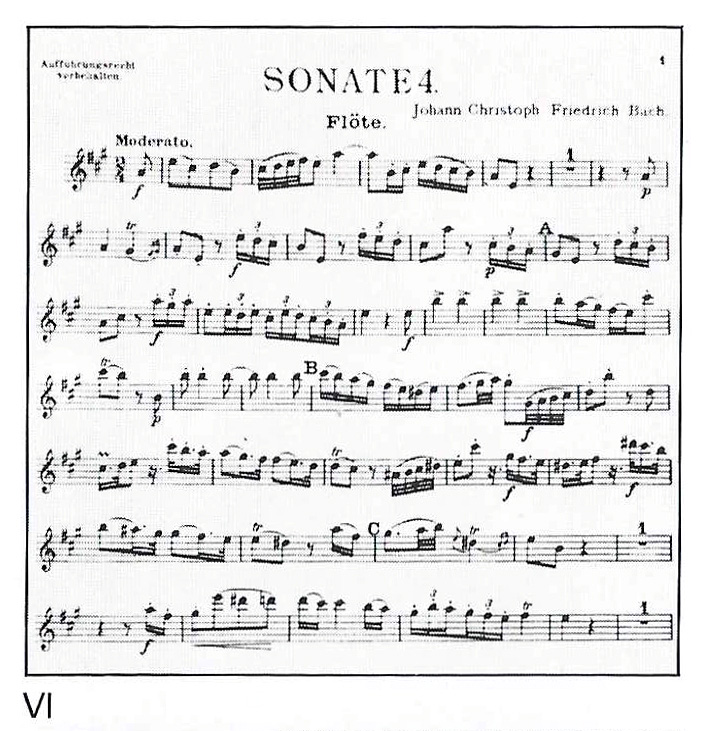 [86_Imagon_06s.jpg] |
“Fig. VI:
Sheet music reproduction. The field is
excellently flat. Aperture H 11.5” |
 [86_Imagon_07s.jpg] |
“Fig.
VII: Aperture H / 4.5. The camera
standards were tilted for maximum sharpness in
depth. Even at this small aperture, the
back lighting still yields a soft sunny
luminosity.” [They must have intended to say, “Even at this large aperture”.] |
 [86_Imagon_08s.jpg] |
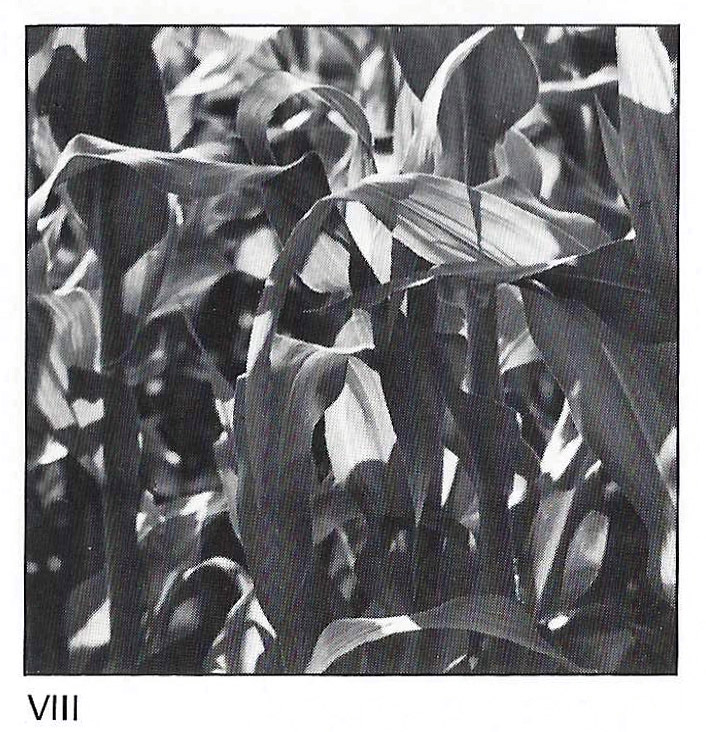
“Fig. VIII: Aperture H 11.5 reproduces clear detail without excessive harshness.” |  [86_Imagon_09s.jpg] |
“Fig. IX: Aperture H 7.7.” |
 [86_Imagon_10s.jpg] |
“Fig. X:
Portraiture, aperture H 9.5.” This is surely what the Imagon lenses were most famous for: glamorous portraiture. We notice in passing that Rodenstock has reproduced this image in square format, such as would have been obtained with the Pentacon Six. This image is slightly larger than the previous four, so clicking on it a second time will enlarge it a little more on most browsers, although in reality only enough to reveal more clearly the limitations of the half-tone printing quality in this small brochure. However, it does permit us to see why these lenses were so loved by some leading professional photographers. |
For an excellent, detailed report on Imagon lenses, see PhotoDeal Issue 68. This substantial article reproduces all 16 pages of a Rodenstock Imagon brochure from the 1930s.
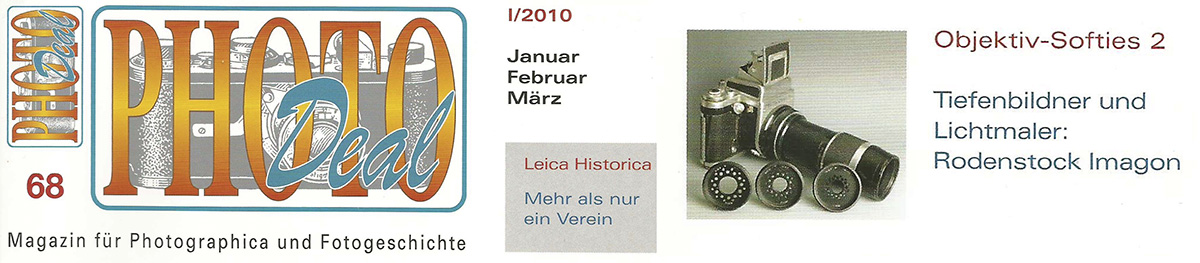
Composite image of parts of the front cover of the magazine referred to
[PhotoDeal_68_Imagon_s.jpg]