by TRA
Stitching Images to get a Wider View
Whether using the Pentacon Six or any
other camera, it has always been possible to shoot a
series of pictures and join together the prints in order
to obtain a wider view. I first did this as a
teenager with a cheap camera, joining five square images
from a cheap 6 × 6 camera, in order to produce a
panoramic result. The problem at that time was
that my black & white film was processed by a lab,
and they did not print all five images to the same
density, resulting in differences of brightness between
the shots, even though they were all shot with the same
camera settings.
It subsequently became possible for me to
avoid these problems by processing my own films and
printing my own prints with an enlarger.
That was a fixed-lens camera, and with a
camera that takes interchangeable lenses, it is
generally possible to switch to a wider-angle lens –
subject to the availability of such a lens and our
ability to pay for it.
This is, however, not a total solution,
and as wider and wider lenses become available (at a
cost!), we become more and more aware of the distortion
introduced by wide-angle lenses.
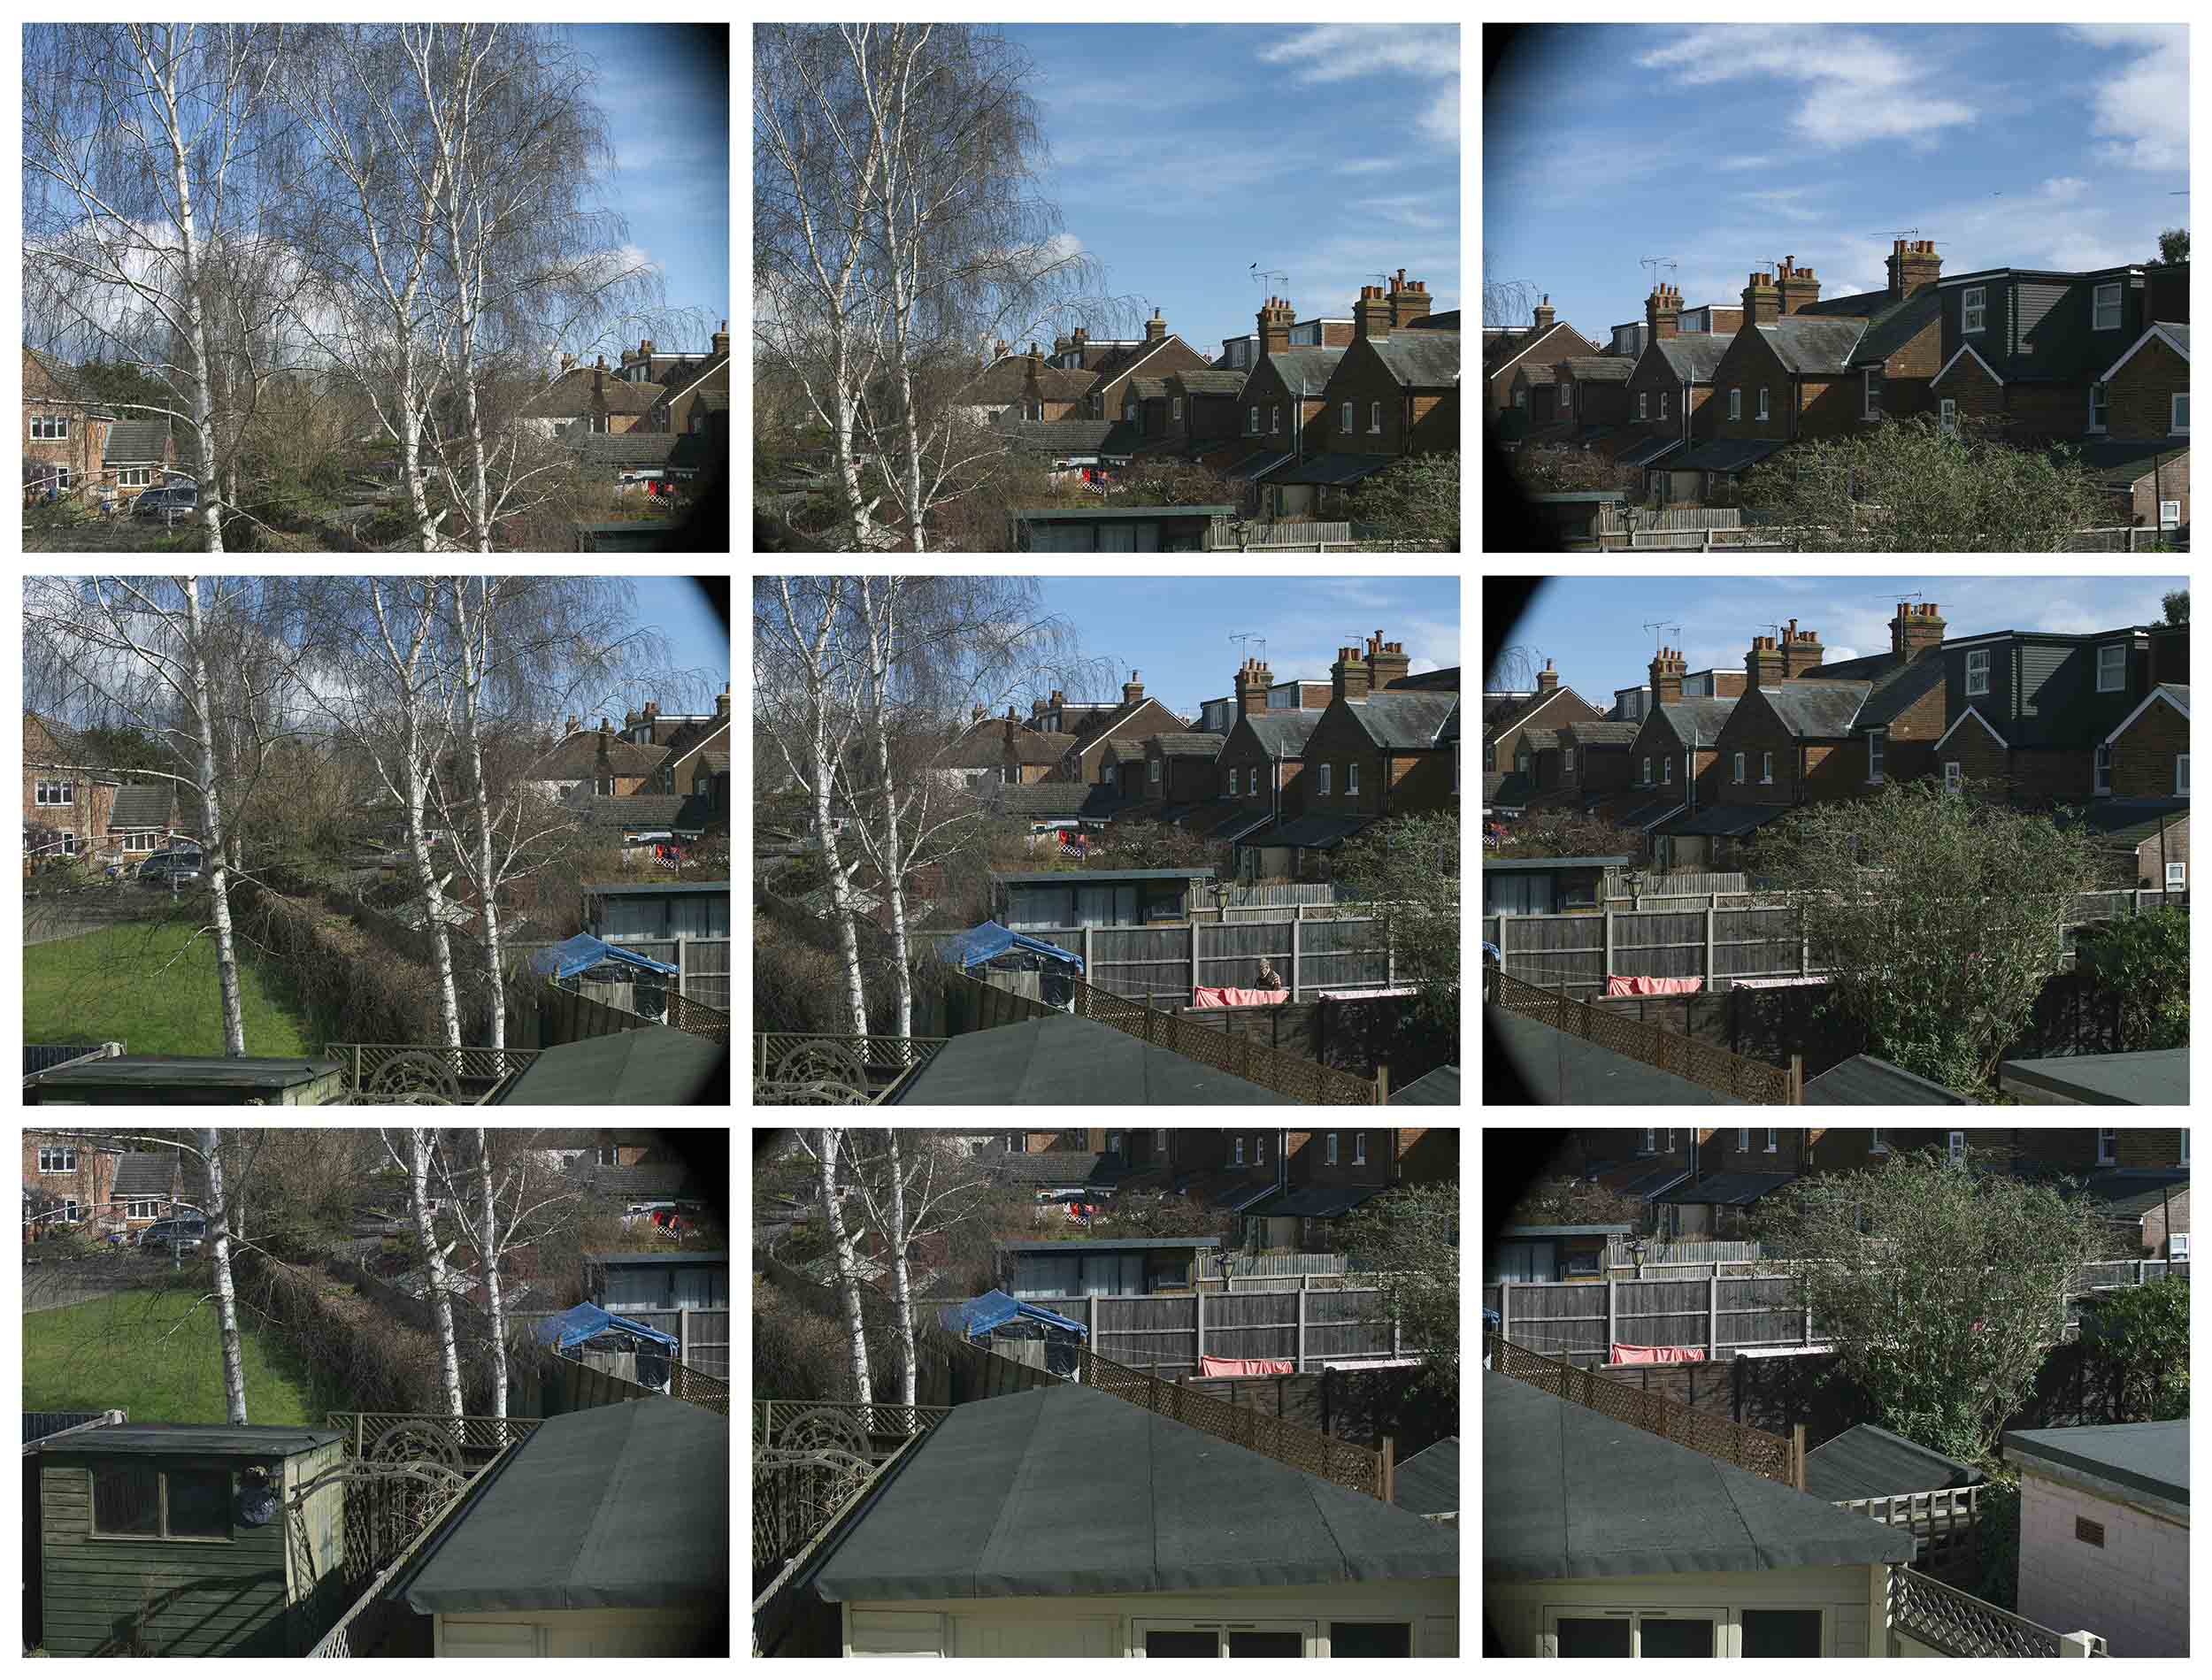
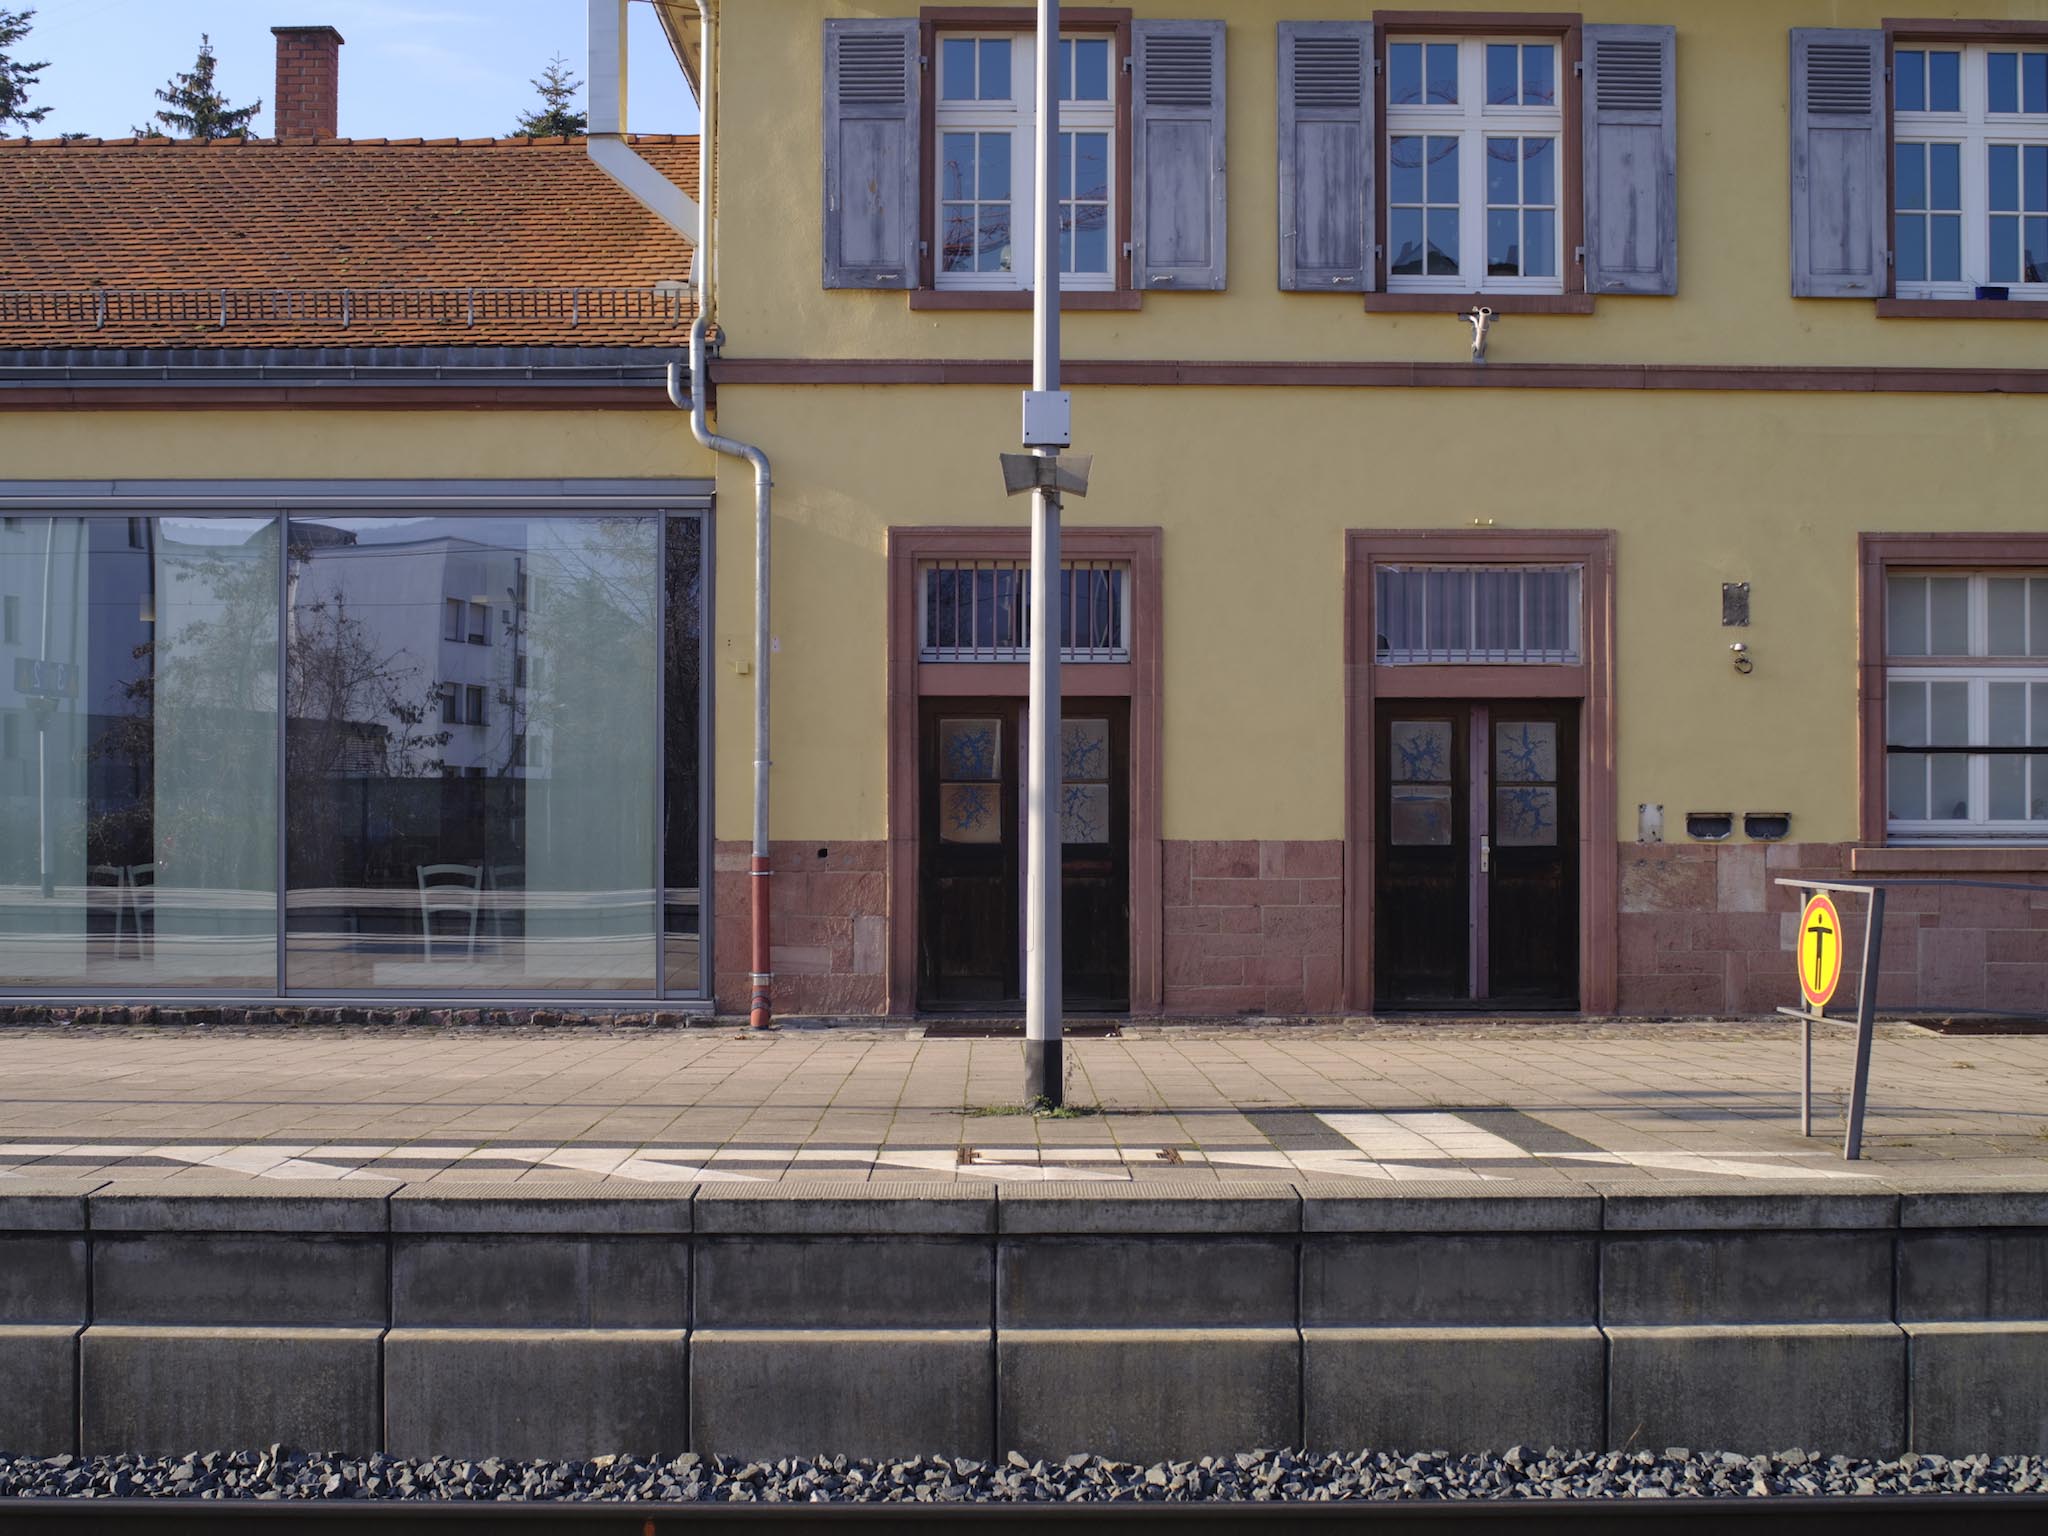
By taking and then joining together multiple images with a “standard” lens such as the Carl Zeiss 80mm Biometar, we can get wide-angle images without the distortion introduced by many wide-angle lenses. In fact, we can even get panoramic images from a long lens, as the following example shows.
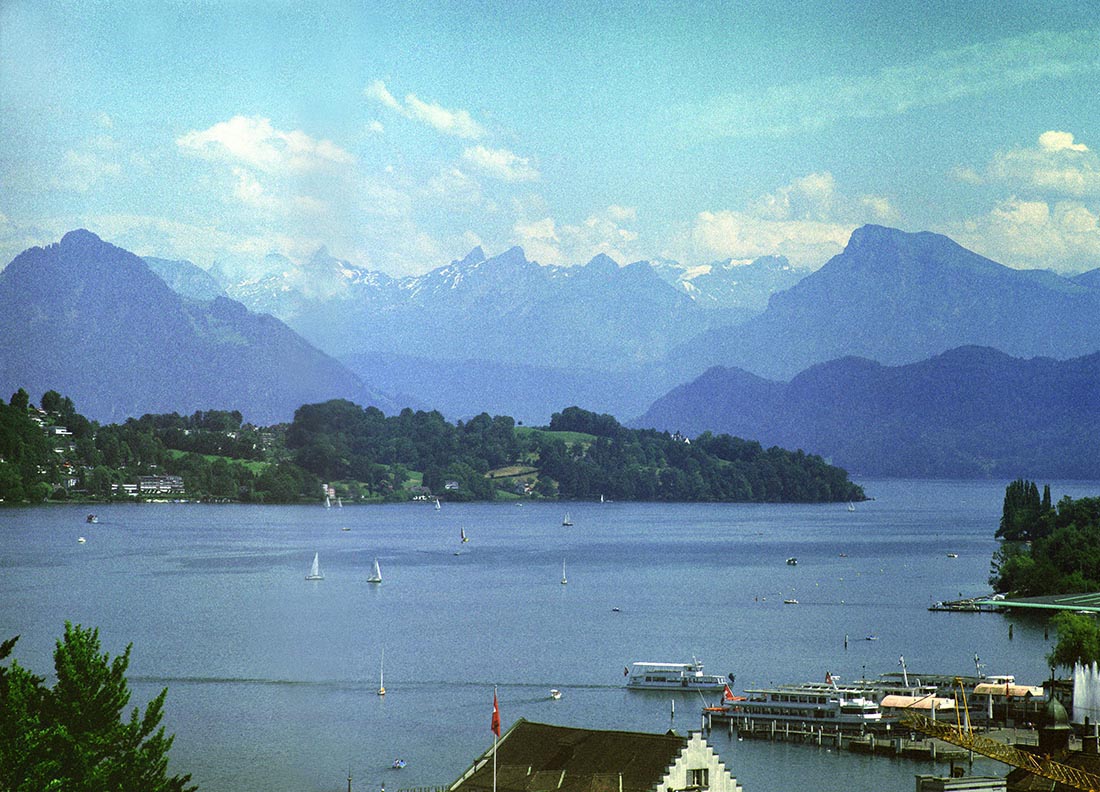 This image of Luzern in Switzerland was shot from the city wall in July 2008, using a Pentacon Six with a 250mm f/5.6 Arsat lens at f/19 with a shutter speed of 1/250 sec. Film was Fuji NPS160. It is technically not problem-free, but as a proof of concept, it does show what is possible. It was scanned on a Minolta Dimage Scan Multi PRO with Minolta software at 4800 dpi. At this scanning resolution, each original image would be approximately 88cm high × 88cm wide, printed at 300 dpi. The camera was hand-held and gently panned between the two shots, resulting in slight variation in the vertical angle of the camera. The two images were manually joined by me in the version of Photoshop that I had at the time, and then marginally trimmed top and bottom to compensate for the change of vertical angle. The stitched image was 399.4 Megapixels in size in Photoshop and at 300 dpi a print would have been 117.9 cm wide (that’s over a metre wide!) × 84.88 cm high. [C458_9&10_s.jpg] |
Stitching images on the computer enables
all signs of the joins to be avoided or
eliminated. For an extreme example of shooting
pictures hand-held for stitching on the computer, I
recommend Christopher Leggett’s video “120 Gigabyte
Image DAS” on YouTube, here: https://www.youtube.com/watch?v=jT3v4PGoO20
Shifting the
lens to produce images for stitching
The above examples do not use a shift lens, but we have already indicated (here and here) that by shifting the lens it is possible to produce images with a wider view.
The user of the Pentacon Six has many
shift lenses available. See for instance here and here.
Generally, these lenses can be used to
reduce or eliminate distortion, especially with tall
buildings. However, by shifting a lens in various
directions, we can if we wish combine far more than two
images and end up with a much larger image that still
has very high resolution.
Using Medium
Format lenses shifted on smaller-format film or
sensors
| Lenses designed for
use on the Pentacon Six produce sharp images that
are at least 79mm in diameter, as this is the
diagonal dimension of 6×6 images. The image
projected by any lens covers what is sometimes
called an “image circle”, as in fact a circular
image is projected, even though we only use a
rectangle that fits within that circle. See
here. If we use a medium format lens on
a 35mm SLR or on a digital camera that takes
interchangeable lenses, the amount of
shift available to us is enormous,
hence the value of the Hartblei shift adapters
described here. We can even use lenses for the Pentacon Six shifted on Medium Format digital cameras, such as the Fujifilm GFX series, in which the sensor size is 43.8 × 32.9mm. And of course, given the availability of suitable adapters, we can use lenses from other medium format cameras, such as those produced by Mamiya for their RB67 and RZ67 cameras. |
|
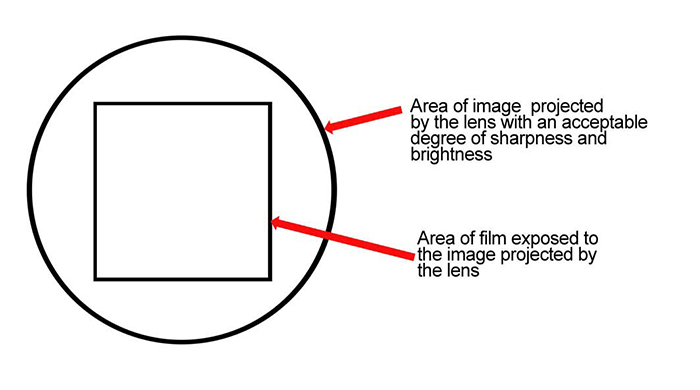 [image_circle_s.jpg]
|
Image
circles
I am grateful to Hartblei for the
following diagram on image circles, which I have
modified slightly.

Click on the image to see a larger version of it.
[Shift_Summary_2_s.jpg]
The results of my initial tests of
Pentacon Six lenses on the Fujifilm GFX 50S, using the
Hartblei shift and tilt adapters, can be seen here.
“Tiles” for
Panoramic Images
1. Images to be joined must overlap. Some people suggest an overlap of one third of the outer edges of the tile. Experience will show what works best in any given setup.
2. Images must have the same exposure. So do not change the aperture between shots, and if the camera being used has an “auto” shutter speed option, turn this off and set a manual shutter speed.
3. If you are using a digital camera that offers “auto white balance”, turn this off, so that all images have the same colour.
Beyond this, the layout of the tiles depends on the format and size designed for the final image.
If shooting on a rectangular film or sensor format (as opposed to the square format of the Pentacon Six), counter-intuitively, for a horizontal panorama maximum resolution may easily be obtained by turning the camera to vertical and shooting an appropriate number of vertical images, with suitable overlapping. Perhaps five images would produce a good result.
Risks of
Distortion when Panning the Camera
Do bear in mind that in such cases,
the sort of distortion can occur that is often seen
with swing-lens cameras such as the Horizont/Horizon
202 or the Noblex, or with panoramic images
captured as a series of individual images obtained by
panning the camera or telephone, with the images being
stitched together on the telephone or on some cameras!
In these, the centre of the final image
is nearer to the camera (or telephone) than the sides,
so one obtains a sort of horizontal “barrel” effect in
which the portion of the subject in the centre of the
final image is larger that the portions at the sides.
The Paleis Noordeinde in The Hague, Holland
Horizon 202 camera 200 ASA film 1/125 f/11,
showing clear barrel distortion
[C354_2627.jpg]
So when using a swing-lens camera, or
swinging the camera or telephone lens manually in front
of a wide building and taking a series of images
distortion will result. By careful composition,
this can be reduced or avoided. See, for example,
this image from the swing-lens Horizon 202.
Choristers’ Close, Wells 18.7.1998 Fuji S-100 film 1/125
f/5.6
[C246_13.jpg]
Also, when an image contains
a clear horizon, whether in a landscape or a seascape,
if the horizon does not pass through the middle of the
image, the horizon will appear to be bent: up at
the ends if the horizon is below the mid point of the
image, down at the ends if it is above the mid
point. See the following two images.
Salisbury Cathedral Horizon
202 Konica 200 ASA film 28.7.2002 1/250 f/16
Sometimes images with this sort of distortion can be
corrected to some extent in programs such as PTGUI,
but it is better and much easier to start with an
original that does not display this sort of problem.
[C324_12.jpg]
On the “Red Eagle” (a Red Funnel Ferry) to the Isle of Wight. Kodak Gold 200 film 1/250 f/11 27.7.1999
The exposure variation for which some Horizon 202 cameras were well known can be observed at both sides of this picture,
as the exposure was controlled by the rotation speed of the lens, which was sometimes not constant across the whole of its travel.
[C259_22A.jpg]
Other Tiling
Layouts
When using a shift lens on a shift
adapter, a wide range of layouts is possible.
Subject to adequate coverage by the lens, the shift of
the lens and the adapter can be combined to achieve
greater shift. For instance, the 20mm shift on the
Mamiya 67 75mm shift lens plus the 12mm shift on the
Hartblei Mamiya to Fujifilm GFX adapter results in a
massive possible shift of 32mm, and as both the
lens and the Hartblei adapter can be rotated, this shift
can be in virtually any direction.
Alternatively, in a simpler layout, one
component (for instance, the lens) can be used for
sideways shift and the other (for instance, the shift
adapter) for vertical shift. If the aim is for a
final horizontal image, with this combination it could
be best to use the 20mm shift (left and
right) of the Mamiya lens for horizontal shift and the
12mm shift (up and down, or even
diagonally!) of the Hartblei adapter for vertical shift.
As an example, 3
× 3 is a possible configuration. We look at this
in more detail below.
When images are shot with a shift lens, the camera is normally mounted on a tripod and the lens is shifted in the desired direction. However, this can lead to problems. Imagine shooting a cityscape, and there are some newly-planted spindly trees in the foreground. Their presence in the composition can enhance the impression of depth in the final image. But as one shifts the lens to the left and the right, the position of the trees in relation to the buildings behind them changes: they mask different parts of the buildings. This can result in severe problems when stitching the component images.
It is better not to shift the lens, but to shift the camera that is behind the lens. Then the relationship between the trees and the buildings behind them will not change.
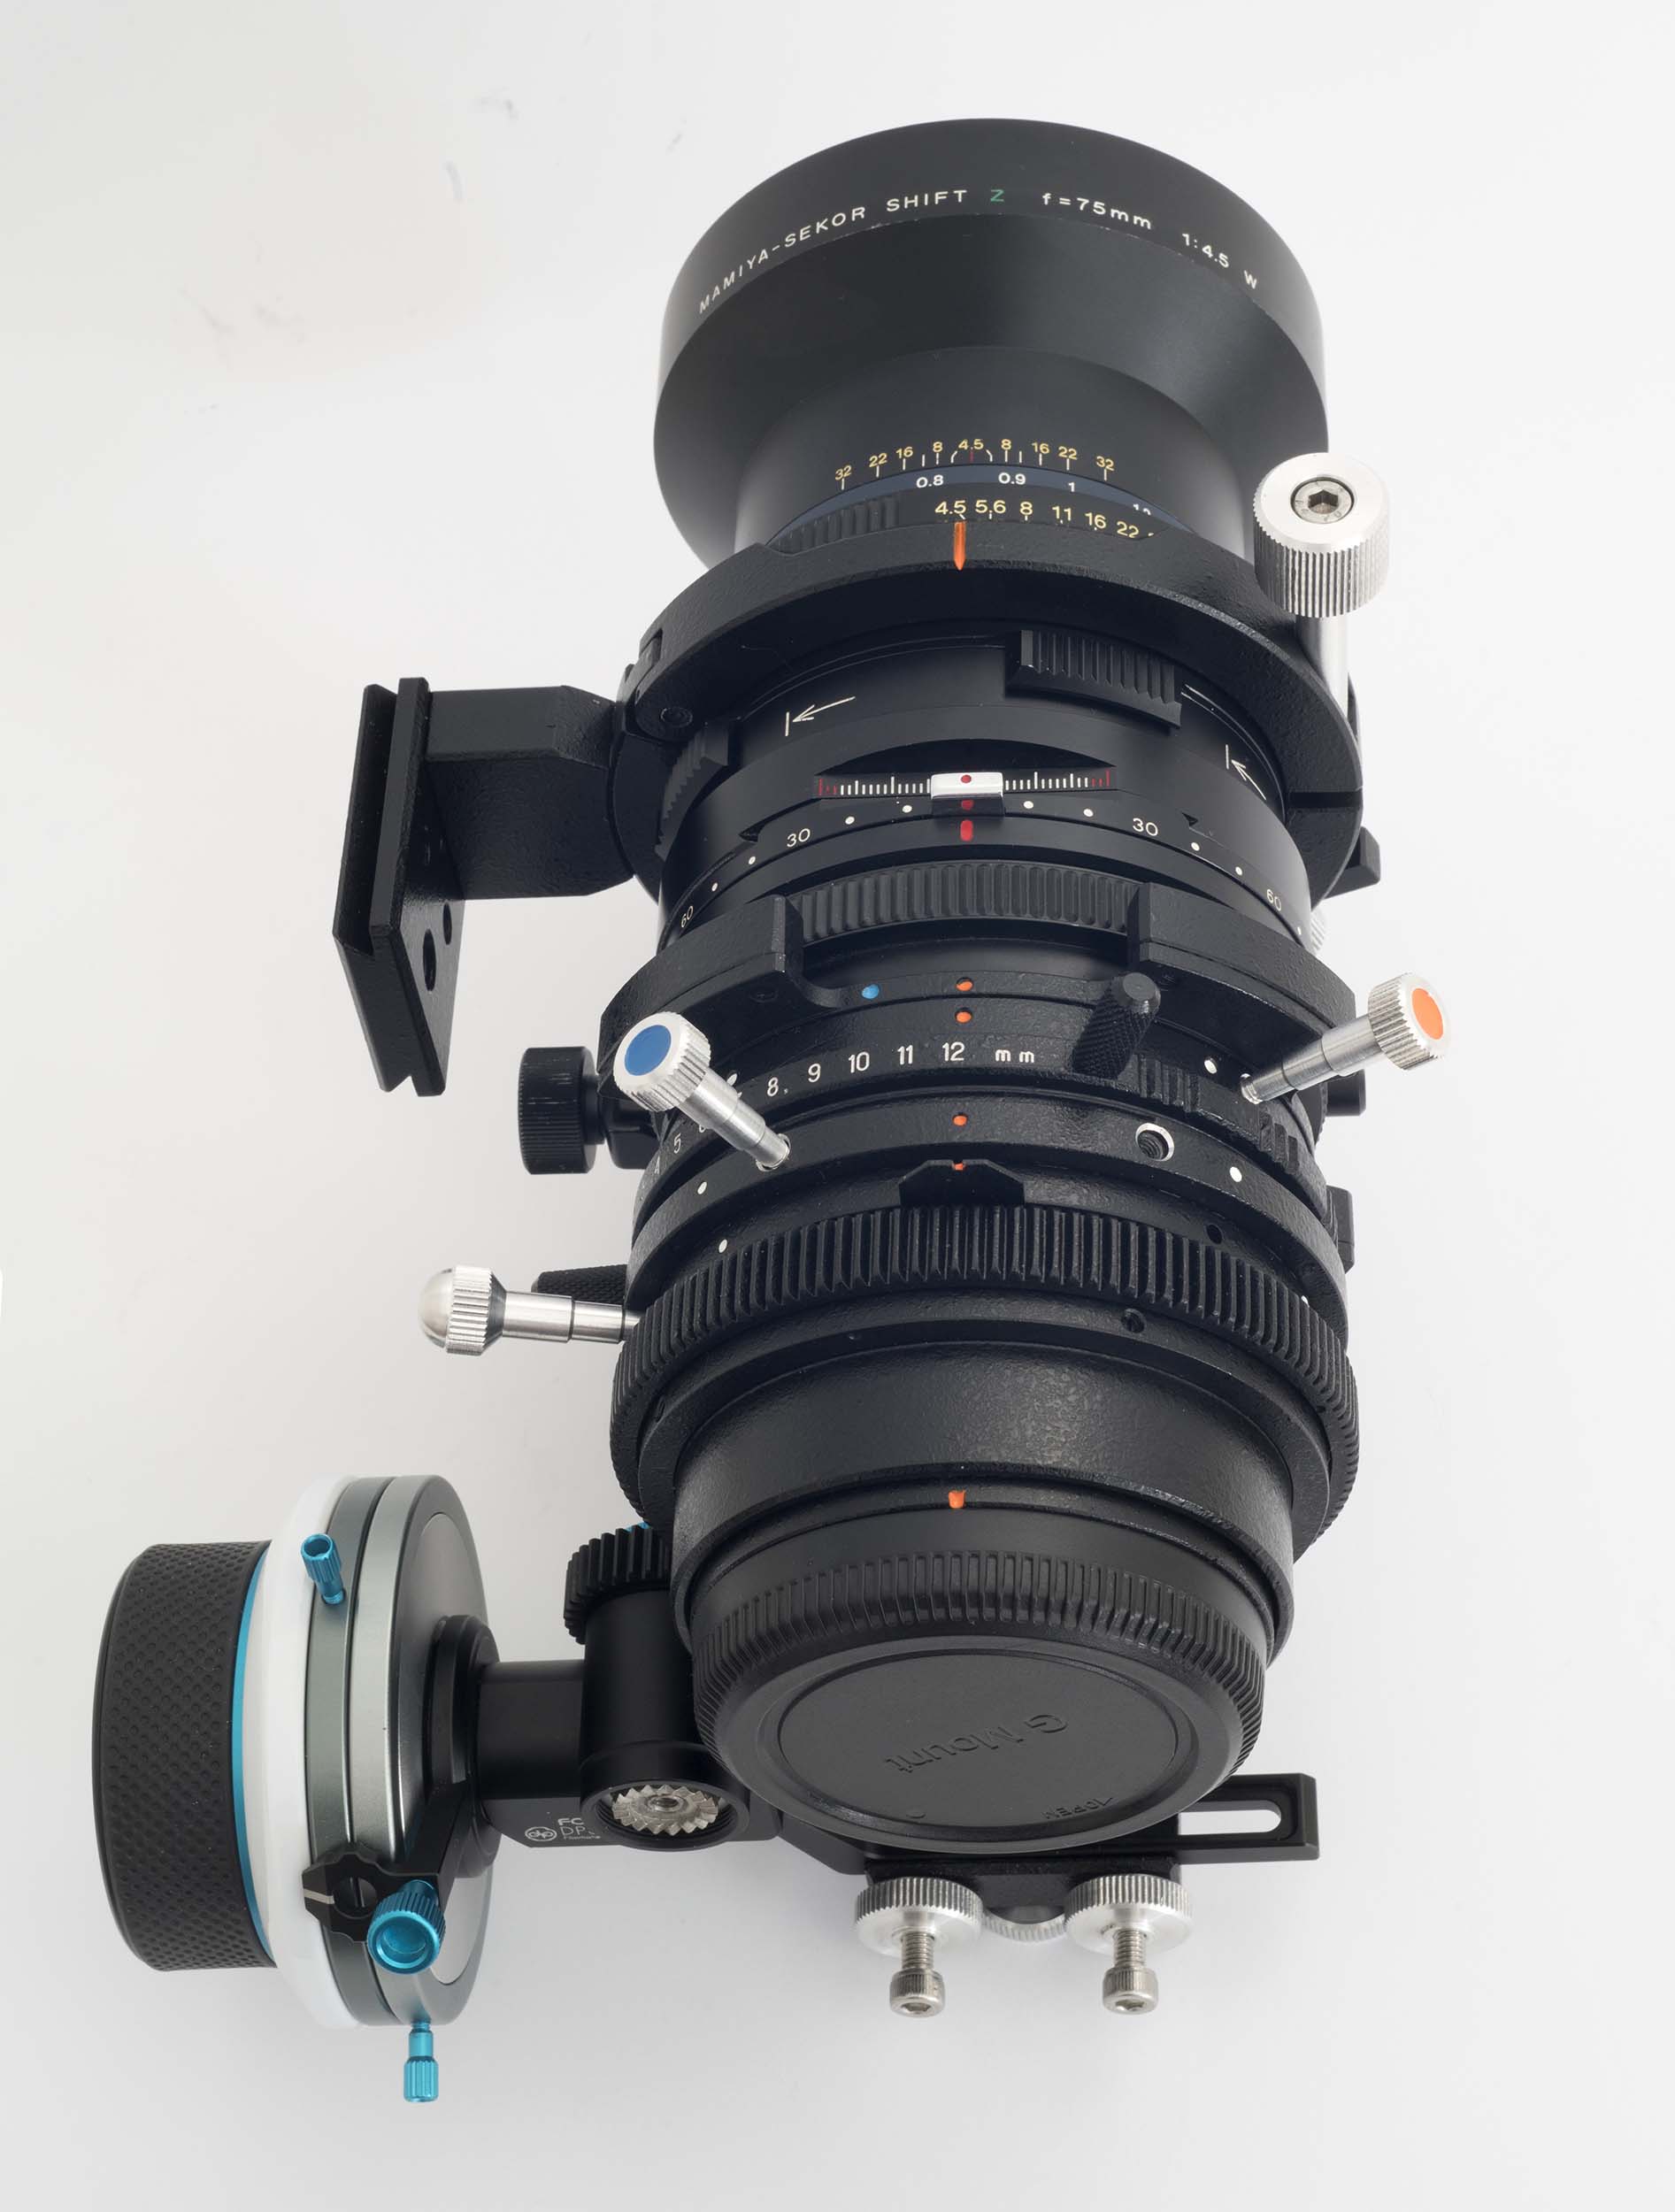
To do this, it is not the camera that needs to be mounted on the tripod but the lens. And if the lens is a shift lens, it is the part of the lens in front of the shift mechanism that needs to be mounted on the tripod. The lenses used for panoramic shots are not usually long; they are generally wide-angle, and wide angle lenses are not supplied with a tripod mount. The solution is to add to the lens a collar that contains a tripod mount, and this collar needs to be mounted near the front of the lens, forward of the shift mechanism. Such a mount is called a “Parallax-Free Mount” and this is what Hartblei has made. In fact, in their latest version of the parallax-free lens collar tripod mount for the Mamiya RZ67 75mm Shift lens there are two tripod mounts, at 90° to each other, so that the lens can easily be mounted on a tripod for horizontal or for vertical shifts of the lens.
 Parallax-Free
collar on Mamiya RZ67 75mm Shift lens.
[75mmShift_paral_free_mnt_01_s.jpg] |
|
In this image a
second Hartblei “Arca Swiss” compatible “Quick
Release” tripod mount has been added to the side
of the lens collar, at 90° to the one at the
base. A further “Arca Swiss” compatible “Quick Release” plate has been temporarily added to the Hartblei “Arca Swiss” compatible “Quick Release” tripod mount at the base of the tripod collar (here resting on coins in order to balance the outfit for the purpose of taking this photograph). Click on this image to see a larger version of it. |
For Mamiya RB/RZ67 lenses that do not have a built-in shift, the Parallax-Free Collar is not needed, as there is on the Hartblei adapter another Parallax-Free Mount (!!), further back on the adapter, but forward of the Hartblei adapter's own shift mechanism. This is very sophisticated.
Parallax-Free collar on Mamiya
RZ67 75mm Shift lens.
In
this image the second Hartblei “Arca Swiss”
compatible “Quick Release” tripod mount has
been removed from the side of the lens
collar. (Compare with the image above.)The further “Arca Swiss” compatible “Quick Release” plate remains on the Hartblei “Arca Swiss” compatible “Quick Release” tripod mount at the base of the tripod collar (here resting on coins in order to balance the outfit). [75mmShift_paral_free_mnt_02_s.jpg]
|
|
 Here with the 50mm ULD lens mounted on the Hartblei adapter, an alternative Hartblei Parallax-Free tripod bracket has been added to the tab that projects below the lens mount on the adapter, with a long forward-pointing “Arca Swiss” compatible “Quick Release” tripod mount foot. The clearance between the back of this “L-shaped” bracket and the front of the base of the standard version of the Fotga Fast Focus mount behind it is about 1mm, enough to enable the different components to be rotated independently when required. The heads of two chrome bolts can be see on the side of the lens. These hold in place on the lens a clever Hartblei Depth of Field bracket that maintains the lens aperture stopped down at the chosen value, to avoid the need to be holding the camera during the exposure, as this could introduce movement, reducing the sharpness of the image. For more information on this see here (about 2/3 way down the page).
[50mmULD_paral_free_mnt_s.jpg]
|
| Click on these images to see larger versions of them. | ||
Results that are Possible
 A 3 by 3
composition
[Stitch_components_s.jpg]
|
|
Here is a test with
the Mamiya 67 75mm shift lens in the Hartblei
focussing and shift adapter illustrated
above. Here I have gone for a 3 by 3
composition with considerable overlaps. The
full 20mm left and right shifts of the Mamiya lens
have been used, while the Hartblei adapter was
shifted 12mm up for the top row and 12mm down for
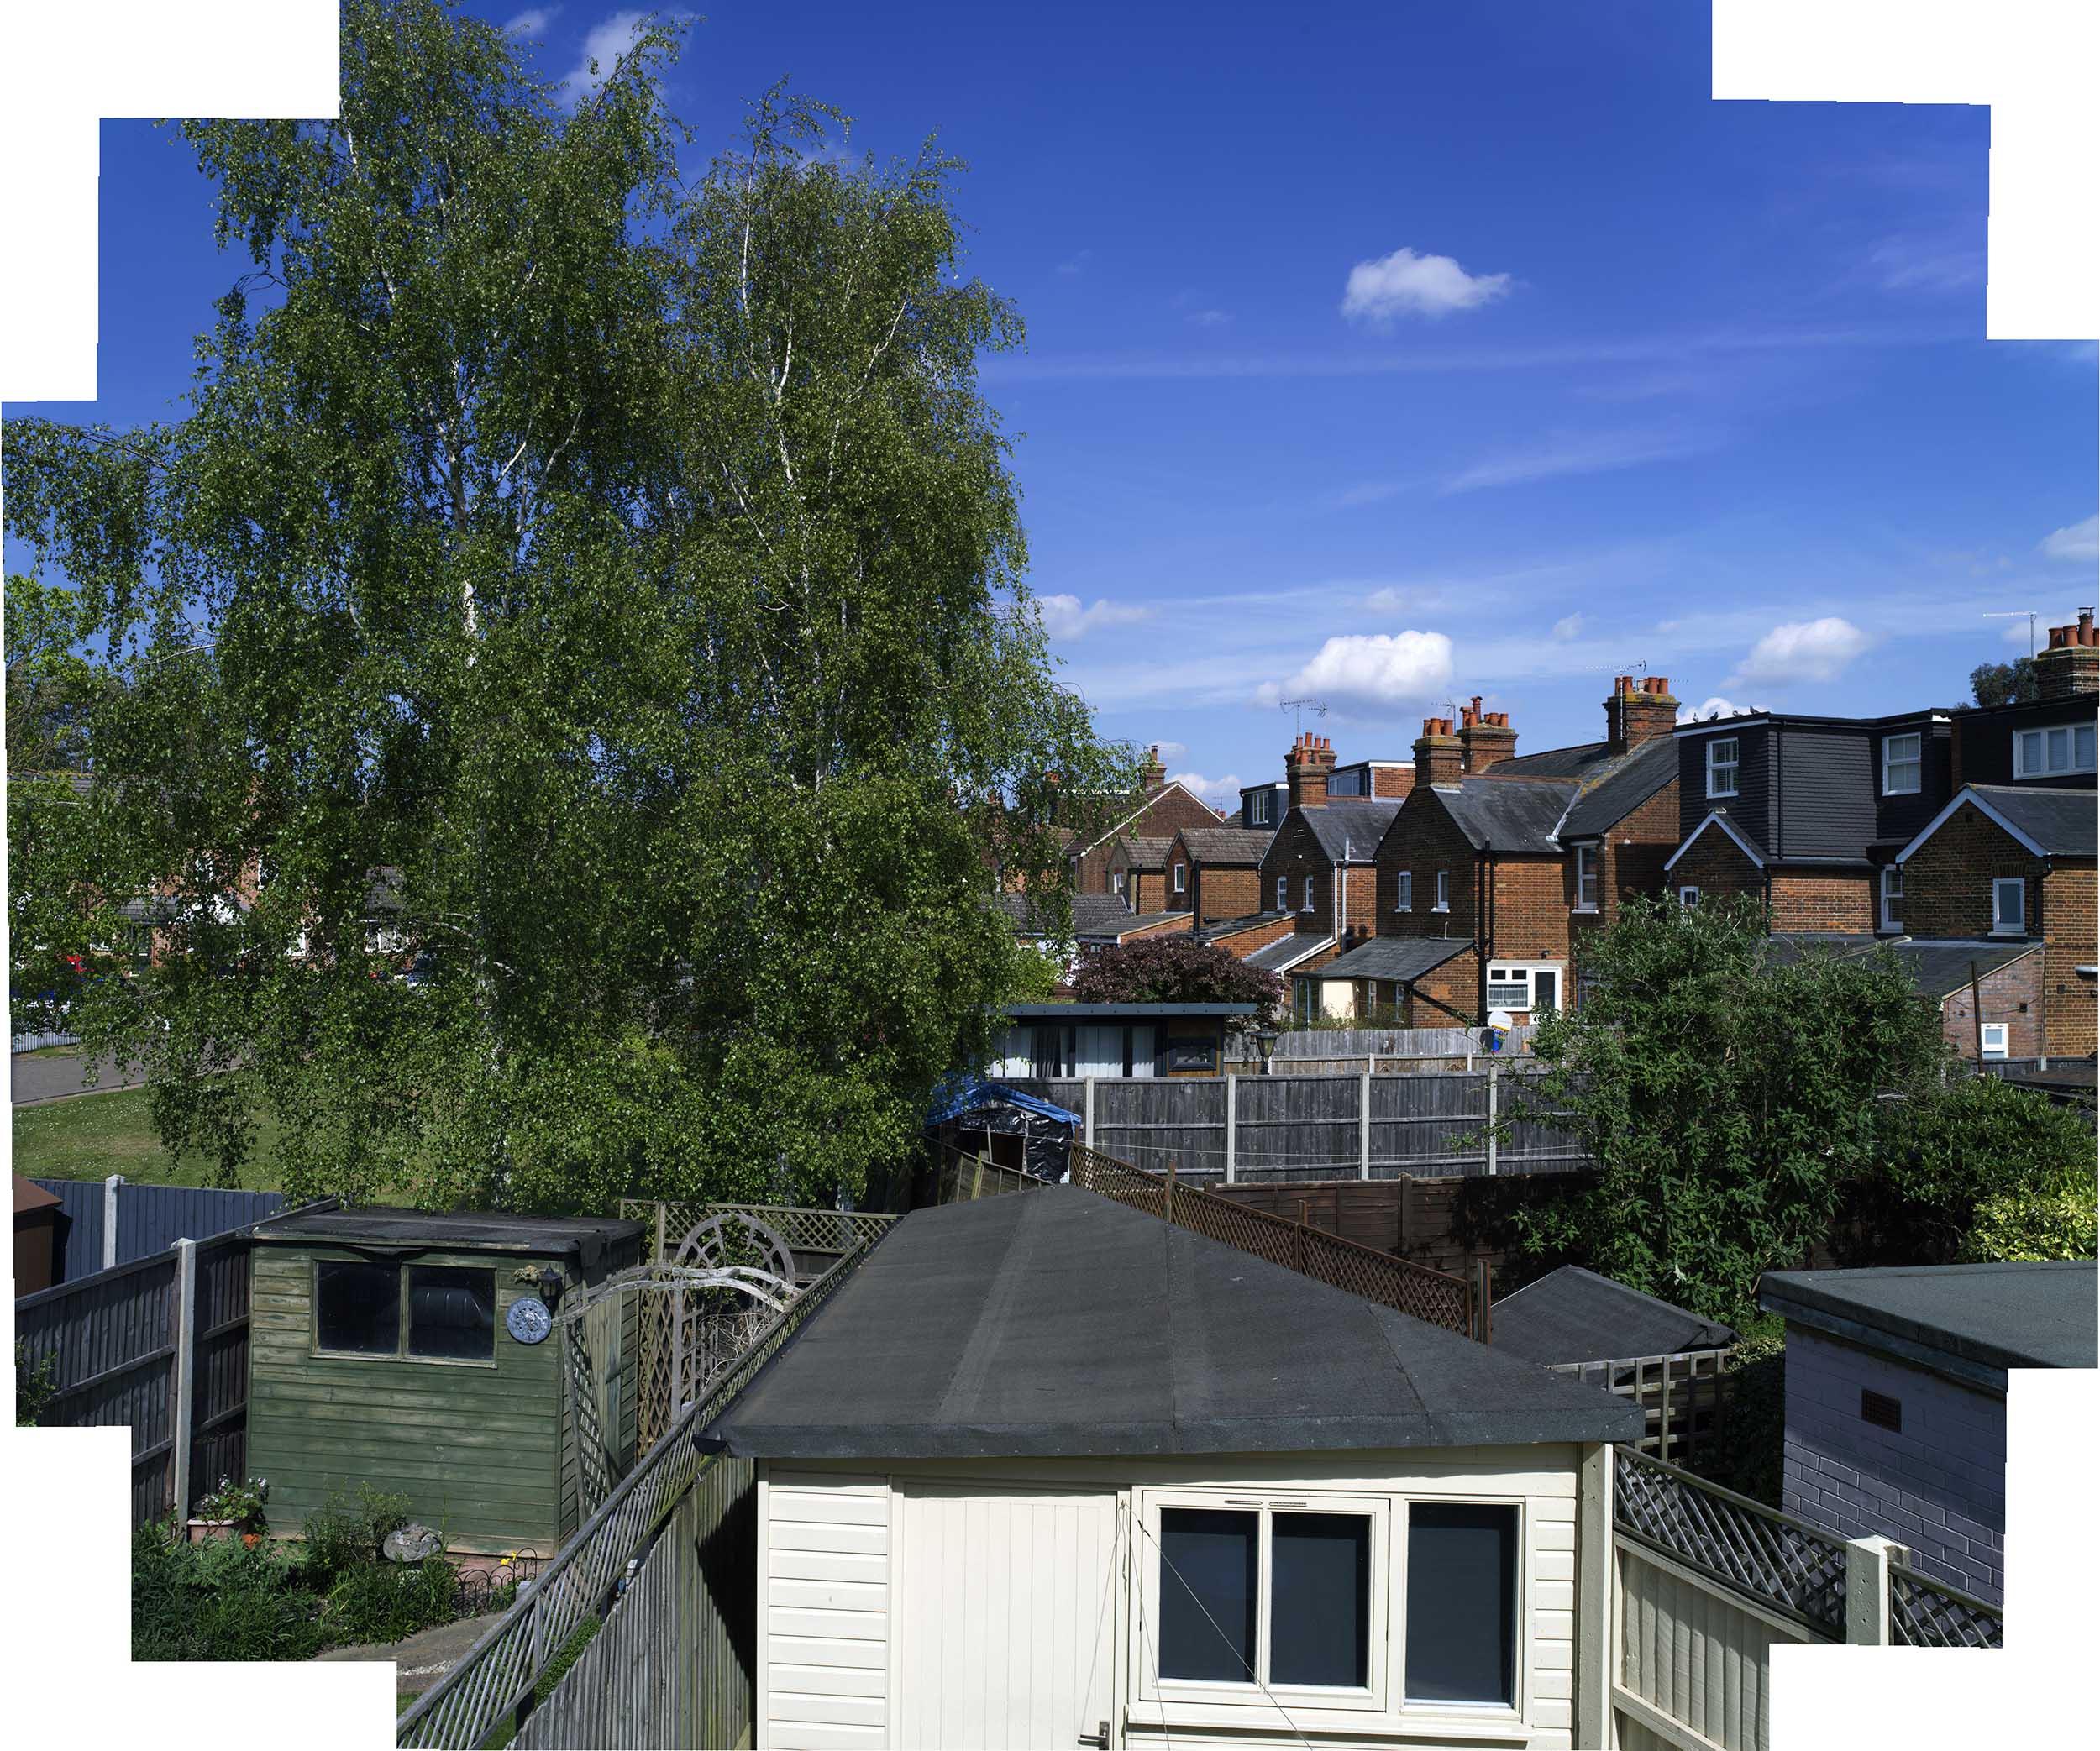
the bottom row. Mamiya marks shifts beyond 17mm on this lens with red lines, so I initially thought that perhaps I should have only shifted 17mm, which would have reduced or perhaps eliminated the vignetting of the images in the first column and the final column. However, Hartblei informs me that “the vignetting is only caused by the adapter (starting from 20 mm shift and >f8) and not by the lens. The vignetting always appears on the opposite side to shift movements. Therefore, it is totally irrelevant because it can be easily compensated by an unshifted or less shifted image.” Hartblei have also explained to me that the 17mm limitation only affects the original 6×7 image on the Mamiya RZ67 camera and only at 45° diagonal shift, as stated in the original Mamiya lens manual (on page 5). In any case, as can be seen from the image circle diagram above, even at 45° 20mm shift, the GFX sensor is still inside of the image circle. Indeed, as Hartblei state, the stitching software should take the image information from the frames that have detail, and not use the vignetted areas. My old (2013) version of Photoshop (bought new from Adobe at that time) did not do a good job with this. I am told that the current version of Photoshop does a much better job. My old version of Photoshop also does not recognise Fujifilm .RAF files, so I converted them first to TIFFS for stitching in Photoshop. I then re-stitched these nine images in Serif’s Affinity Photo, this time using the original raw files, which Affinity Photo does recognise. The result was much better, although not perfect. See below. In a subsequent test with other images, Photoshop did a better job and Affinity Photo generated garbage, so it is worth testing with both programs and/or other programs. In Photoshop, use File, Automate, then select Photomerge. In the dialogue box that opens, it is suggested that Auto is chosen, at least initially. Browse to find the constituent images. Tick Blend Images Together and Vignette Removal, then click OK. Click on this image to see it larger. |
 Composite
stitched image from the above nine shots
Click on the image here to see it larger. [Aff_Photo_from_RAW_s.jpg]
|
|
Here is the stitched
image that Affinity Photo produced from raw.
It has on the whole done an excellent job, but I
can see two problems:
Affinity Photo also offers to fill in the gaps round the edges of the composite image (a sort of “content-aware fill”), and it reportedly can do a good job with the sky but is generally less successful with more complex components of an image. The height difference from left to right, visible at the top and the bottom of the image, must be an indication that the tripod was not totally level, an error that is easy to correct in the future. |
 The edited and
cropped image
[Aff_Photo_from_RAW_edit_s.jpg]
Click on the image to see it larger (but nowhere near full size!!) |
|
Here we have
corrected the stitching errors and reduced (but
not yet totally eliminated!) the dark patch in the
sky, after which we cropped as little as possible
in order to produce a rectangular image. It is interesting to note that the area covered by this composite image is equivalent to that obtained with a 40mm medium format wide angle lens – but without any wide-angle distortion, and with a resolution way beyond the already extremely high limits of this high quality digital camera. See the chart below on equivalent focal lengths achieved when taking multiple images for stitching. Image Resolution and File Size The resolution of one image taken with the Fujifilm GFX 50S is a little over 51 megapixels, which is massive by digital standards. If we had used the Fujifilm GFX 100, we could have achieved a single image with a resolution a little over 102 megapixels. But the TIFF version of this composite image, before cropping, has a file size of 502.5 Megapixels, being 15,799 pixels wide by 11,117 pixels high. The cropped Photoshop version of the image (reproduced here as a jpeg) has a file size of 457.7 Megapixels, being 15,468 pixels wide by 10,342 pixels high. So two of these images will occupy a little over 1 Gigabyte on the hard disk before editing and only a little under this after cropping. |
|||
The largest sensor available currently (in April 2022) in a digital stills camera seems to be the 53 × 40mm sensor that can be found in two cameras. The Hasselblad H6D – 100C creates image files of “just” 100 megapixels, with multiples of this resolution available with some multi-shot systems. This camera is available from various photographic retailers in the U.K. for £31,080 in April 2022. It is not surprising that they offer loans to potential purchasers. The other camera with a sensor this size is the Phase One XF IQ4, which creates 150 megapixel images. Dpreview describes this as “the largest digital sensor format in large-scale production”. See here. (Accessed on 8.4.22.) Phase One XF and XT IQ4 cameras have a range of prices apparently “from £24,080.00 to £42,260.00” (plus tax), according to London-based Teamwork (viewed on 8.4.22.). A Google search on 8.4.22 generated this response: “Phase One, a specialist in medium-format cameras, has designed the XT IQ4 field system especially for landscape photography. It costs $58,990, which buys you the camera and the 32 mm F/4 lens, and there's a new 90 mm F/5.6 lens available for just under $13,000 more.” (This statement was dated 23 Jan 2021, and it was not linked to any website.) Yet with the Mamiya RZ67 75mm shift lens and this Hartblei adapter we can obtain the equivalent of a larger sensor size and a much higher resolution image, and at a fraction of the cost. |
|||||
Equivalent
focal lengths achieved when taking multiple
images for stitching
Taking multiple
images for stitching results in an angle of view
equivalent to that obtained with a lens of much
shorter focal length. As
indicated above, taking a series of images for
stitching with the Mamiya RZ67 75mm Shift lens
results in an image coverage equal to that which
would be obtained with a 40mm lens, but without
any of the distortion that wide-angle lenses can
introduce. Bear in mind that in 6×6
format a 40mm lens covers approximately the
same area as a 22mm lens on a 35mm “full
frame” camera. For more
information on focal lengths on 35mm cameras
equivalent to focal lengths on the Pentacon Six,
see here.
The following
chart from Hartblei summarises some equivalent
focal lengths for various formats, when using
the 12mm shift possibilities of the Hartblei
adapter and the shift possibilities of shift
lenses.
| Lens |
Shift used |
Image size |
Direction of shift
with GFX Camera in horizontal orientation |
Image Circle |
Focal length
Equivalent on GFX |
Focal length
Equivalent on FF |
Angle of View GFX |
Angle of View
Panorama |
Angle of View 6×6/6×7 |
|
| CZ
Distagon 40 mm |
12 mm |
68 × 33 mm |
Horizontal |
90 mm |
29.1 mm |
22.9 mm |
69° |
86.7° |
89.3° |
|
| Arsat 55
mm shift |
12 mm |
68 × 33 mm |
Horizontal |
104 mm |
40 mm |
31.5 mm |
53.1° |
69° |
71.4° |
|
| (equivalent to Super-Angulon 55mm) | 24 mm1 |
92 × 33 mm |
Horizontal |
104 mm |
30.9 mm |
24.4 mm |
53.1° |
83.2° |
71.4° |
|
| Mamiya
Sekor 75 mm SHIFT |
32mm2 |
97 × 44 mm |
Vertical |
124 mm |
38.7 mm |
30.5 mm |
40.3° |
70.8° |
60.4° |
|
| Mamiya
Sekor 75 mm SHIFT |
32mm |
108 × 33 mm |
Horizontal |
124 mm |
36.5 mm |
28.8 mm |
73.9° |
60.4° |
||
| Mamiya
Sekor 75 mm SHIFT |
20 mm |
84 × 57 mm3 |
Vertical |
124 mm |
40.6 mm |
32 mm |
68.2° |
60.4° |
||
| Mamiya
Sekor 75 mm SHIFT |
32 mm |
65 × 44 mm |
Vertical |
124 mm |
52.6 mm |
41.4 mm |
55.2° |
60.4° |
||
| Mamiya
Sekor 50 mm ULD |
12 mm |
68 × 33 mm |
Horizontal |
95 mm |
36.4 mm |
28.6 mm |
57.6° |
74.2° |
82.3° |
|
| Mamiya
Sekor 50 mm ULD |
12 mm |
57 × 44 mm |
Vertical |
95 mm |
38.2 mm |
30.1 mm |
57.6° |
71.5° |
82.3° |
|
Chart courtesy of
Hartblei
Notes
1 The 12mm shift of the lens + the
12mm shift of the adapter, when used in the same
direction
2 The 20mm shift of the lens + the
12mm shift of the adapter, when used in the same
direction
3 Camera vertical with lens shift
20mm to left and to right (44 + 20 + 20 = 84mm)
and with adapter shift up and down (33 + 12 + 12
= 57mm)
We note that when
we use the Mamiya RZ67 50mm ULD lens with the
shift potential of the Hartblei adapter, we
can obtain image coverage equivalent to that
obtained when using a lens with a focal length
of approximately 30mm on a 35mm (“full frame”)
camera.
When we combine the shift
potential of the Mamiya RZ 67 75mm shift lens
with the shift potential of the Hartblei
adapter, we can even obtain image
coverage equivalent to that
obtained when using a lens with a
focal length of approximately
28.8mm on a 35mm (“full frame”)
camera.
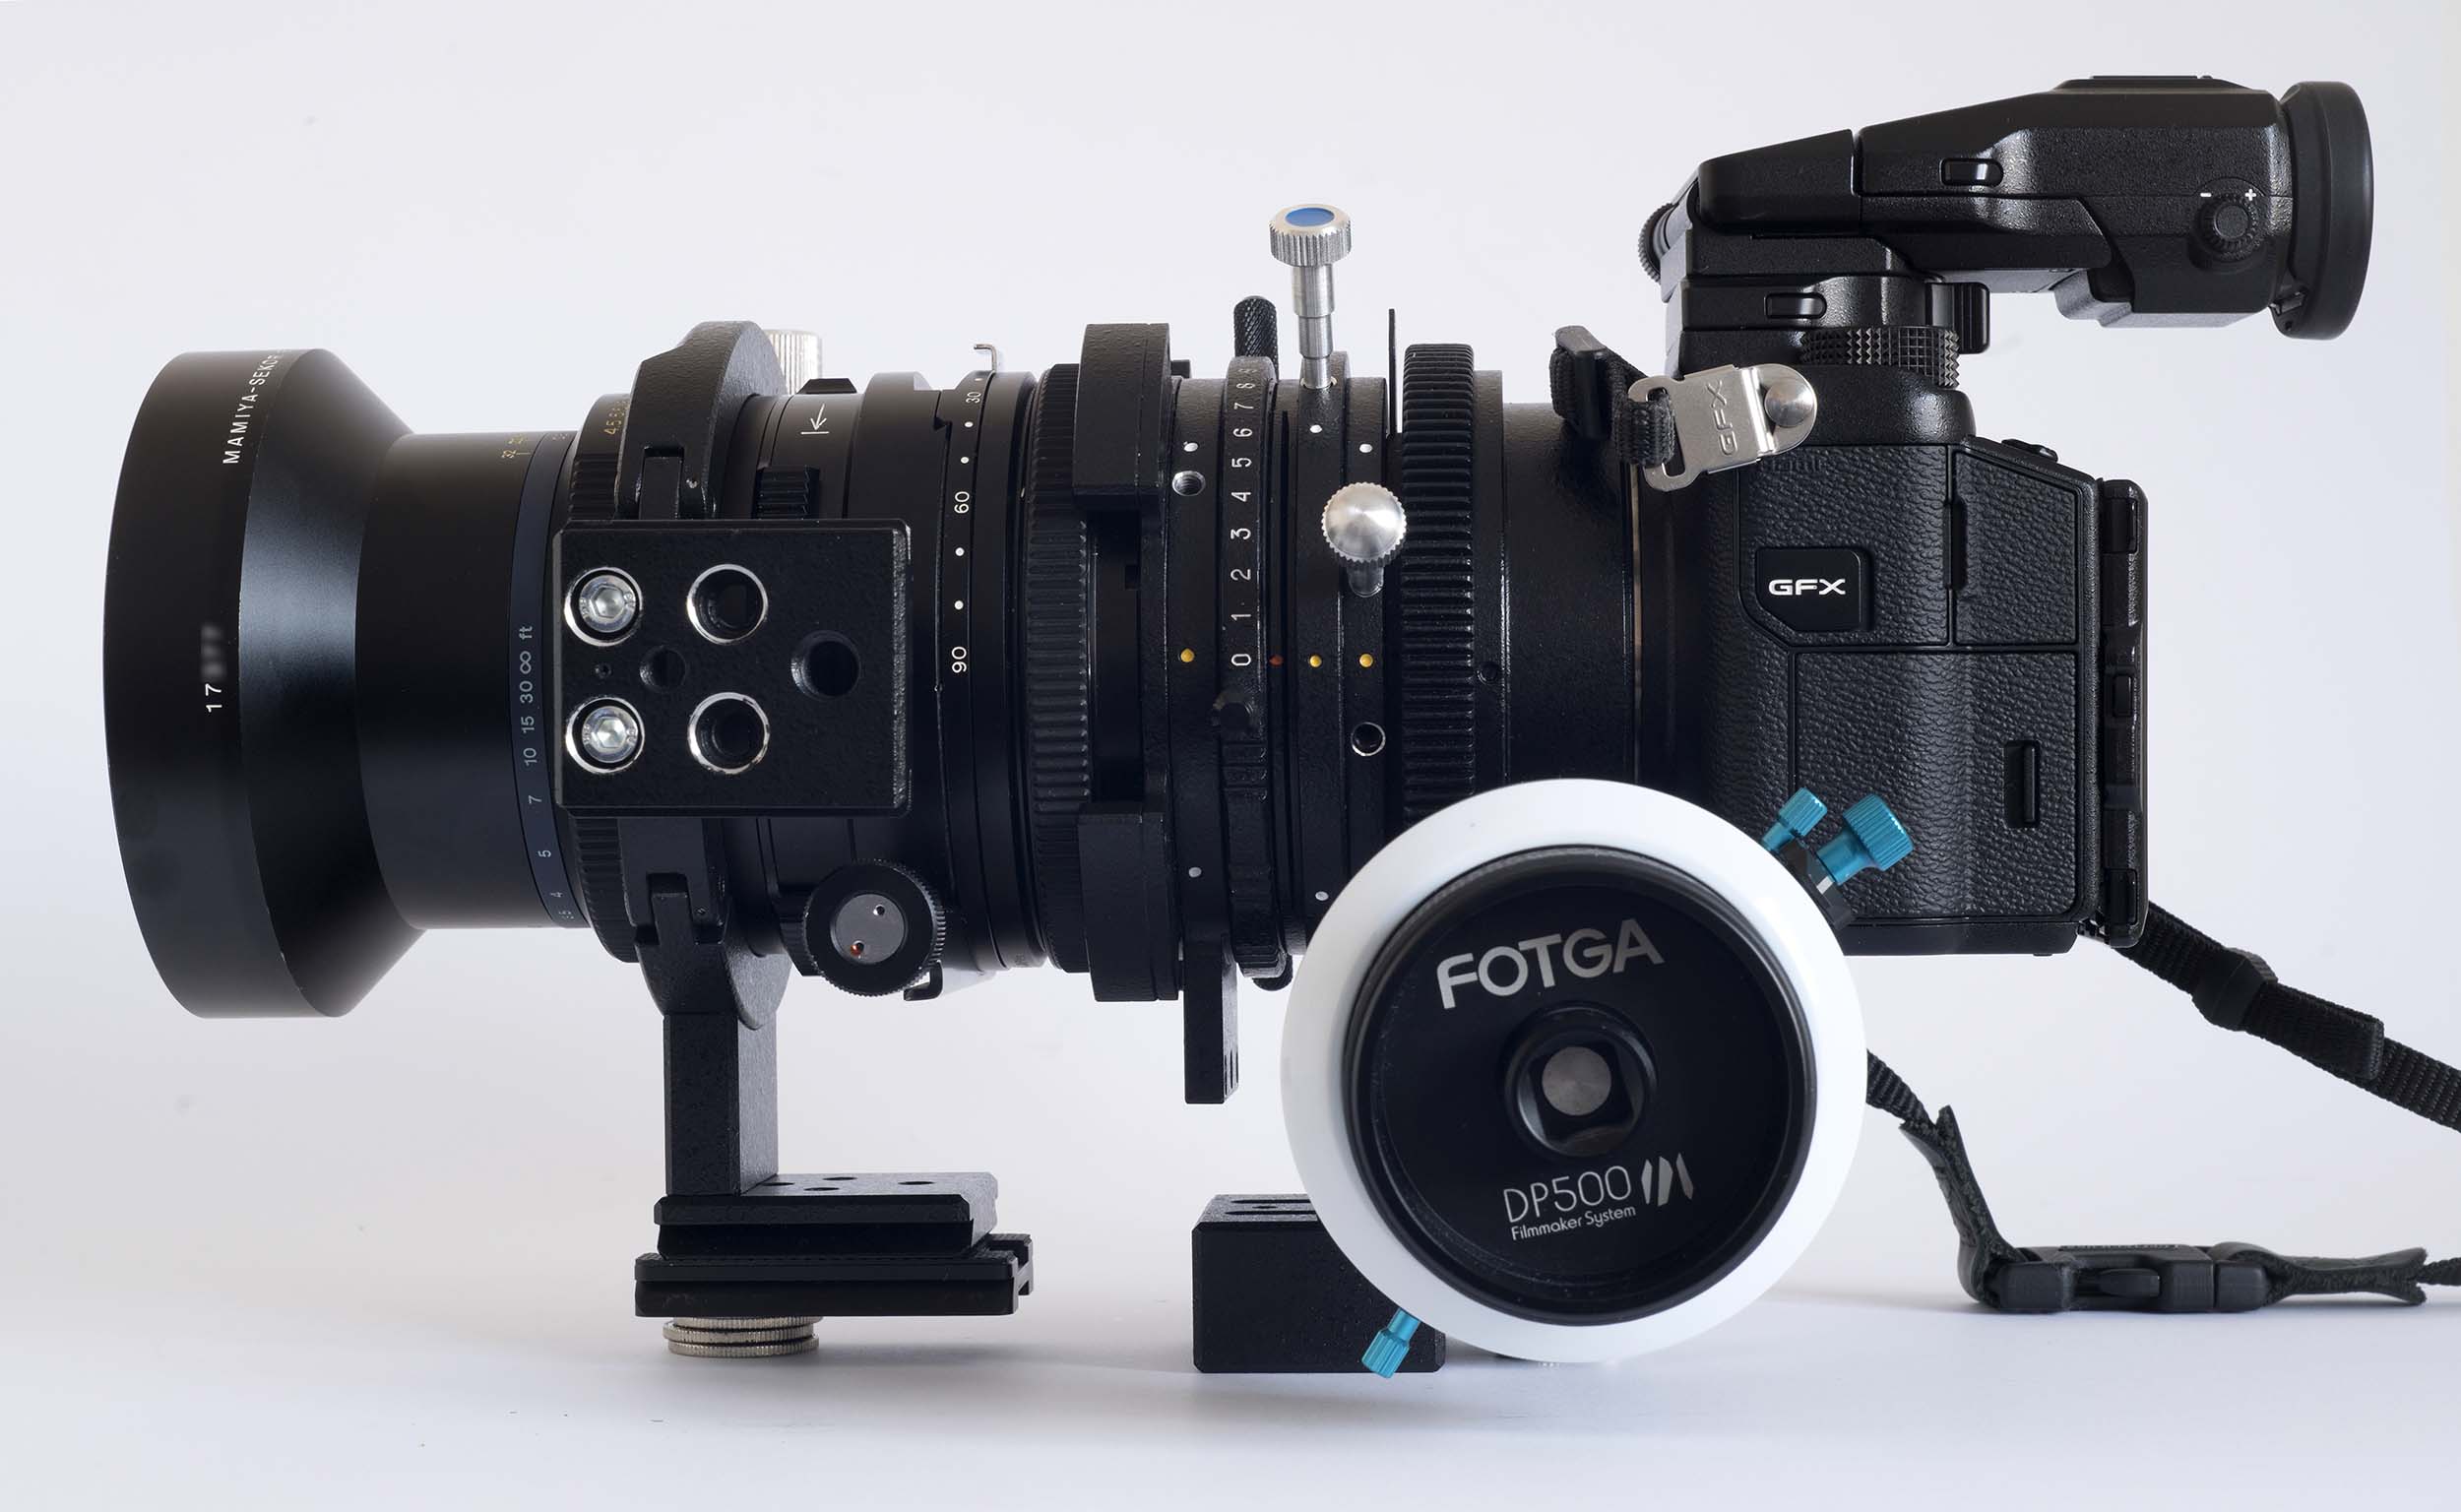
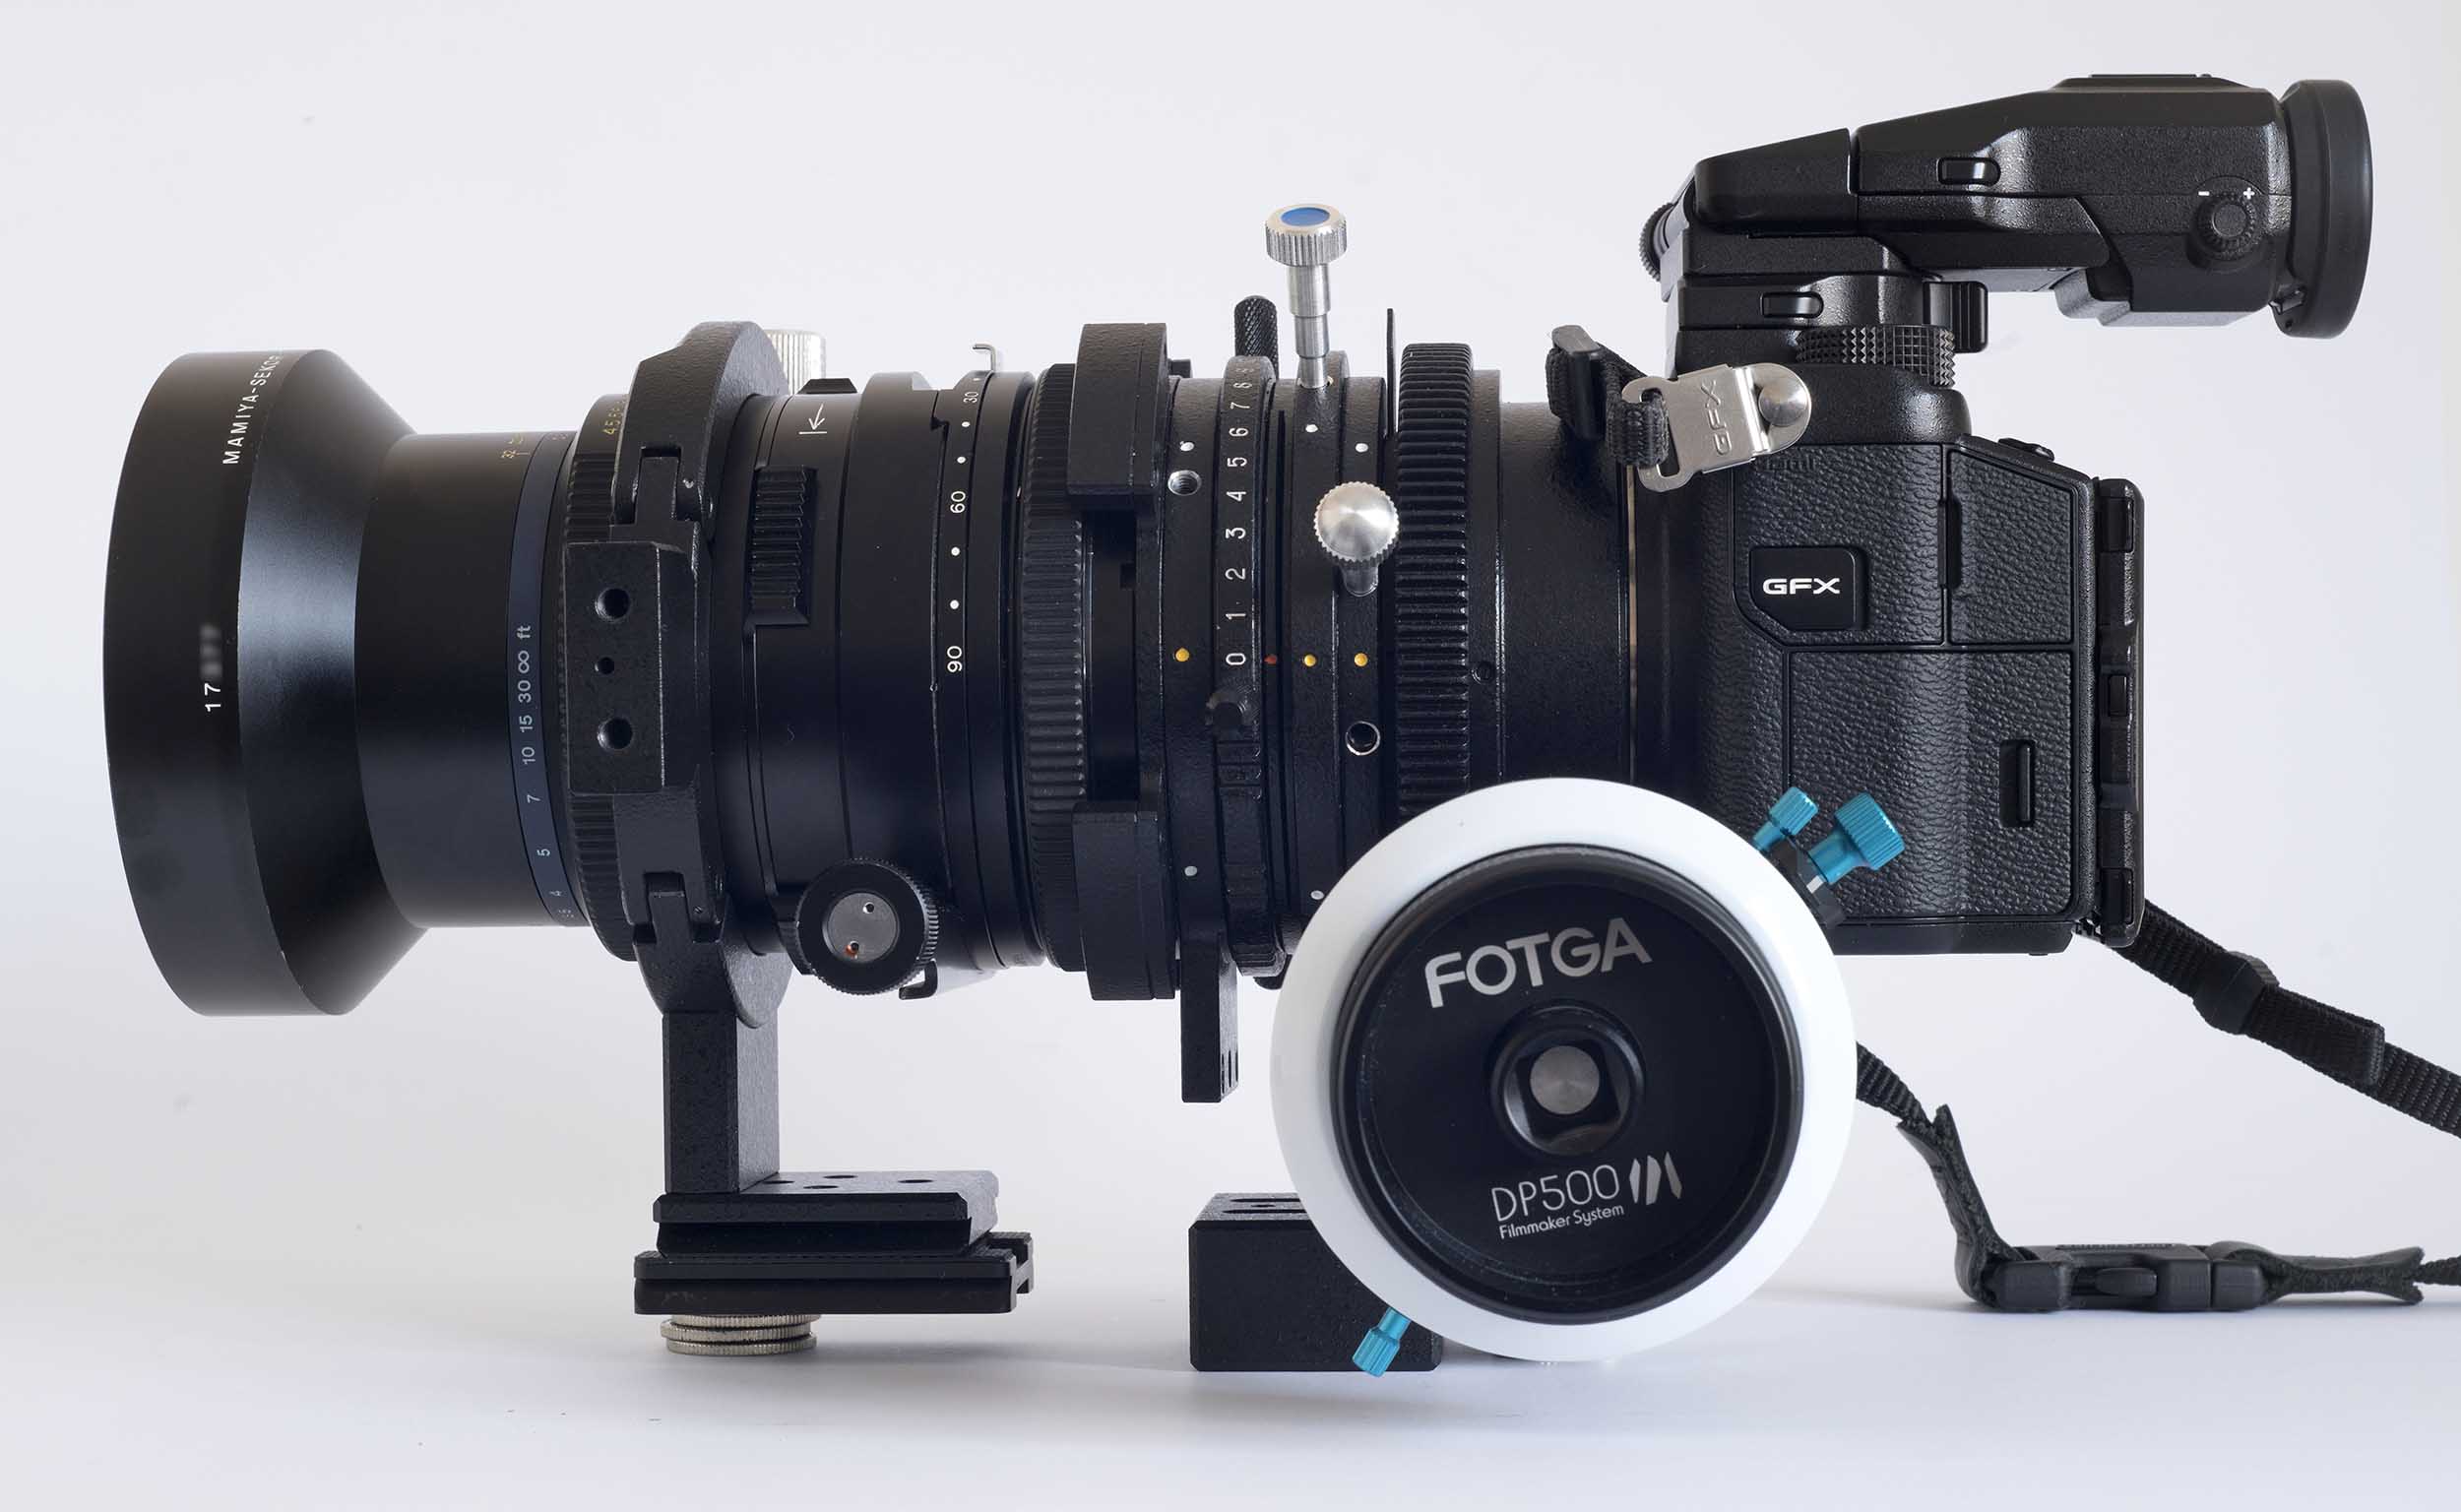
My
setup with the Hartblei Mamiya RB/RZ67 lens to
Fujifilm GFX adapter
| The Hartblei adapter
is rather like a series of tubes, placed one in
front of the other. One of these tubes
contains the focussing mechanism and the camera
mount. Another one contains the shift
mechanism. The front one contains the lens
mount. Each of these tubes can be rotated
individually, making it easy to turn the camera
between horizontal and vertical without changing
the orientation of the lens, with its shift
mechanism, in the case of the 75mm Mamiya RZ67
shift lens. One can also rotate the shift
mechanism of the Hartblei adapter through 360°,
with click détentes at regular intervals. When taking photographs, each tube is locked in place by one or two locking screws. Hartblei provide a large number of locking screws with the unit, and some users decide to use two screws for each rotation point. I have so far found one screw for each rotation point to be sufficient.
|
|
The three
locking screws on my setup
Click on this image to see it larger. [Hartblei_75_setup_s.jpg] |
|||
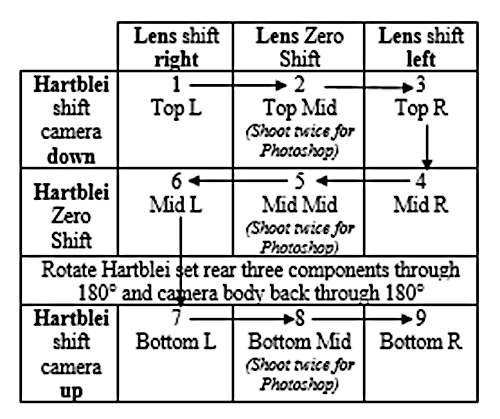
Camera & Lens Movements for shooting 3 × 3 tiles with the Hartblei Module for Mamiya RB/RZ 67 lenses on the Fujifilm GFX camera
|
|
For
a 3 × 3 Dual Axis Shift photo, with the Mamiya
RZ67 75mm shift lens, the shifts shown in the
table below are suggested.
|
||||||||||||||||||||||||||||||||||||
When the lens used does not include shift
When a non-shift lens is used, movements are limited to those offered by the Hartblei adapter. Here we show the maximum coverage that is possible when using the Mamiya RZ67 50mm ULD lens, data for which is included in the above table. The lens can be seen with the Hartblei Depth of Field Bracket here.
 [50ULD_GFX50_01_pano_s.jpg]
|
|
The image to the left
shows the typical maximum coverage when using a
non-shift lens. The Hartblei adapter
provides 12mm shift in any direction and it can be
rotated through 360º, with click stops every
45º. This image consists of ten images: the
unshifted (central) image, then with maximum shift
in all eight peripheral click-stop positions,
followed by a further shot of the central image,
which was not really necessary in order for
Photoshop to generate this stitched result. Obviously, with the four diagonal shift positions the outer edges of the resultant images are not so far from the upright or top/bottom edges of the cental image, resulting in the typical “cross-like” shape of the stitched image. Image-processing software may on some occasions generate an acceptable fill (“content-aware fill” or equivalent) in sky areas, but is unlikely to produce satisfactory results in areas of image detail. The resolution of the Mamiya RZ67 50mm ULD lens is phenomenal, with also a virtually total lack of chromatic aberrations. With the Fujifilm GFX 50S camera, the total file size of the stitched image is also substantial. For this image, I converted the raw “RAF” files of the component images to 16-bit Tiffs, which Photoship then stitched. The resultant file was too big for the standard Photoshop PSD format, which has a maximum size of 2 Gigabytes. I therefore saved it in Photoshop’s PSB format. After making minor adjustments to the raw colour and the brightness range, I reduced the file to 8 bits, which made it possible to save the image in PSD format. Naturally, images have to be massively reduced for hosting on this website. Nevertheless, potential coverage and some idea of image detail is discernable. Click on this image in order to see it larger. |
||||||||||||||||||||||||||||||||||||
For more information on using non-shift lenses with a Hartblei shift adapter, see here. File Sizes
|
||||||||||||||||||||||||||||||||||||||
Alternative solutions for rectangular images
The above “cross-shaped” image format is impressive, but is unlikely to meet all requirements. What other way is it possible to get larger rectangular images with the GFX camera? If enlarging the image in one dimension only is satisfactory, using a Pentacon Six shift lens on the GFX via the “basic” Pentacon Six-GFX adapter (see here) is an easy solution. For more information on shift lenses, see here. Most Pentacon Six shift lenses provide 12mm of shift, and as this can be in any direction (with most of the lenses), it is easy to see that images could be produced that were 24mm (2× 12mm) wider or higher than the basic camera format. Remembering that the best result may sometimes be obtained with the camera vertical, there is a considerable range of possibilities.
Another way to achieve the same result is to use a Pentacon Six non-shift lens on the Hartblei Pentacon Six to GFX shift adapter (illustrated here).
| Remembering that the
size of the Fujifilm GFX sensor is 43.8 × 32.9mm, if we use
the 12mm shift possibility of a Pentacon
Six shift lens in two directions (for
instance, up and down with the camera horizontal),
or the 12mm shift possibility of the
Hartblei shift adapter in two directions
(also up and down with the camera horizontal),
effectively to widen the narrower dimension
of the GFX sensor, we create an effective
sensor size equivalent to 43.8mm × 56.9mm, which
is rounded in the above chart to 57 × 44mm, larger
than the Phase One sensor size of 53 × 40mm (see above), for
less than a tenth of the cost, when we add the cost
of a Pentacon Six shift lens or a Hartblei
shift adapter to our existing GFX camera and
Pentacon Six non-shift lenses. With
these shift movements to widen the effective
narrower dimension of the GFX sensor, the
camera can of course be held in horizontal or
vertical orientation. This result is clearly not achieved with a single shot, and stitching is not suitable for action images, but for many other subjects the result will be indistinguishable from that achievable with a Phase One camera and back. Obviously, this effectively larger equivant sensor size will result in a correspondingly higher resolution of the resultant stitched image, with the highest-possible resolution being achieved with a GFX100 or GFX100S camera. |
For the result of widening the longer dimension of the GFX sensor format by 2×12mm, see the horizontal black rectangle (marked 68mm) on the Image Circles chart above.
For the result of increasing the height (in horizontal orientation of the camera) of the shorter dimension of the GFX sensor format by 2×12mm, see the vertical black rectangle (marked 57mm) on the Image Circles chart above.
But the greatest flexibility is achieved by combining a Pentacon Six shift lens with the Hartblei Pentacon Six to GFX shift adapter. If the shift of both components is in the same direction (subject to the results of tests to check the coverage of the lens!), massive amounts of shift can be obtained, up to a possible 24mm shift in two opposite directions, a total of 48mm of additional equivalent sensor dimension on the chosen axis. This can potentially produce some really wide panoramic images. Here is an example, courtesy of Hartblei, using the Arsat 55mm shift lens (see here):
 [55mm_-24mm_s.jpg] |
 [55mm_-12mm_s.jpg] |
 [55mm_Mitte_s.jpg] |
 [55mm+12mm_s.jpg] |
 [55mm+24mm_s.jpg] |
| For these images taken on a Fujifilm
GFX50S, the Arsat shift lens was mounted via the
Hartblei shift adapter (see here).
Both the lens and the Hartblei adapter offer 12mm
of shift in any direction. For the first
image on the left here, both the lens and the
adapter were shifted 12mm left, giving 24mm of
total shift. For the next image, there was
only 12mm of shift to the left, for the middle
image, zero shift on both the lens and the
adapter, and so on. Click on the images to see them larger. As always, the resolution that we can host on the internet is much lower than the original, but it does give an idea of the potential. |
||||
Stitching these images together, we achieve the following result:
 As with all images on this page, it has been necessary to reduce the resolution of the original image. [Arsat55_pano01_s.jpg] |
Rotating this
image 0.5º anti-clockwise and performing a
minimal crop results in the following image:
 [Arsat55_pano01_c_s.jpg] Click on
this image to see it larger. With most
browsers, clicking again on the enlarged
image will enlarge it further.
Our thanks to Hartblei for these images and for permission to reproduce them here. This is
incredibly impressive. The
reduced-size version of the image that I am
working with here has a width of 35.81 cm
and pixel dimensions of 18.3
Megapixels. The original will have
been much larger than this.
We also note that even the 24mm shift is completely free of adapter vignetting. This is due to the large inner diameter of the shift modules in both the lens and the adapter. |
“Dual-Axis Shift”
Christopher Leggett has described images for which the camera or the lens is shifted both up-and-down and from-left-to-right as “Dual-Axis Shift”, or “DAS”. He describes this in his videos on YouTube. See, for instance, the following video, which is one of several by him: https://www.youtube.com/watch?v=SiLxjWpG9c8&t=452s or this one: https://www.youtube.com/watch?v=t25L-vGgVAk&t=297s.
Indeed, with shift lenses perhaps the most useful is to have the built-in lens shift moving in one direction (for instance, to the left and to the right) and the adapter shift moving in the other direction, at 90º to it (for instance, up and down). This can produce results comparable to those obtained with the above Mamiya 67 75mm shift lens used on the Hartblei adapter, with the combination capable of producing the 3 × 3 component images layout illustrated above.
Stitching Software
Most image processing software now seems to offer stitching of images as an option. For instance, both Adobe Photoshop and Serif’s Affinity Photo offer this possibility, and so, apparently, do many other programs. It is reasonable to expect that some programs will do a better job of stitching than others, so testing is advised, perhaps with a free trial version of the program before purchasing it.
A note on the “Arca Swiss” mount
The mount developed by Arca Swiss is described here. It has over recent years become a popular mounting system, adopted by a wide range of manufacturers, including Novoflex, Benro and others.
Unfortunately, the implementation of this mount has not been totally standardised world-wide, so many manufacturers offer “Arca Swiss-compatible” mounts that may have been made without any access to the original Arca Swiss technical engineering specification. This has principally resulted in some variation of the thickness of mounts that will be securely held by so-called “Arca Swiss-compatible” mounts. For mounts from Novoflex and some other manufacturers, it appears that a slightly thinner plate is required than for others (including the original Arca Swiss!).
To maximise compatibility with equipment from a wide range of manufacturers, Hartblei took the decision to work to the Novoflex standard for its “Arca Swiss-compatible” mounts. They are held tightly in place with Novoflex equipment with which they have been tested.
However, they may not be held tightly with mounts from some other manufacturers, no matter how much the mount is tightened. This is clearly dangerous, as in the event that the mount is tilted to quite an angle, the Hartblei equipment might slide out! Hartblei suggest that with such mounts, the best solution is to add some teflon tape to the base of the Hartblei mount, to increase the total thickness of the mount by approximately 0,5 mm. The Hartblei “Arca Swiss-compatible” “Quick Release” feet can thus be safely used with the widest-possible range of equipment.