| Shutter speed |
1/8 sec |
1/15 |
1/30 |
1/60 |
1/125 |
1/250 |
1/500 |
1/1000 |
| Aperture |
f/32 |
f/22 |
f/16 |
f/11 |
f/8 |
f/5.6 |
f/4 |
f/2.8 |
On most analogue cameras produced over the past 50+
years, a range of shutter speeds has been used in which
each speed is half the time of the next speed on
one side of it and twice the time of the next
speed on the other side.
Thus, at 1/125 sec the shutter is open for half
the time (approximately) of 1/60 sec, but for twice
as long as 1/250 sec.
Likewise, during the past 50+ years, the aperture values
on lenses for analogue cameras have used a range of
settings, each of which lets through half the
light of the setting on one side and twice the
light of the setting on the other side.
Thus, f/8 lets through half the light of f/5.6 but
twice the light of f/11.
So, if you halve the time that the
shutter is open (say, by using 1/125 sec instead of 1/60
sec), you can compensate by doubling the amount
of light coming through the lens (for instance, by using
f/8 instead of f/11). In both cases, the film will
receive the same amount of light.
To know which combination to use, we need to answer a few
questions.
1. What lens are
you using?
A general rule states that the slowest shutter speed at
which you can safely hold the camera is the reciprocal of
the focal length of the lens. What does that mean?
If you are shooting with a 250mm lens, you should
consider 1/250 sec the slowest speed at which you
can safely hold the camera without risking blur in the
image due to movement of the camera during the
exposure. Not all focal lengths correspond to a
shutter speed, so if in doubt, choose the next higher
speed. Here are some examples:
| Focal length of Lens |
Recommended minimum
hand-held shutter speed |
| 30mm |
1/30 |
| 50mm |
1/60 |
| 80mm |
1/125 |
| 120mm |
1/125 |
| 180mm |
1/250 |
| 250mm |
1/250 |
| 500mm |
1/500 |
You may know from experience that you can safely hold the
camera absolutely still at a slower shutter speed, but if
in doubt go for a higher shutter speed, to avoid any risk
of blur, or use a tripod.
Other things that you can do in order to be able to use a
slower speed can be:
- stand with your feet apart (at a comfortable distance
from each other)
- tuck your elbows in as far as possible (dependent on
the lens that you are using – with a longer lens, your
left arm will obviously be further forward)
- brace your body (tighten your muscles)
- hold your breath
- squeeze the shutter gently.
|
2. Is the
subject moving?
If you want to freeze movement,
perhaps of a fast-moving subject, choose the
highest-possible shutter speed, possibly even
1/1000, even if the lens that you are using is not
that long. If we use the example
combinations given above, you would then need to
set the aperture at f/2.8 to get the correct
exposure.
Alternatively, perhaps you want to reveal
the movement. An example might be to show
the movement of water. For that you will
probably need the slowest-possible shutter speed –
in the example above, that would be 1/8 sec, for
which you would need an aperture of f/32. If
your lens doesn’t stop down that far, but has a
smallest aperture of f/22, like the 80mm Biometar
standard lens, you would need to use a shutter
speed of 1/15 sec. Needless to say, for
either of these exposures, the camera would need
to be on a tripod, and it would be preferable to
use a cable release, and possibly mirror
pre-release or MLU,
if it is available.
You can achieve slower speeds still (or larger
apertures) by using a neutral-density filter
– a colourless filter that will reduce the amount
of light entering the lens. These are
available in various densities. For
instance, a ×2 ND filter halves the light,
which means that you can double the
exposure time, for instance, instead
of using 1/15 sec you could use 1/8 sec. A
×4 ND filter obviously reduces the light reaching
your film to one quarter, enabling you to go, in
the above example, from 1/15 sec to 1/4 sec.
One of the great things about using a TTL
metering prism (as opposed to a hand-held meter)
is that the prism automatically compensates
for the filter, so you don’t have to
adjust the reading that you get from the meter,
just choose the combination of shutter speed and
aperture that you prefer.
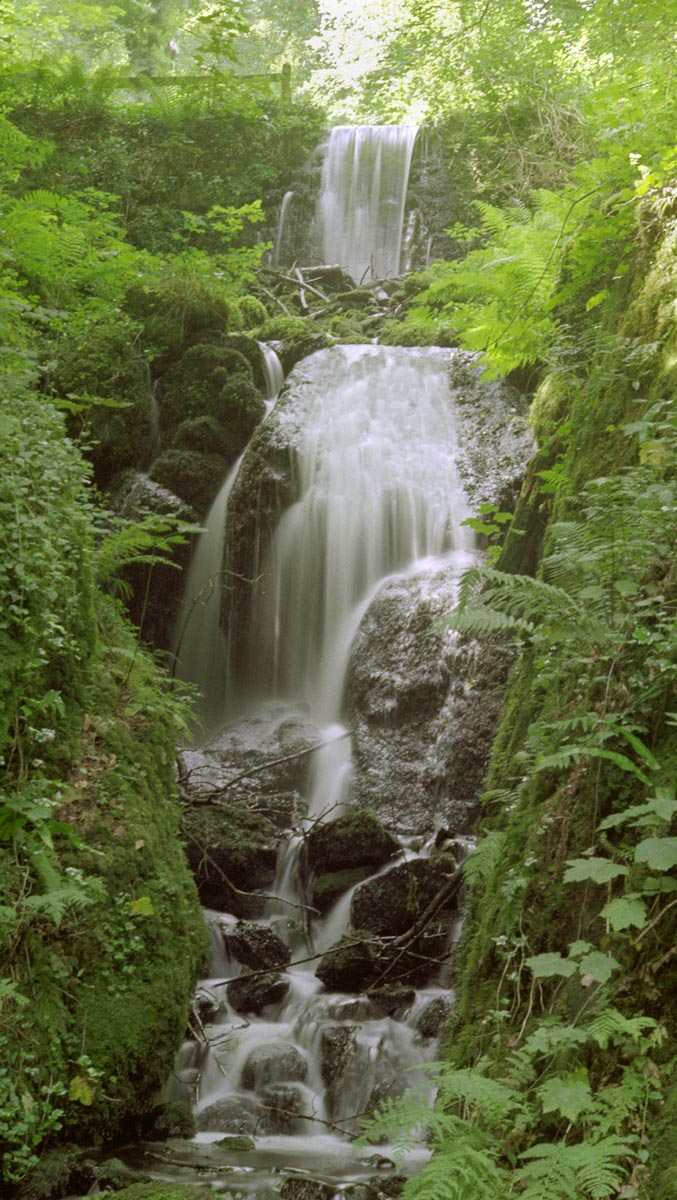
Image to the right:
This waterfall was quite dark, being shaded by
branches and foliage.
The exposure was 8 seconds at f/22 to reveal the
movement of the water.
You can see more information on this picture here.
(scroll down)
|
|
[c248_7v1.jpg]
|
3. What depth of
field do you want?
Do you want maximum depth of field?
This means, “Do you want everything from very near to the
camera to very far away to be in focus?”
This can be great for much landscape photography.
Or do you want minimum depth of
field? This means, “Do you want just one part of the
image to be sharp, with other parts of it that are nearer
to the camera or farther from it to be out of focus?”
This can be great for many portraits, but also for
other types of photography.
There is a detailed explanation of depth of field,
differential focus and hyperfocal focussing here.
To see how the 80mm Biometar reproduces the out-of-focus
parts of an image (so-called "bokeh"), see here.
You can learn more about the effects of different formats
and lenses on depth of field here.
You are in charge!
By thinking through these options, you will be able to
find the combination of exposure speed and lens aperture
that are right for the lens that you are using and the
type of picture that you wish to create.
In the above, I have mostly gone to the extremes
of aperture and shutter speed, to explain the point as
clearly as possible. However, depending on your
preferred type of photography, most of your exposures may
not be at the extremes; they may well use a medium speed
for the shutter (such as 1/125) and a medium aperture
(such as f/8 or f/11). Depending on the sensitivity
of the film and the ambient lighting, such settings are
likely to give you sharp images that are not blurred by
movement nor by out-of-focus areas.
One of the great benefits of the Pentacon Six is that it
gives you the choice. As you increase
your familiarity with the results of the different
settings, you will be able to express your own
creativity by selecting the combination
that is best for the photograph that you wish
to create.
|
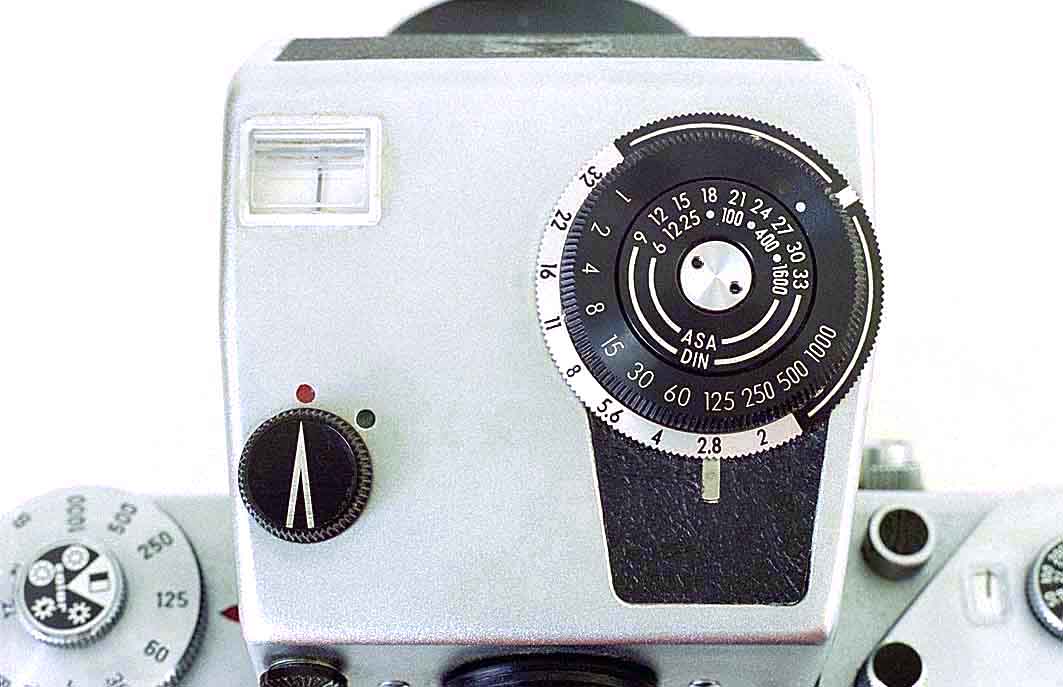
What if the shutter speed
and aperture numbers don't line up on the meter?
Above, I gave a list of equivalent exposure values with a
range of shutter speeds and aperture values. But
what if the shutter speed numbers and the aperture numbers
don't line up neatly in the way that they do in the photo
and the chart at the top of this page? Someone
who viewed one of my videos asked this recently:
Q:
Hi, your tutorials on the Pentacon six have been a great
help ... I'm new to vintage photography so when
reading my light meter which is analogue what reading do I
use if the reading falls in between numbers,
example: f/11 falls between 30 & 15 shutter speed,
can I use either 30 or 15?
A:
Congratulations on getting this camera. You must of
course use the actual shutter speeds on the camera and you
can't set speeds between two numbers, so in the
example you give you should use 1/30 sec. However, you
can use lens aperture settings between the numbers that
are printed on the lens, to compensate, so here I
would suggest that you use the "half-stop" setting between
f/11 and f/8. (This is usually called f/9.5)
In fact, 1/30 sec is rather a slow speed for a hand-held
camera, and you would be better using 1/60 and f/6.3 (half
way between f/8 and f/5.6) or even 1/125 and f/4.5 (half way
between f/5.6 and f/4). For hand-held photography with
the standard (80mm) lens, it is generally better not to use
a slower shutter speed than 1/125, to ensure that the image
is not blurred by camera or subject movement.
If you are shooting negative film, being "half a stop out"
(e.g., using f/11 instead of f/9.5) is probably well within
the exposure lattitude of the film and so will give you a
satisfactory exposure. If you are using "slide" or
reversal film, being "half a stop out" will show,
and so you should aim for the most exact exposure possible.
In fact, as you gain experience with your camera and your
light-meter (whether in a prism of with a hand-held meter),
you will learn what gives the best exposure. I would
advise two points:
- Keep notes of exposure (shutter speed and aperture,
plus the name of the lens used, if you have more than
one);
- Choose a film that you like and stick to it. You
will learn its characteristics and its lattitude to a
range of exposures.
This will enable you to compensate if on a given camera (of
any brand) the actual shutter speeds are slightly different
from those indicated on the speed dial.
|