The Pentacon Six System
by TRA

Macro

The manufacturers of the Pentacon Six went to great trouble to facilitate macro photography – the recording on film of very small objects at image scales up to greater than 2× life size on the film.  They produced bellows and two principal types of close-up tubes:

  • manual tubes
  • automatic tubes
The tubes are also sometimes called “rings”or even “Z-rings”, from the German “Zwischenring” (“intermediate ring”).   “Z-rings” was regularly used in Pentacon and Praktica publicity by C.Z. Scientific Instruments Ltd in the U.K.

 
Why shoot macro in this age of scanners?

Scanners are fine for:

  • two-dimensional objects, such as paper with printing on
  • still objects
  • items up to a maximum size of A4
But they are not very good for:
  • three-dimensional objects
  • living creatures (insects, small reptiles etc)
  • wet items (e.g. frogs!)
  • shooting plant or animal life in its natural environment or habitat.
This is why macro photography is still very much alive – and once you have a macro outfit, you may well find that you enjoy using it for two-dimensional objects, too, because you can control the exposure and framing much more easily than on a scanner.
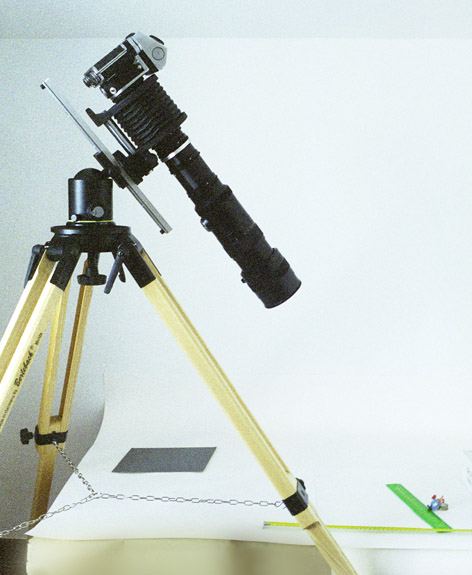
Set-up for macro photography

In macro photography, depth of field is usually very small, sometimes tiny.  Even finding the object in the viewfinder can at times be difficult.  It is therefore necessary to work with a good tripod or a copying stand, preferably with a focussing slide (scroll down).

Methodical working is essential, and the taking of detailed notes will pay dividends in subsequent sessions.  There is a lot of extremely helpful information on this website that can save you time – for instance, by telling you at what distance from your subject you will need to work with different lenses and bellows extensions or combinations of tubes.

New information and examples, April 2017
You can see examples of depth of field in macro photography in a new page here.

Factors affecting exposure times in macro photography

As well as the amount of light illuminating the subject, two other factors affect exposure times in macro photography:

  • It is generally necessary to stop down the lens as much as possible, in order to increase the depth of field.  (For an explanation of depth of field, see here.)  I recommend an aperture of at least f/14 for most occasions.  This does of course have the undesirable but unavoidable side-effect of reducing substantially the amount of light reaching the film.
  • There is also another reason why the intensity of the light reaching the film is greatly reduced in macro photography.  The further the lens is moved from the film, which is what happens when it is mounted on bellows or extension tubes, the larger the image that it projects towards the film.  The larger the projected image, the dimmer it is.  Of course, only the central area of the projected image reaches the film.  But the intensity of the light that composes that projected image can be quite low.  In consequence, the photographer will either need to work at very slow shutter speeds or to have a lot of light illuminating the subject being photographed.  Even so, exposures of 10 or 20 seconds are not unusual in macro photography for “still life” subjects.

Light sources

Naturally, all normal light sources can be used:

  • daylight
  • studio lighting
  • flash
Daylight is of course beyond your control, other than in choosing the angle from which you will work.  Make sure that your body/your equipment does not cast a shadow on your subject.

Studio lighting has the advantage of giving you more control of the direction of the lighting, to improve modelling and increase or decrease contrast, and you may be able to adjust the brightness, by one of three methods:

  • by moving the lights nearer to or further from the subject
  • by adjusting the brightness level electrically
  • by turning on/off some of the lighting.


Flash photography with macro

Using flash for macro photography can allow very small apertures (where the slow sync speed of the Pentacon Six will not be a problem).
This will:

  • increase depth of field
  • freeze most movement
Position of the flash is important.  In most “traditional” positions (above or beside the camera) it can cast a shadow of your lens/bellows/tubes onto your subject.  It is worth considering the twin flash outfits that mount on a ring screwed into the front of some lenses, or ring flash.

For macro flash photography, you are better off using a lens with a fully-automatic diaphragm pin (most Pentacon Six lenses), instead of a macro lens, where it is necessary to stop down the lens manually before firing the shutter.  With wildlife, the appearance of your hand in front of your camera (to adjust the aperture) may startle your subject and lose you the shot.

Limitations on suitable lenses

While any lens with a Pentacon Six mount will fit onto the bellows or tubes, not every lens is suitable for macro work or for use with long tubes or a large bellows extension.
With the longer lenses, the image-forming “cone” of light projected by the lens is wider at the point where it enters the camera throat than with the shorter lenses.  This can result in the aperture pin lever in the camera throat casting a shadow in the image area.  There can also be some vignetting (darkening of the corners of the image).

[C469_2A.jpg]
Here is an unusual set-up: the Pentacon Six bellows have been added to the camera, then all five of the East German tubes: the 60mm, 30mm, 22.5mm and 15mm tubes, plus the special 10mm tube.  Onto these has been mounted the 300mm Soviet Tair lens.  The total extension (not including the focussing extension of the lens, which was set at the maximum for this photograph) is approximately 238.5mm (allowing for the 101mm maximum extension of the Pentacon bellows).  It allows a substantial distance between the front of the lens and the object being photographed and enables very small objects to be recorded on film.  This little plastic figure of Obélix is 5.1 cm (about 2") high to the top of his raised left hand, BUT ...

[C464-19.jpg]
(Fuji NPS160, Berlebach tripod, Arca-Swiss B1-G head, cable release, 16 sec f/22)
Image resolution is excellent – but some vignetting and the shadow of the aperture pin lever is the result.
To be fair to the camera and the lens, I have (as often on this website) scanned beyond the frame area, in order to show as much of the lever shadow as possible.  In prints (or mounted slides), the black at the top of the image would not be visible, the black at the bottom of the image would only just be visible at the very bottom of the image, and the vignetting and the lever shadow would be a lot less.
Further, the shadow of the lever can be greatly reduced, and probably eliminated, by folding back the aperture pin lever, which is not needed if one is using a manual lens, such as this one.

[C464-17/18.jpg]
Tubes with an extension of 112.5mm, Tair-33 lens, cable release, 4 sec f/11

This perhaps a case of exaggerating to prove a point.  Even without folding back the aperture pin lever, if the Tair is used with just some of the German tubes – in the example on the left here, the 60mm, 30mm and 22.5mm tubes – the macro possibilities are substantial, vignetting is a lot less, and the shadow of the aperture pin lever is only just visible at the edge of the frame.  With a minor vertical crop, all these effects would disappear.  Of course, it is preferable to have the whole of the frame usable, and this is where knowing one’s equipment is important.  In reality, using the otherwise excellent Tair lens for macro work goes against the design specifications of the lens and the camera.

There can also be some problems of vignetting with some other combinations of lenses and tubes or bellows.  You will find more details on this here and here.

Recommended lenses

The 80mm Biometar is recommended for most macro work, possibly mounted in reverse.  For greater camera-to-subject distance, the 120mm Biometar is also excellent.

Of course, as lenses are moved further from the camera, for instance, on bellows or extension tubes, they project a larger image circle.  The consequence of this is that even lenses designed for coverage of 35mm format (24mm × 36mm) are likely to give complete coverage of the larger “6×6” or 2¼" square format when used on bellows or extension tubes.  (“6×6” has been defined by Hasselblad as in fact 54mm × 54mm.  See details here.)  Enlarger lenses can be particularly good in this regard, and in fact the Macro Componons appear to be precisely that.

The Novoflex bellows offer interchangeable mounts, so with a Pentacon Six mount on the back and the mount of your choice on the front, it is easy to use other lenses for macro work on the Pentacon Six.

Alternatively, companies such as SRB-Griturn of Dunstable, England, can supply or even make suitable mounts.

The 80mm Arsat lens has also been recommened, especially mounted reversed on the bellows or tubes.  Arsenal made a 62mm-Pentacon Six reversing ring for this purpose.  It can be seen here


Other Macro options

There exist at least two other options for macro photography:

  • close-up filters
  • combinations of lenses.
Close-up filters are available (from other manufacturers) in a range of strengths and can be used individually or even in combination.  Professionals do not generally like them, stating that image quality deteriorates substantially with some of these filters.  However, they do have various advantages:
  • they are generally cheap
  • you can get into macro without bellows or extension tubes
  • fully automatic aperture operation is retained
  • they enable you to get closer without long bellows or tube extensions, which can lead to vignetting.
Alternatively, with a suitable adapter, it is possible to combine lenses to get massive enlargement.  For instance, if you mount a 150mm lens (the Arsenal Kaleinar or the Schneider Tele-Xenar, for instance) on the camera, and then mount the standard 80mm lens on the front of it, back to front, via an adapter ring, you will get a great degree of magnification.  The 250mm f/5.6 Telear/Arsat lens is another good alternative for mounting onto the camera body.  Keep the 80mm lens at full aperture, and control the focussing and the aperture of the lens that is mounted directly onto the camera.

Reversing rings are available with two filter threads on them, for mounting two lenses front-to-front (either with the same or different filter threads).  The 250mm f/5.6 Telear/Arsat lens has the same filter size as the 80mm Volna/Arsat: 62mm.  If you use a 150mm lens or the 180mm Sonnar on the camera, you will need a larger filter thread for the longer lens.  Again, SRB would be a good source for such a reversing ring.


[cu_filters.jpg]
This set of close-up filters comes in powers of +1, +2 and +4 diopters, which used individually or in combination give all values from +1 to +7. This set also includes a much more powerful close-up filter, labelled “MACRO” (here mounted on the lens).
You can see the effect of using these diopter filters here.
(scroll down)

 
Other accessories for macro and micro photography

For close-up photography, Pentacon recommended two special focussing screens (called “field lenses” in their literature):

  • the groundglass field lens with clear field and bisecting lines (Order No 207 330) “suited for close-ups and photomicrographs.  The bright aerial picture and a hairline cross assist in focusing.”
  • the clear glass field lens with bisecting lines and 5mm division (Order No 207 350) for “photomicrographs of high enlargement as well as in combination with medical apparatuses, such as endoscopes etc. where a picture of poor light intensity will be available.”
The magnifying head and the focussing magnifier (the “magnifying attachment”, also called the “Focussing Telescope”) are also particularly helpful for macro and micro photography (click on the underlined words to go to the section that describes the accessory).

Macro photography is one area where a mirror pre-release can be helpful.  To find out more information on this, click here.

To read about the Schneider macro lenses for the Exakta 66 (and the Pentacon Six!), click here.

It can be very helpful to avoid stray light getting into the viewfinder when shooting in macro, as this can make it difficult to view the object clearly.  This can be resolved by using the viewfinder eye cup.


Screen 207 330

Screen 207 350

Links to other macro sections on this website
 
1.  Tubes

2.  Image sizes, extensions available and exposure factors with Pentacon tubes and bellows

3.  Viewing aids

4.  Introduction to Pentacon bellows

5.  Introduction to Exakta bellows

6.  Introduction to Novoflex bellows

7.  Introduction to “technical bellows” on the Pentacon Six

8.  Introduction to Kilfitt lenses; Makro-Kilar lens


9.  Macro lenses from Schneider

10. Using Schneider macro lenses with the Exakta 66 bellows

11. Using Schneider macro lenses with the Pentacon Six bellows

12. Using tubes and bellows with the Kiev 88

13. Mirror pre-release

14. Examples of the effects of using various macro accessories

15. Depth of field in macro with the 80mm Biometar

My video on how to use the Pentacon Six bellows can be seen here:
https://www.youtube.com/watch?v=yMZkj-naS2o

To go on to the next section, click below.

The Pentacon Six bellows

Home

© TRA January 2006
Latest revision: October 2019